


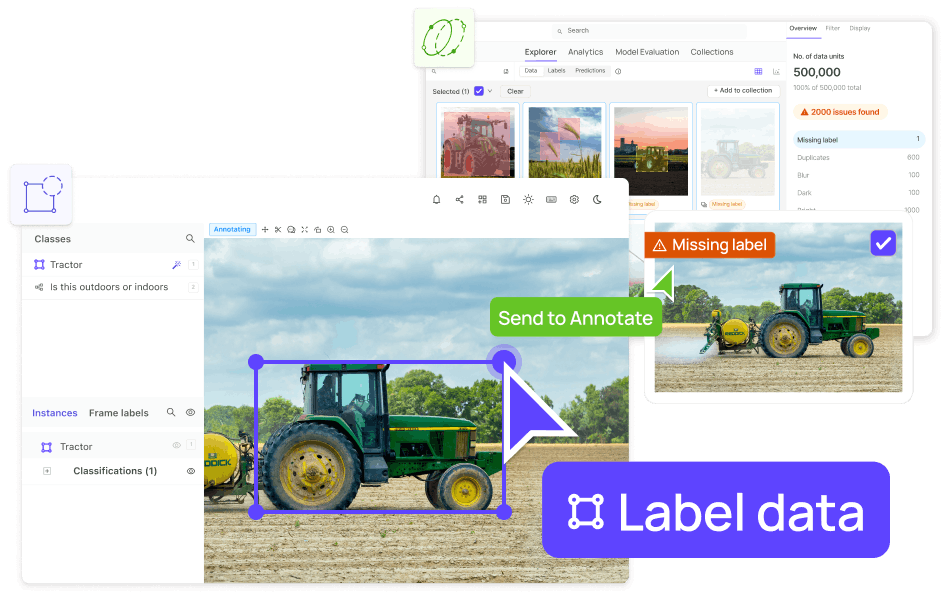
Software To Help You Turn Your Data Into AI
Forget fragmented workflows, annotation tools, and Notebooks for building AI applications. Encord Data Engine accelerates every step of taking your model into production.
Contents

Perhaps the most common modeling point-of-failure faced by machine learning practitioners is the problem of overfitting. This happens when our models memorize our model training examples but fail to generalize predictions to unseen images. Overfitting is especially pertinent in computer vision where we deal with high-dimensional image inputs and large, over-parameterized deep networks. There are many modern modeling techniques to deal with this problem including dropout-based methods, label smoothing, or architectures that reduce the number of parameters needed while still maintaining the power to fit complex data. But one of the most effective places to combat overfitting is the data itself.
Deep learning models can be incredibly data-hungry, and one of the most effective ways to improve your model’s performance is to give it more data - the fuel of deep learning. This can be done in two ways:
However, data collection can often be very expensive and time-consuming. For example, in healthcare applications, collecting more data usually requires access to patients with specific conditions, considerable time and effort from skilled medical professionals to collect and annotate the data, and often the use of expensive imaging and diagnostic equipment. In many situations, the “just get more data” solution will be very impractical. Furthermore, public datasets aren’t usually used for custom CV problems, aside from transfer learning. Wouldn’t it be great if there were some way to increase the size of our dataset without returning to the data collection phase? This is data augmentation.
Scale your annotation workflows and power your model performance with data-driven insights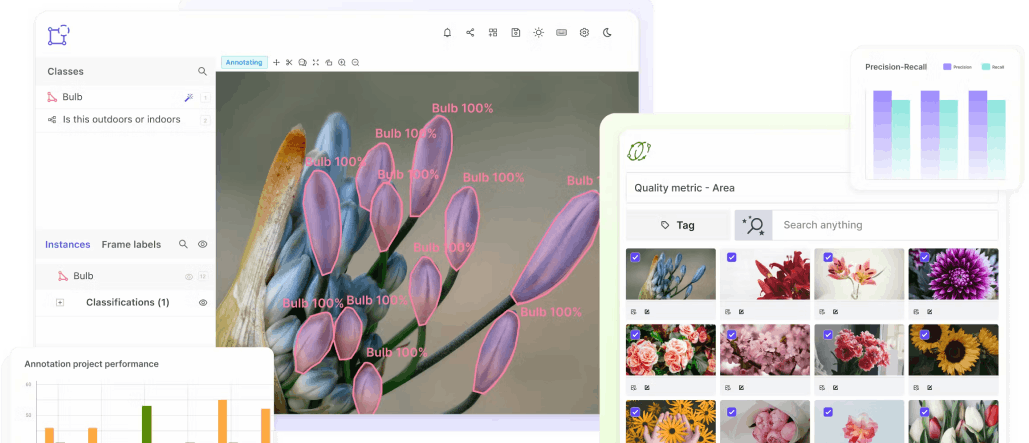
Data augmentation is generating new training examples from existing ones through various transformations. It is a very effective regularization tool and is used by experts in virtually all CV problems and models. Data augmentation can increase the size of just about any image training set by 10x, 100x or even infinitely, in a very easy and efficient way. Mathematically speaking:
More data = better model. Data augmentation = more data. Therefore, data augmentation = better machine learning models.
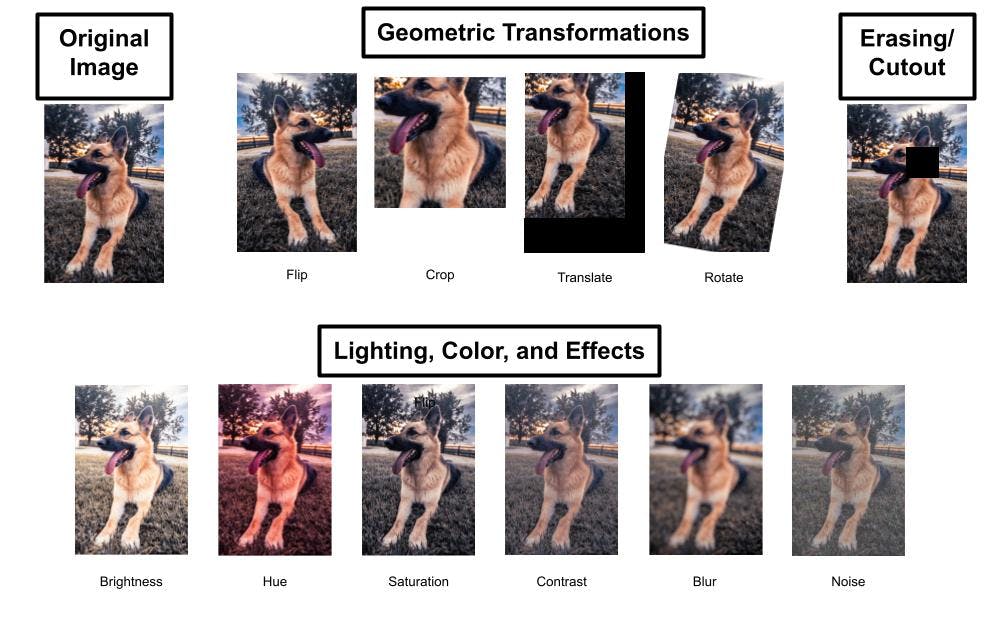
Common image transformations for data augmentation.
The list of methods demonstrated by the figure above is by no means exhaustive. There are countless other ways to manipulate images and create augmented data. You are only limited by your own creativity!
Don’t feel limited to only using each technique in isolation either. You can (and should) chain them together like so:
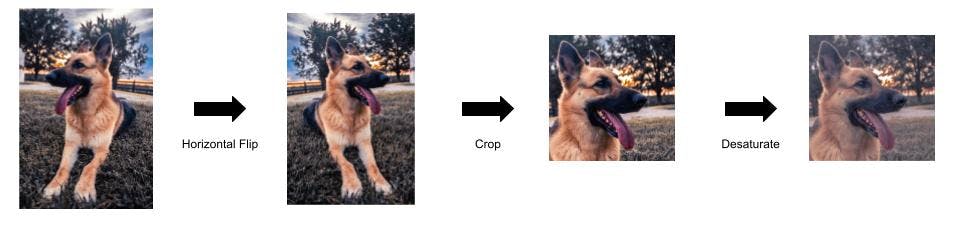
Multiple transformations
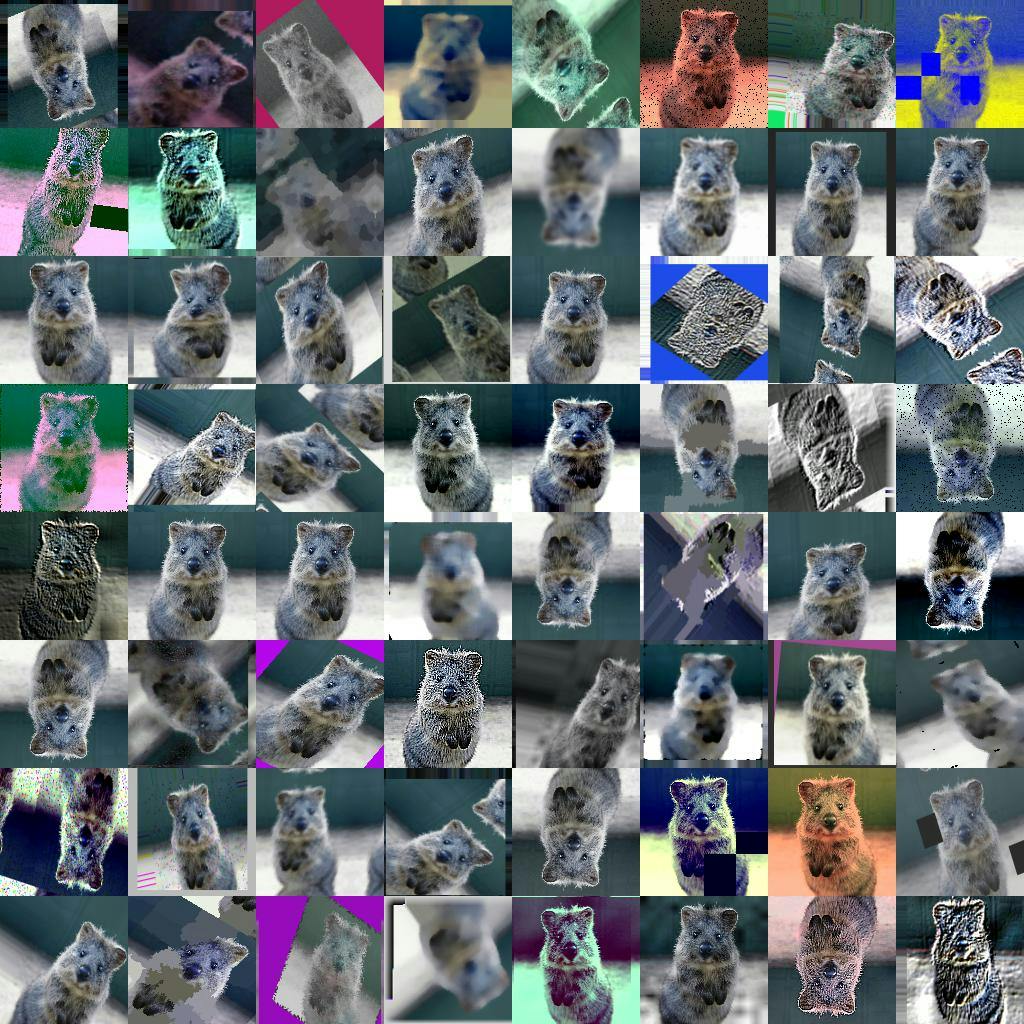
More examples of augmentation combinations from a single source image. (source)
That being said, transformed images don’t need to be perfect to be useful. The quantity of data will often beat the quality of data. The more examples you have, the less detrimental effect one outlier/mistake image will have on your model, and the more diverse your dataset will be.
While it will almost always have a positive effect on your model’s performance, data augmentation isn’t a cure-all silver bullet for problems related to dataset size. You can’t expect to take a tiny dataset of 50 images, blow it up to 50,000 with the above techniques and get all the benefits of a dataset of size 50,000. Data augmentation can help make models more robust to things like rotations, translations, lighting, and camera artifacts, but not for other changes such as different backgrounds, perspectives, variations in the appearance of objects, relative positioning in scenes, etc.
You might be wondering “When should I use data augmentation? When is it beneficial?” The answer is: always! Data augmentation is usually going to help regularize and improve your model, and there are unlikely to be any downsides if you apply it in a reasonable way. The only instance where you might skip it is if your dataset is so incredibly large and diverse that augmentation does not add any meaningful diversity to it. But most of us will not have the luxury of working with such fairytale datasets 🙂.
Augmentation can also be used to deal with class imbalance problems. Instead of using sampling or weighting-based approaches, you can simply augment the smaller classes more to make all classes the same size.
There is no one exact answer, but you should start by thinking about your problem. Does the transformation only generate images that are completely outside the support that you’d ever expect in the real world? Even if an inverted image of a tree in a park isn’t something you’d see in real life, you might see a fallen tree in a similar orientation. However, some transformations might need to be re-considered such as:
Your transformations don’t have to be exclusively realistic, but you should definitely be using any transformations that are likely to occur in practice.
In addition to knowledge of your task and domain, knowledge of your dataset is also important to consider. Better knowledge of the distribution of images in your dataset will allow you to better choose which augmentations will give you sensible results or possibly even which augmentations can help you fill in gaps in your dataset. A great tool to help you explore your dataset, visualize distributions of image attributes, and examine the quality of your image data is Encord Active.
However, we are engineers and data scientists. We don’t just make decisions based on conjectures, we try things out and run experiments. We have the tried-and-true technique of model validation and hyperparameter tuning. We can simply experiment with different techniques and choose the combination that maximizes performance on our validation set.
If you need a good starting point: horizontal reflection (horizontal flip), cropping, blur, noise, and an image erasing method (like a cutout or random erasing) are a good base, to begin with. Then you can experiment with combining them together and adding brightness and coloring changes.
Augmentation techniques for video data are very similar to image data, with a few differences. Generally, the chosen transformation will be applied identically to each frame in the video (with the exception of noise). Trimming videos to create shorter segments is also a popular technique (temporal cropping).
The exact specifics of your implementation will depend on your hardware, chosen deep learning library, chosen transformations, etc. But there are generally two strategies to implement data augmentation: offline and online.
Offline augmentation: Performing data augmentation offline means you will compute a new dataset that includes all of your original and transformed images, and save it to disk. Then you’ll train your model, as usual, using the augmented dataset instead of the original one. This can drastically increase the disk storage required, so we don’t recommend it unless you have a specific reason to do so (such as verifying the quality of the augmented images or controlling for the exact images that are shown during training).
Online augmentation: This is the most common method of implementing data augmentation. In online augmentation, you will transform the images at each epoch or batch when loading them. In this scenario, the model sees a different transformation of the image at each epoch, and the transformations are never saved to disk. Typically, transformations are randomly applied to an image each epoch. For example, you will randomly decide whether or not to flip an image at each epoch, perform a random crop, sample a blur/sharpening amount, etc.
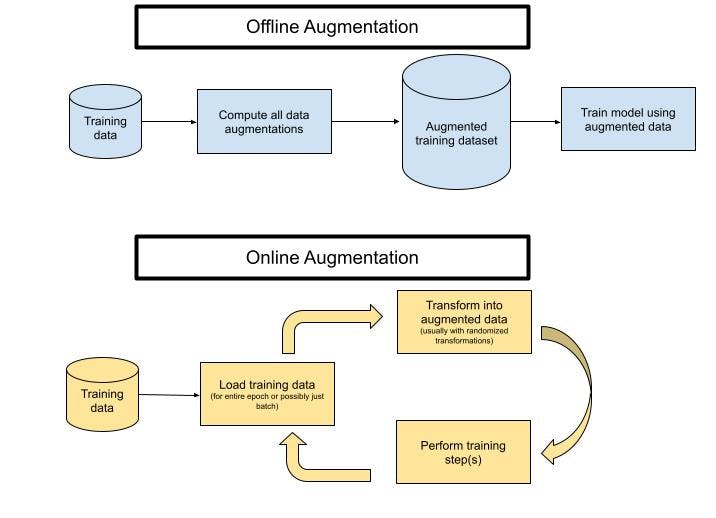
Online and offline data augmentation processes.
TensorFlow and PyTorch both contain a variety of modules and functions to help you with augmentation. For even more options, check out the imgaug Python library.
You may still be wondering, “How do people who train state-of-the-art models use image augmentation?” Let’s take a look:
| Paper | Data Augmentation Techniques |
|---|---|
Translate, Scale, Squeeze, Shear | |
Translate, Flip, Intensity Changing | |
Crop, Flip | |
Flip, Crop, Translate | |
Crop, Elastic distortion | |
Cutout, Crop, Flip | |
AutoAugment, Mixup, Crop | |
AutoAugment, RandAugment, Random erasing, Mixup, CutMix | |
RandAugment, Mixup, CutMix, Random erasing | |
Translate, Rotate, Gray value variation, Elastic deformation | |
Flip | |
Scale, Translate, Color space | |
Crop, Resize, Flip, Color Space, Distortion | |
Mosaic, Distortion, Scale, Color space, Crop, Flip, Rotate, Random erase, Cutout, Hide and Seek, GridMask, Mixup, CutMix, StyleGAN |
Erasing/Cutout: Wait, what is all this cut-mix-rand-aug stuff? Some of these like Cutout, Random Erasing, and GridMask are image-erasing methods. When performing erasing, you can cut out a square, rectangles of different shapes, or even multiple separate cuts/masks within the image. There are also various ways to randomize this process. Erasing is a popular strategy, and for example, in the context of image classification, can force the model to learn to identify objects from each individual part rather than just the most distinct one by erasing the most distinct part (for example learning to recognize dogs by paws and tails, not just faces). Erasing can be thought of as a sort of “dropout in the input space”.
Mixing: Another popular technique in data augmentation is mixing. Mixing involves combining separate examples (usually of different classes) to create a new training image. Mixing is less intuitive than the other methods we have seen because the resulting images do not look realistic. Let’s look at a couple of popular techniques for doing this:
Mixup: Mixup combines two images by linear interpolation (weighted average) of the two images. The same interpolation is then applied to the class label.
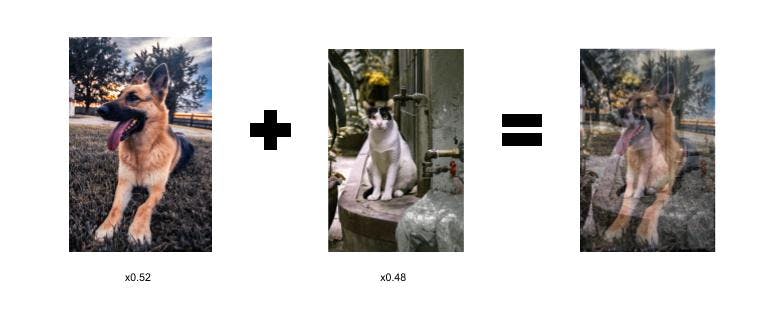
An example of a mixup image. The corresponding image label in a binary image classification problem with labels (dog, cat) would then be (0.52, 0.48).
What? This looks like hazy nonsense! And what are those label values? Why does this work?
Essentially, the goal here is to encourage our model to learn smoother, linear transitions between different classes, rather than oscillate or behave erratically. This helps stabilize model behavior on unseen examples at inference time.
CutMix: CutMix is a combination of the Cutout and Mixup approaches. As mentioned before, Mixup images look very unnatural and can be confusing to the model when performing localization. Rather than interpolate between two images, CutMix simply takes a crop of one image and pastes it onto a second image. This also has the benefit over cutout, that the cut-out region is not just thrown away and replaced with garbage, but instead with actual information. The label weighting is similar - for a classification problem, the labels correspond to the percentage of pixels from the corresponding class image that is present in the augmented image. For localization, we keep the same bounding boxes or segmentation from the original images in their respective parts of the composite image.
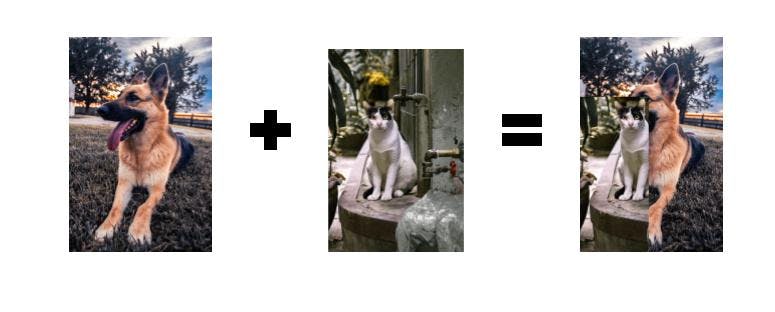
An example of a CutMix image.
AugMix: Augmix is a little different from the above examples, but is also worth mentioning here. AugMix doesn’t mix different training images together - instead, it mixes different transformations of the same image. This retains some of the benefits of mixing by exploring the input space between images and reduces degradation effects from applying many transformations to the same image. The mixes are computed as follows:
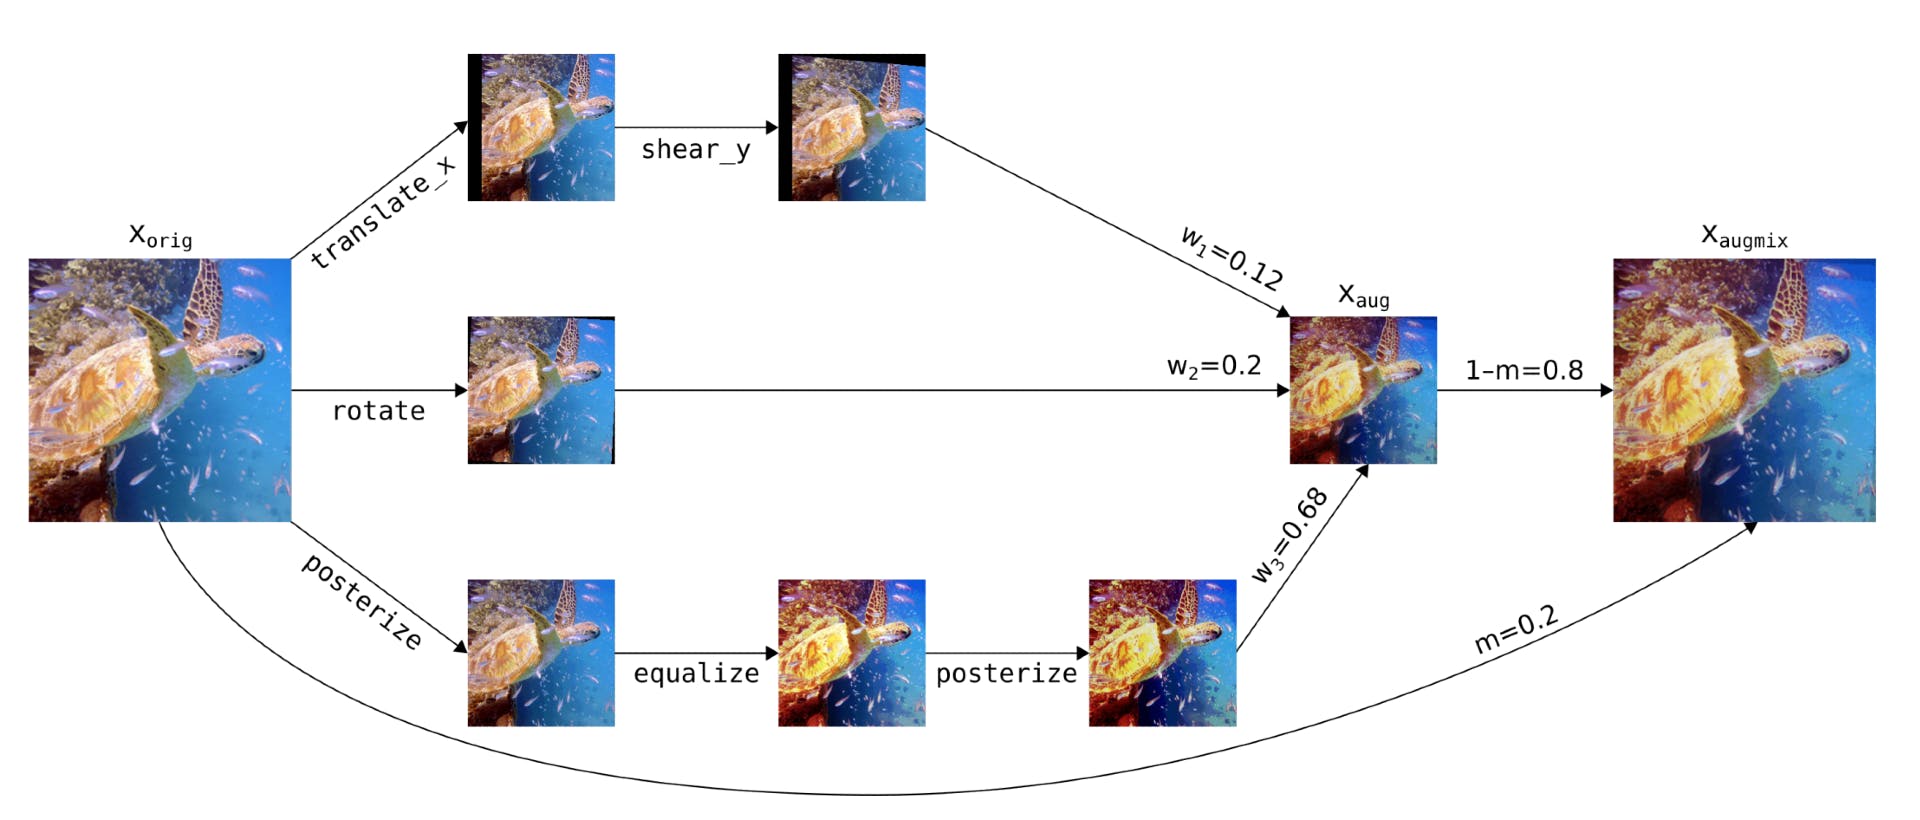
AugMix augmentation process. The entire method involves other parts as well such as a specific loss function. (source)
Image augmentation is still an active research area, and there are a few more advanced methods to be aware of. The following techniques are more complex (particularly the last two) and will not always be the most practical or efficient-to-implement strategies. We list these for the sake of completeness.
Now you know what data augmentation is and how it helps address overfitting by filling out your dataset. You know that you should be using data augmentation for all of your computer vision tasks. You have a good overview of the most essential data augmentation transformations and techniques, you know what to be mindful of, and you’re ready to add data augmentation to your own preprocessing and training pipelines. Good luck!
Ready to automate and improve the quality of your data annotations?
Sign-up for an Encord Free Trial: The Active Learning Platform for Computer Vision, used by the world’s leading computer vision teams.
AI-assisted labeling, model training & diagnostics, find & fix dataset errors and biases, all in one collaborative active learning platform, to get to production AI faster. Try Encord for Free Today.
Want to stay updated?
Follow us on Twitter and LinkedIn for more content on computer vision, training data, and active learning.

Join the Encord Developers community to discuss the latest in computer vision, machine learning, and data-centric AI
Join the communityRelated Blogs
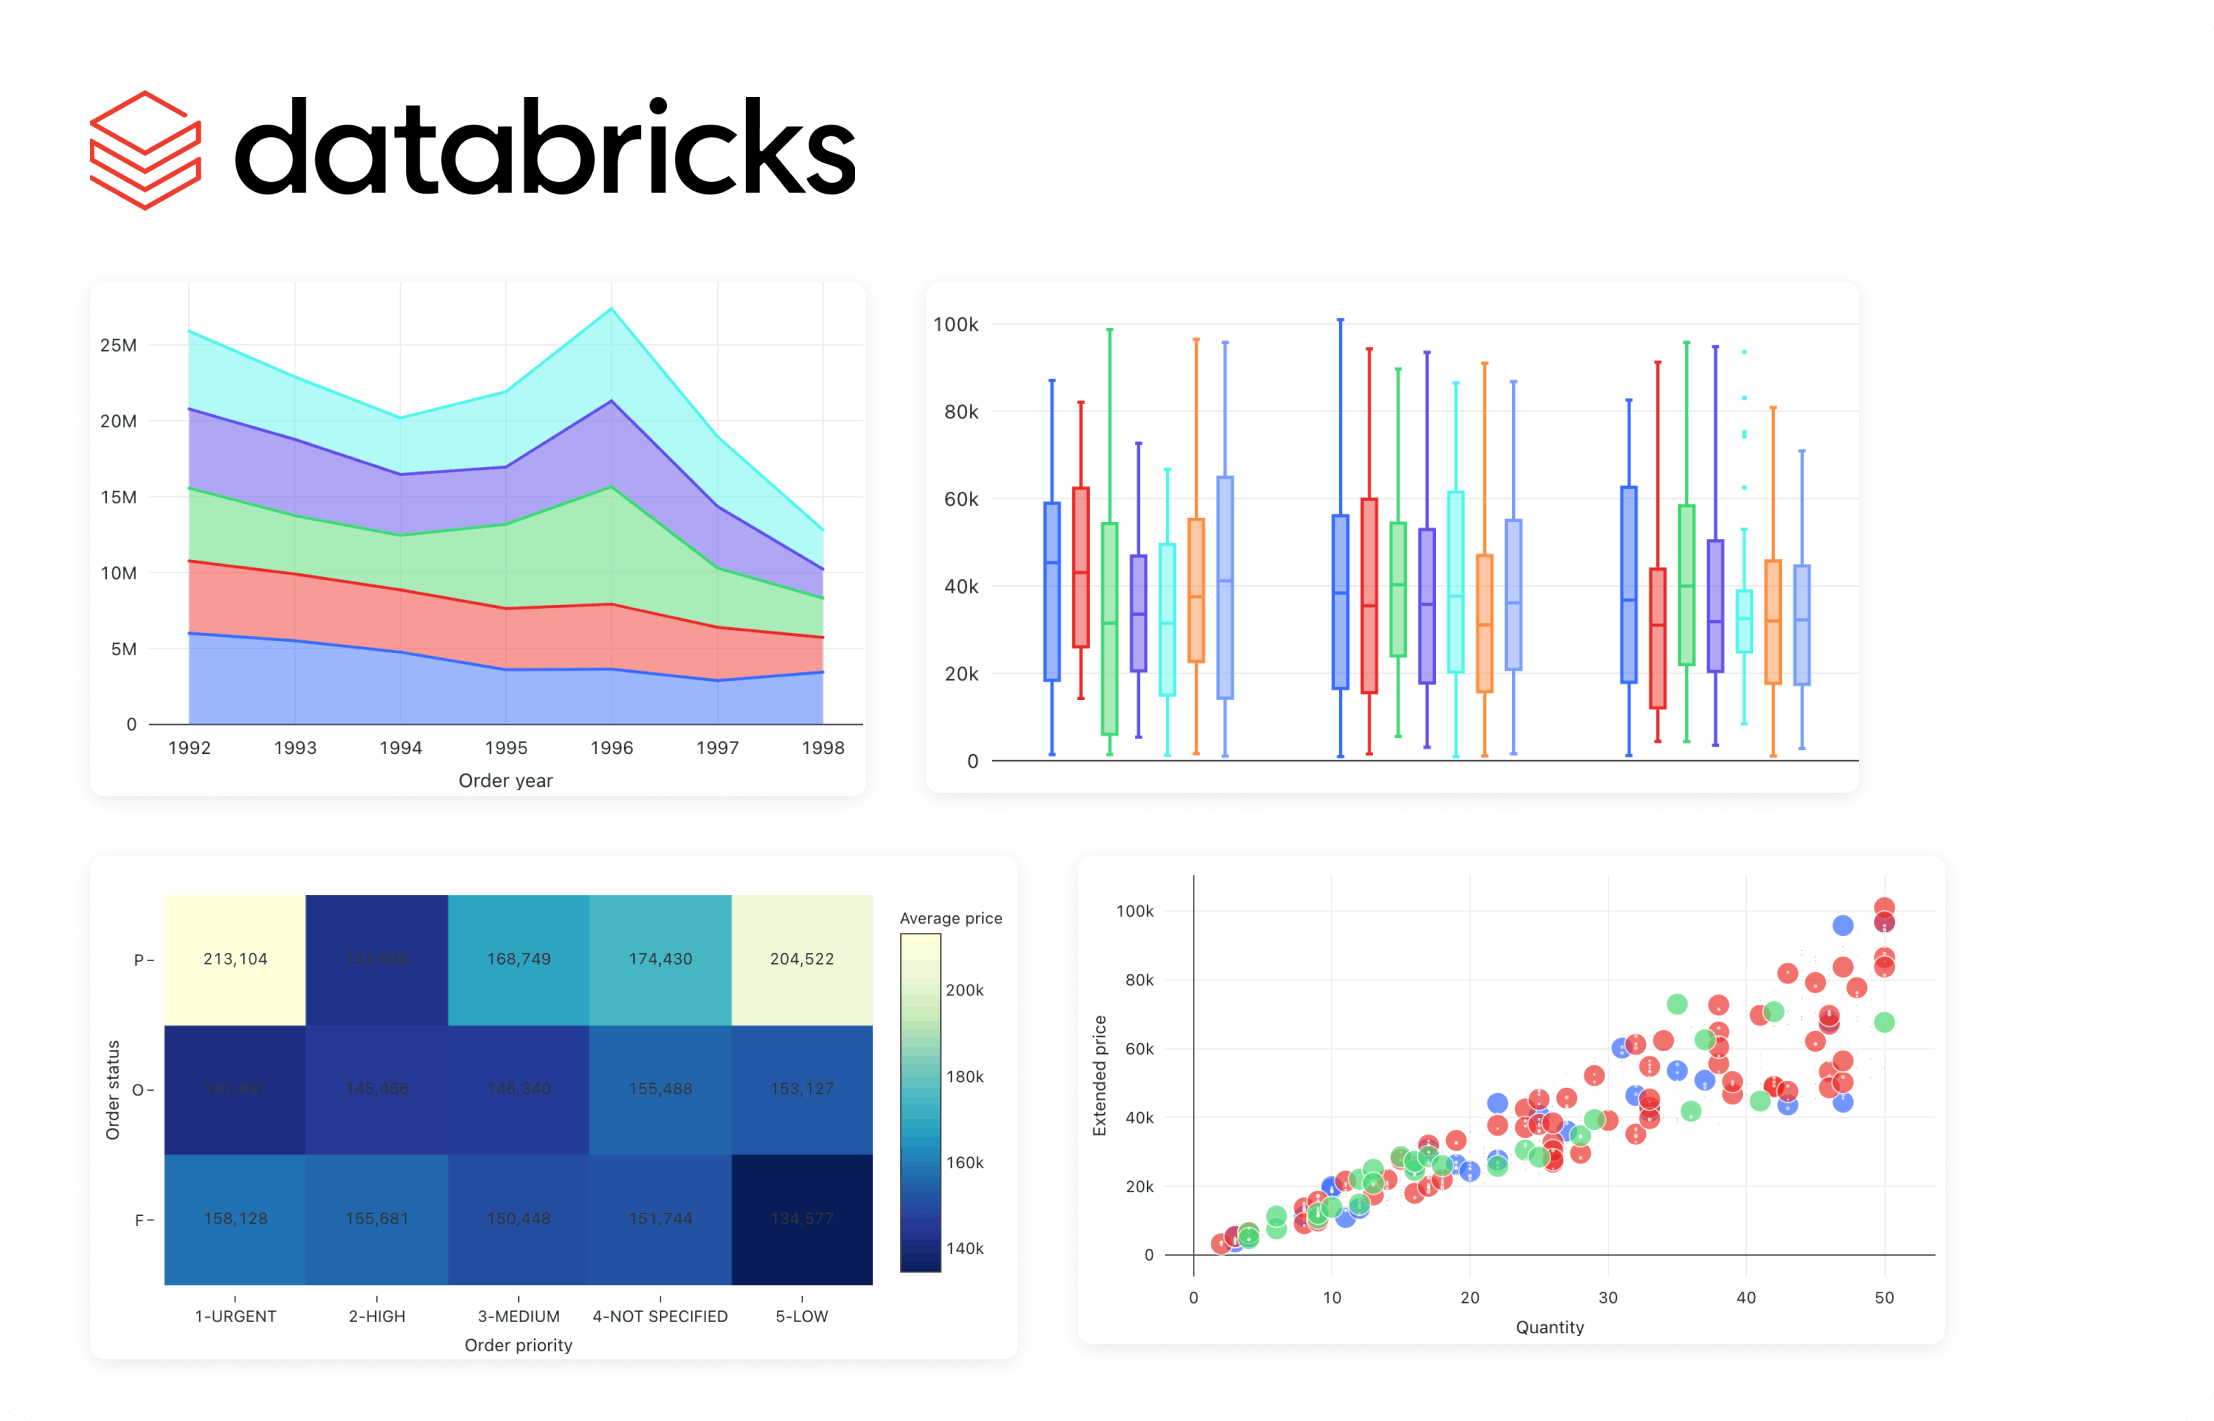
With data becoming a pillar stone of a company’s growth strategy, the market for visualization tools is growing rapidly, with a projected compound annual growth rate (CAGR) of 10.07% between 2023 and 2028. The primary driver of these trends is the need for data-driven decision-making, which involves understanding complex data patterns and extracting actionable insights to improve operational efficiency. PowerBI and Tableau are traditional tools with interactive workspaces for creating intuitive dashboards and exploring large datasets. However, other platforms are emerging to address the ever-changing nature of the modern data ecosystem. In this article, we will discuss the visualizations offered by Databricks - a modern enterprise-scale platform for building data, analytics, and artificial intelligence (AI) solutions. Databricks Databricks is an end-to-end data management and model development solution built on Apache Spark. It lets you create and deploy the latest generative AI (Gen AI) and large language models (LLMs). The platform uses a proprietary Mosaic AI framework to streamline the model development process. It provides tools to fine-tune LLMs seamlessly through enterprise data and offers a unified service for experimentation through foundation models. In addition, it features Databricks SQL, a state-of-the-art lakehouse for cost-effective data storage and retrieval. It lets you centrally store all your data assets in an open format, Delta Lake, for effective governance and discoverability. Further, Databricks SQL has built-in support for data visualization, which lets you extract insights from datasets directly from query results in the SQL editor. Users also benefit from the visualization tools featured in Databricks Notebooks, which help you build interactive charts by using the Plotly library in Python. Through these visualizations, Databricks offers robust data analysis for monitoring data assets critical to your AI models. So, let’s discuss in more detail the types of chart visualizations, graphs, diagrams, and maps available on Databricks to help you choose the most suitable visualization type for your use case. Effective visualization can help with effortless data curation. Learn more about how you can use data curation for computer vision Visualizations in Databricks As mentioned earlier, Databricks provides visualizations through Databricks SQL and Databricks Notebooks. The platform lets you run multiple SQL queries to perform relevant aggregations and apply filters to visualize datasets according to your needs. Databricks also allows you to configure settings related to the X and Y axes, legends, missing values, colors, and labels. Users can also download visualizations in PNG format for documentation purposes. The following sections provide an overview of the various visualization types available in these two frameworks, helping you select the most suitable option for your project. Bar Chart Bar charts are helpful when you want to compare the frequency of occurrence of different categories in your dataset. For instance, you can draw a bar chart to compare the frequency of various age groups, genders, ethnicities, etc. Additionally, bar charts can be used to view the sum of the prices of all orders placed in a particular month and group them by priority. Bar chart The result will show the months on the X-axis and the sum of all the orders categorized by priority on the Y-axis. Line Line charts connect different data points through straight lines. They are helpful when users want to analyze trends over some time. The charts usually show time on the X-axis and some metrics whose trajectory you want to explore on the Y-axis. Line chart For instance, you can view changes in the average price of orders over the years grouped by priority. The trends can help you predict the most likely future values, which can help you with financial projections and budget planning. Pie Chart Pie charts display the proportion of different categories in a dataset. They divide a circle into multiple segments, each showing the proportion of a particular category, with the segment size proportional to the category’s percentage of the total. Pie chart For instance, you can visualize the proportion of orders for each priority. The visualization is helpful when you want a quick overview of data distribution across different segments. It can help you analyze demographic patterns, market share of other products, budget allocation, etc. Scatter Plot A scatter plot displays each data point as a dot representing a relationship between two variables. Users can also control the color of each dot to reflect the relationship across different groups. Scatter Plot For instance, you can plot the relationship between quantity and price for different color-coded item categories. The visualization helps in understanding the correlation between two variables. However, users must interpret the relationship cautiously, as correlation does not always imply causation. Deeper statistical analysis is necessary to uncover causal factors. Area Charts Area charts combine line and bar charts by displaying lines and filling the area underneath with colors representing particular categories. They show how the contribution of a specific category changes relative to others over time. Area Charts For instance, you can visualize which type of order priority contributed the most to revenue by plotting the total price of different order priorities across time. The visualization helps you analyze the composition of a specific metric and how that composition varies over time. It is particularly beneficial in analyzing sales growth patterns for different products, as you can see which product contributed the most to growth across time. Box Chart Box charts concisely represent data distributions of numerical values for different categories. They show the distribution’s median, skewness, interquartile, and value ranges. Box Chart For instance, the box can display the median price value through a line inside the box and the interquartile range through the top and bottom box enclosures. The extended lines represent minimum and maximum price values to compute the price range. The chart helps determine the differences in distribution across multiple categories and lets you detect outliers. You can also see the variability in values across different categories and examine which category was the most stable. Bubble Chart Bubble charts enhance scatter plots by allowing you to visualize the relationship of three variables in a two-dimensional grid. The bubble position represents how the variable on the X-axis relates to the variable on the Y-axis. The bubble size represents the magnitude of a third variable, showing how it changes as the values of the first two variables change. Bubble chart The visualization is helpful for multi-dimensional datasets and provides greater insight when analyzing demographic data. However, like scatter plots, users must not mistake correlation for causation. Combo Chart Combo charts combine line and bar charts to represent key trends in continuous and categorical variables. The categorical variable is on the X-axis, while the continuous variable is on the Y-axis. Combo Chart For instance, you can analyze how the average price varies with the average quantity according to shipping date. The visualization helps summarize complex information involving relationships between three variables on a two-dimensional graph. However, unambiguous interpretation requires careful configuration of labels, colors, and legends. Heatmap Chart Heatmap charts represent data in a matrix format, with each cell having a different color according to the numerical value of a specific variable. The colors change according to the value intensity, with lower values typically having darker and higher values having lighter colors. Heatmap chart For instance, you can visualize how the average price varies according to order priority and order status. Heatmaps are particularly useful in analyzing correlation intensity between two variables. They also help detect outliers by representing unusual values through separate colors. However, interpreting the chart requires proper scaling to ensure colors do not misrepresent intensities. Histogram Histograms display the frequency of particular value ranges to show data distribution patterns. The X-axis contains the value ranges organized as bins, and the Y-axis shows the frequency of each bin. Histogram For instance, you can visualize the frequency of different price ranges to understand price distribution for your orders. The visualization lets you analyze data spread and skewness. It is beneficial in deeper statistical analysis, where you want to derive probabilities and build predictive models. Pivot Tables Pivot tables can help you manipulate tabular displays through drag-and-drop options by changing aggregation records. The option is an alternative to SQL filters for viewing aggregate values according to different conditions. Pivot Tables For instance, you can group total orders by shipping mode and order category. The visualization helps prepare ad-hoc reports and provides important summary information for decision-making. Interactive pivot tables also let users try different arrangements to reveal new insights. Choropleth Map Visualization Choropleth map visualization represents color-coded aggregations categorized according to different geographic locations. Regions with higher value intensities have darker colors, while those with lower intensities have lighter shades. Choropleth map visualization For instance, you can visualize the total revenue coming from different countries. This visualization helps determine global presence and highlight disparities across borders. The insights will allow you to develop marketing strategies tailored to regional tastes and behavior. Funnel Visualization Funnel visualization depicts data aggregations categorized according to specific steps in a pipeline. It represents each step from top to bottom with a bar and the associated value as a label overlay on each bar. It also displays cumulative percentage values showing the proportion of the aggregated value resulting from each stage. Funnel Visualization For instance, you can determine the incoming revenue streams at each stage of the ordering process. This visualization is particularly helpful in analyzing marketing pipelines for e-commerce sites. The tool shows the proportion of customers who view a product ad, click on it, add it to the cart, and proceed to check out. Cohort Analysis Cohort analysis offers an intuitive visualization to track the trajectory of a particular metric across different categories or cohorts. Cohort Analysis For instance, you can analyze the number of active users on an app that signed up in different months of the year. The rows will depict the months, and the columns will represent the proportion of active users in a particular cohort as they move along each month. The visualization helps in retention analysis as you can determine the proportion of retained customers across the user lifecycle. Counter Display Databricks allows you to configure a counter display that explicitly shows how the current value of a particular metric compares with the metric’s target value. Counter display For instance, you can check how the average total revenue compares against the target value. In Databricks, the first row represents the current value, and the second is the target. The visualization helps give a quick snapshot of trending performance and allows you to quantify goals for better strategizing. Sankey Diagrams Sankey diagrams show how data flows between different entities or categories. It represents flows through connected links representing the direction, with entities displayed as nodes on either side of a two-dimensional grid. The width of the connected links represents the magnitude of a particular value flowing from one entity to the other. Sankey Diagram For instance, you can analyze traffic flows from one location to the other. Sankey diagrams can help data engineering teams analyze data flows from different platforms or servers. The analysis can help identify bottlenecks, redundancies, and resource constraints for optimization planning. Sunburst Sequence The sunburst sequence visualizes hierarchical data through concentric circles. Each circle represents a level in the hierarchy and has multiple segments. Each segment represents the proportion of data in the hierarchy. Furthermore, it color codes segments to distinguish between categories within a particular hierarchy. Sunburst Sequence For instance, you can visualize the population of different world regions through a sunburst sequence. The innermost circle represents a continent, the middle one shows a particular region, and the outermost circle displays the country within that region. The visualization helps data science teams analyze relationships between nested data structures. The information will allow you to define clear data labels needed for model training. Table A table represents data in a structured format with rows and columns. Databricks offers additional functionality to hide, reformat, and reorder data. Tables help summarize information in structured datasets. You can use them for further analysis through SQL queries. Word Cloud Word cloud visualizations display words in different sizes according to their frequency in textual data. For instance, you can analyze customer comments or feedback and determine overall sentiment based on the highest-occurring words. Word Cloud While word clouds help identify key themes in unstructured textual datasets, they can suffer from oversimplification. Users must use word clouds only as a quick overview and augment textual analysis with advanced natural language processing techniques. Visualization is critical to efficient data management. Find out the top tools for data management for computer vision Visualizations in Databricks: Key Takeaways With an ever-increasing data volume and variety, visualization is becoming critical for quickly communicating data-based insights in a simplified manner. Databricks is a powerful tool with robust visualization types for analyzing complex datasets. Below are a few key points to remember regarding visualization in Databricks. Databricks SQL and Databricks Notebooks: Databricks offers advanced visualizations through Databricks SQL and Databricks Notebooks as a built-in functionality. Visualization configurations: Users can configure multiple visualization settings to produce charts, graphs, maps, and diagrams per their requirements. Visualization types: Databricks offers multiple visualizations, including bar charts, line graphs, pie charts, scatter plots, area graphs, box plots, bubble charts, combo charts, heatmaps, histograms, pivot tables, choropleth maps, funnels, cohort tables, counter display, Sankey diagrams, sunburst sequences, tables, and word clouds.
March 28
10 min

What is Mora? Mora is a multi-agent framework designed for generalist video generation. Based on OpenAI's Sora, it aims to replicate and expand the range of generalist video generation tasks. Sora, famous for making very realistic and creative scenes from written instructions, set a new standard for creating videos that are up to a minute long and closely match the text descriptions given. Mora distinguishes itself by incorporating several advanced visual AI agents into a cohesive system. This lets it undertake various video generation tasks, including text-to-video generation, text-conditional image-to-video generation, extending generated videos, video-to-video editing, connecting videos, and simulating digital worlds. Mora can mimic Sora’s capabilities using multiple visual agents, significantly contributing to video generation. In this article, you will learn: Mora's innovative multi-agent framework for video generation. The importance of open-source collaboration that Mora enables. Mora's approach to complex video generation tasks and instruction fidelity. About the challenges in video dataset curation and quality enhancement. TL; DR Mora's novel approach uses multiple specialized AI agents, each handling different aspects of the video generation process. This innovation allows various video generation tasks, showcasing adaptability in creating detailed and dynamic video content from textual descriptions. Mora aims to fix the problems with current models like Sora, which is closed-source and does not let anyone else use it or do more research in the field, even though it has amazing text-to-video conversion abilities 📝🎬. Unfortunately, Mora still has problems with dataset quality, video fidelity, and ensuring that outputs align with complicated instructions and people's preferences. These problems show where more work needs to be done in the future. OpenAI Sora’s Closed-Source Nature The closed-source nature of OpenAI's Sora presents a significant challenge to the academic and research communities interested in video generation technologies. Sora's impressive capabilities in generating realistic and detailed videos from text descriptions have set a new standard in the field. Related: New to Sora? Check out our detailed explainer on the architecture, relevance, limitations, and applications of Sora. However, the inability to access its source code or detailed architecture hinders external efforts to replicate or extend its functionalities. This limits researchers from fully understanding or replicating its state-of-the-art performance in video generation. Here are the key challenges highlighted due to Sora's closed-source nature: Inaccessibility to Reverse-Engineer Without access to Sora's source code, algorithms, and detailed methodology, the research community faces substantial obstacles in dissecting and understanding the underlying mechanisms that drive its exceptional performance. This lack of transparency makes it difficult for other researchers to learn from and build upon Sora's advancements, potentially slowing down the pace of innovation in video generation. Extensive Training Datasets Sora's performance is not just the result of sophisticated modeling and algorithms; it also benefits from training on extensive and diverse datasets. But the fact that researchers cannot get their hands on similar datasets makes it very hard to copy or improve Sora's work. High-quality, large-scale video datasets are crucial for training generative models, especially those capable of creating detailed, realistic videos from text descriptions. However, these datasets are often difficult to compile due to copyright issues, the sheer volume of data required, and the need for diverse, representative samples of the real world. Creating, curating, and maintaining high-quality video datasets requires significant resources, including copyright permissions, data storage, and management capabilities. Sora's closed nature worsens these challenges by not providing insights into compiling the datasets, leaving researchers to navigate these obstacles independently. Computational Power Creating and training models like Sora require significant computational resources, often involving large clusters of high-end GPUs or TPUs running for extended periods. Many researchers and institutions cannot afford this much computing power, which makes the gap between open-source projects like Mora and proprietary models like Sora even bigger. Without comparable computational resources, it becomes challenging to undertake the necessary experimentation—with different architectures and hyperparameters—and training regimes required to achieve similar breakthroughs in video generation technology. Learn more about these limitations in the technical paper. Evolution: Text-to-Video Generation Over the years, significant advancements in text-to-video generation technology have occurred, with each approach and architecture uniquely contributing to the field's growth. Here's a summary of these evolutionary stages, as highlighted in the discussion about text-to-video generation in the Mora paper: GANs (Generative Adversarial Networks) Early attempts at video generation leveraged GANs, which consist of two competing networks: a generator that creates images or videos that aim to be indistinguishable from real ones, and a discriminator that tries to differentiate between the real and generated outputs. Despite their success in image generation, GANs faced challenges in video generation due to the added complexity of temporal coherence and higher-dimensional data. Generative Video Models Moving beyond GANs, the field saw the development of generative video models designed to produce dynamic sequences. Generating realistic videos frame-by-frame and maintaining temporal consistency is a challenge, unlike in static image generation. Auto-Regressive Transformers Auto-regressive transformers were a big step forward because they could generate video sequences frame-by-frame. These models predicted each new frame based on the previously generated frames, introducing a sequential element that mirrors the temporal progression of videos. But this approach often struggled with long-term coherence over longer sequences. Large-Scale Diffusion Models Diffusion models, known for their capacity to generate high-quality images, were extended to video generation. These models gradually refine a random noise distribution toward a coherent output. They apply this iterative denoising process to the temporal domain of videos. Related: Read our guide on HuggingFace’s Dual-Stream Diffusion Net for Text-to-Video Generation. Image Diffusion U-Net Adapting the U-Net architecture for image diffusion models to video content was critical. This approach extended the principles of image generation to videos, using a U-Net that operates over sequences of frames to maintain spatial and temporal coherence. 3D U-Net Structure The change to a 3D U-Net structure allowed for more nuance in handling video data, considering the extra temporal dimension. This change also made it easier to model time-dependent changes, improving how we generate coherent and dynamic video content. Latent Diffusion Models (LDMs) LDMs generate content in a latent space rather than directly in pixel space. This approach reduces computational costs and allows for more efficient handling of high-dimensional video data. LDMs have shown that they can better capture the complex dynamics of video content. Diffusion Transformers Diffusion transformers (DiT) combine the strengths of transformers in handling sequential data with the generative capabilities of diffusion models. This results in high-quality video outputs that are visually compelling and temporally consistent. Useful: Stable Diffusion 3 is an example of a multimodal diffusion transformer model that generates high-quality images and videos from text. Check out our explainer on how it works. AI Agents: Advanced Collaborative Multi-agent Structures The paper highlights the critical role of collaborative, multi-agent structures in developing Mora. It emphasizes their efficacy in handling multimodal tasks and improving video generation capabilities. Here's a concise overview based on the paper's discussion on AI Agents and their collaborative frameworks: Multimodal Tasks Advanced collaborative multi-agent structures address multimodal tasks involving processing and generating complex data across different modes, such as text, images, and videos. These structures help integrate various AI agents, each specialized in handling specific aspects of the video generation process, from understanding textual prompts to creating visually coherent sequences. Cooperative Agent Framework (Role-Playing) The cooperative agent framework, characterized by role-playing, is central to the operation of these multi-agent structures. Each agent is assigned a unique role or function in this framework, such as prompt enhancement, image generation, or video editing. By defining these roles, the framework ensures that an agent with the best skills for each task is in charge of that step in the video generation process, increasing overall efficiency and output quality. Multi-Agent Collaboration Strategy The multi-agent collaboration strategy emphasizes the orchestrated interaction between agents to achieve a common goal. In Mora, this strategy involves the sequential and sometimes parallel processing of tasks by various agents. For instance, one agent might enhance an initial text prompt, convert it into another image, and finally transform it into a video sequence by yet another. This collaborative approach allows for the flexible and dynamic generation of video content that aligns with user prompts. AutoGen (Generic Programming Framework) A notable example of multi-agent collaboration in practice is AutoGen. This generic programming framework is designed to automate the assembly and coordination of multiple AI agents for a wide range of applications. Within the context of video generation, AutoGen can streamline the configuration of agents according to the specific requirements of each video generation task to generate complex video content from textual or image-based prompts. Mora drone to butterfly flythrough shot. | Image Source. Role of an AI Agent The paper outlines the architecture involving multiple AI agents, each serving a specific role in the video generation process. Here's a closer look at the role of each AI agent within the framework: Illustration of how to use Mora to conduct video-related tasks Prompt Selection and Generation Agent This agent is tasked with processing and optimizing textual prompts for other agents to process them further. Here are the key techniques used for Mora: GPT-4: This agent uses the generative capabilities of GPT-4 to generate high-quality prompts that are detailed and rich in context. Prompt Selection: This involves selecting or enhancing textual prompts to ensure they are optimally prepared for the subsequent video generation process. This step is crucial for setting the stage for generating images and videos that closely align with the user's intent. Good Read: Interested in GPT-4 Vision alternatives? Check out our blog post. Text-to-Image Generation Agent This agent uses a retrained large text-to-image model to convert the prompts into initial images. The retraining process ensures the model is finely tuned to produce high-quality images, laying a strong foundation for the video generation process. Image-to-Image Generation Agent This agent specializes in image-to-image generation, taking initial images and editing them based on new prompts or instructions. This ability allows for a high degree of customization and improvement in video creation. Image-to-Video Generation Agent This agent transforms static images into dynamic video sequences, extending the visual narrative by generating coherent frames. Here are the core techniques and models: Core Components: It incorporates two pre-trained models: GPT-3 for understanding and generating text-based instructions, and Stable Diffusion for translating these instructions into visual content. Prompt-to-Prompt Technique: The prompt-to-prompt technique guides the transformation from an initial image to a series of images that form a video sequence. Classifier-Free Guidance: Classifier-free guidance is used to improve the fidelity of generated videos to the textual prompts so that the videos remain true to the users' vision. Text-to-Video Generation Agent: This role is pivotal in transforming static images into dynamic videos that capture the essence of the provided descriptions. Stable Video Diffusion (SVD) and Hierarchical Training Strategy: A model specifically trained to understand and generate video content, using a hierarchical training strategy to improve the quality and coherence of the generated videos. Video Connection Agent This agent creates seamless transitions between two distinct video sequences for a coherent narrative flow. Here are the key techniques used: Pre-Trained Diffusion-Based T2V Model: This model uses a pre-trained diffusion-based model specialized in text-to-video (T2V) tasks to connect separate video clips into a cohesive narrative. Text-Based Control: This method uses textual descriptions to guide the generation of transition videos that seamlessly connect disparate video clips, ensuring logical progression and thematic consistency. Image-to-Video Animation and Autoregressive Video Prediction: These capabilities allow the agent to animate still images into video sequences, predict and generate future video frames based on previous sequences, and create extended and coherent video narratives. Mora’s Video Generation Process Mora's video-generation method is a complex, multi-step process that uses the unique capabilities of specialized AI agents within its framework. This process allows Mora to tackle various video generation tasks, from creating videos from text descriptions to editing and connecting existing videos. Here's an overview of how Mora handles each task: Mora’s video generation process. Text-to-Video Generation This task begins with a detailed textual prompt from the user. Then, the Text-to-Image Generation Agent converts the prompts into initial static images. These images serve as the basis for the Image-to-Video Generation Agent, which creates dynamic sequences that encapsulate the essence of the original text and produce a coherent video narrative. Text-Conditional Image-to-Video Generation This task combines textual prompts with a specific starting image. Mora first improves the input with the Prompt Selection and Generation Agent, ensuring that the text and image are optimally prepared for video generation. Then, the Image-to-Video Generation Agent takes over, generating a video that evolves from the initial image and aligns with the textual description. Extend Generated Videos To extend an existing video, Mora uses the final frame of the input video as a launchpad. The Image-to-Video Generation Agent crafts additional sequences that logically continue the narrative from the last frame, extending the video while maintaining narrative and visual continuity. Video-to-Video Editing In this task, Mora edits existing videos based on new textual prompts. The Image-to-Image Generation Agent first edits the video's initial frame according to the new instructions. Then, the Image-to-Video Generation Agent generates a new video sequence from the edited frame, adding the desired changes to the video content. Connect Videos Connecting two videos involves creating a transition between them. Mora uses the Video Connection Agent, which analyzes the first video's final frame and the second's initial frame. It then generates a transition video that smoothly links the two segments into a cohesive narrative flow. Simulating Digital Worlds Mora generates video sequences in this task that simulate digital or virtual environments. The process involves appending specific style cues (e.g., "in digital world style") to the textual prompt, guiding the Image-to-Video Generation Agent to create a sequence reflecting the aesthetics of a digital realm. This can involve stylistically transforming real-world images into digital representations or generating new content within the specified digital style. See Also: Read our explainer on Google’s Video Gaming Companion: Scalable Instructable Multiworld Agent [SIMA]. Mora: Experimental Setup As detailed in the paper, the experimental setup for evaluating Mora is comprehensive and methodically designed to assess the framework's performance across various dimensions of video generation. Here's a breakdown of the setup: Baseline The baseline for comparison includes existing open-sourced models that showcase competitive performance in video generation tasks. These models include Videocrafter, Show-1, Pika, Gen-2, ModelScope, LaVie-Interpolation, LaVie, and CogVideo. These models are a reference point for evaluating Mora's advancements and position relative to the current state-of-the-art video generation. Basic Metrics The evaluation framework comprises several metrics to quantify Mora's performance across different dimensions of video quality and condition consistency: Video Quality Measurement Object Consistency: Measures the stability of object appearances across video frames. Background Consistency: Assesses the uniformity of the background throughout the video. Motion Smoothness: Evaluates the fluidity of motion within the video. Aesthetic Score: Gauges the artistic and visual appeal of the video. Dynamic Degree: Quantifies the video's dynamic action or movement level. Imaging Quality: Assesses the overall visual quality of the video, including clarity and resolution. Video Condition Consistency Metric Temporal Style: Measures how consistently the video reflects the temporal aspects (e.g., pacing, progression) described in the textual prompt. Appearance Style: Evaluates the adherence of the video's visual style to the descriptions provided in the prompt, ensuring that the generated content matches the intended appearance. Self-Defined Metrics Video-Text Integration (VideoTI): Measures the model’s fidelity to textual instructions by comparing text representations of input images and generated videos. Temporal Consistency (TCON): Evaluates the coherence between an original video and its extended version, providing a metric for assessing the integrity of extended video content. Temporal Coherence (Tmean): Quantifies the correlation between the intermediate generated and input videos, measuring overall temporal coherence. Video Length: This parameter quantifies the duration of the generated video content, indicating the model's capacity for producing videos of varying lengths. Implementation Details The experiments use high-performance hardware, specifically TESLA A100 GPUs with substantial VRAM. This setup ensures that Mora and the baseline models are evaluated under conditions allowing them to fully express their video generation capabilities. The choice of hardware reflects the computational intensity of training and evaluating state-of-the-art video generation models. Mora video generation - Fish underwater flythrough Limitations of Mora The paper outlines several limitations of the Mora framework. Here's a summary of these key points: Curating High-Quality Video Datasets Access to high-quality video datasets is a major challenge for training advanced video generation models like Mora. Copyright restrictions and the sheer volume of data required make it difficult to curate diverse and representative datasets that can train models capable of generating realistic and varied video content. Read Also: The Full Guide to Video Annotation for Computer Vision. Quality and Length Gaps While Mora demonstrates impressive capabilities, it has a noticeable gap in quality and maximum video length compared to state-of-the-art models like Sora. This limitation is particularly evident in tasks requiring the generation of longer videos, where maintaining visual quality and coherence becomes increasingly challenging. Simulating videos in Mora vs in Sora. Instruction Following Capability Mora sometimes struggles to precisely follow complex or detailed instructions, especially when generating videos that require specific actions, movements, or directionality. This limitation suggests that further improvement in understanding and interpreting textual prompts is needed. Human Visual Preference Alignment The experimental results may not always align with human visual preferences, particularly in scenarios requiring the generation of realistic human movements or the seamless connection of video segments. This misalignment highlights the need to incorporate a more nuanced understanding of physical laws and human dynamics into the video-generation process. Mora Vs. Sora: Feature Comparisons The paper compares Mora and OpenAI's Sora across various video generation tasks. Here's a detailed feature comparison based on their capabilities in different aspects of video generation: Check out the project repository on GitHub. Mora Multi-Agent Framework: Key Takeaways The paper "Mora: Enabling Generalist Video Generation via a Multi-Agent Framework" describes Mora, a new framework that advances video technology. Using a multi-agent approach, Mora is flexible and adaptable across various video generation tasks, from creating detailed scenes to simulating complex digital worlds. Because it is open source, it encourages collaboration, which leads to new ideas, and lets the wider research community add to and improve its features. Even though Mora has some good qualities, it needs high-quality video datasets, video quality, length gaps, trouble following complicated instructions correctly, and trouble matching outputs to how people like to see things. Finding solutions to these problems is necessary to make Mora work better and be used in more situations. Continuing to improve and develop Mora could change how we make video content so it is easier for creators and viewers to access and have an impact.
March 26
8 min
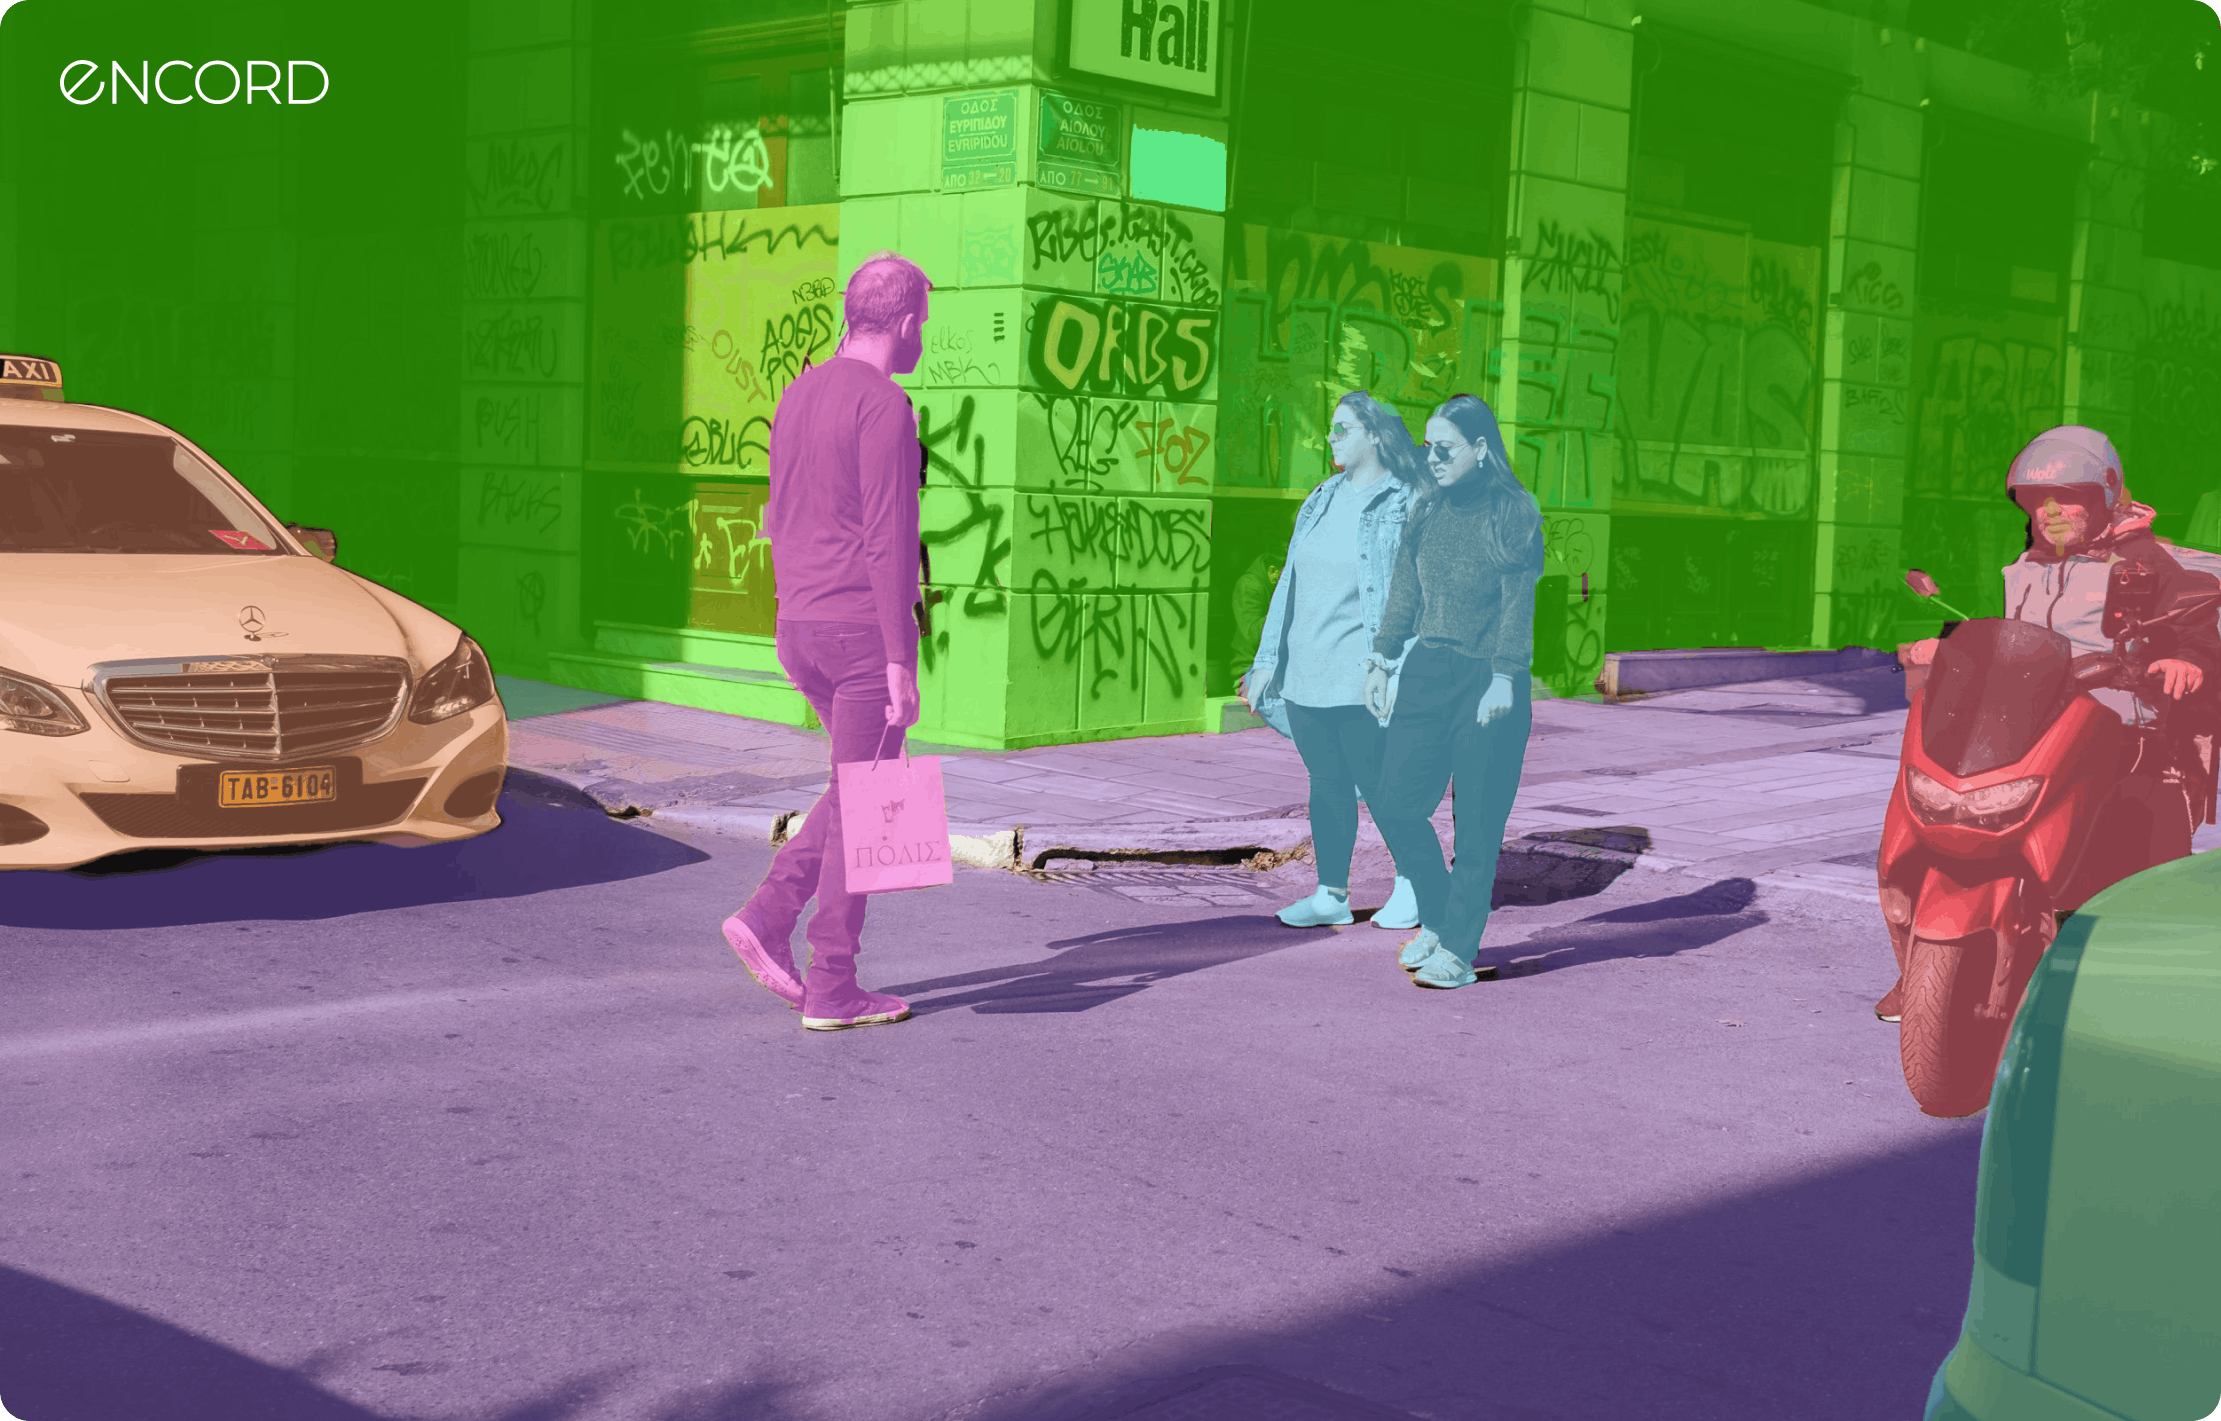
Panoptic Segmentation Updates in Encord Over the past 6 months, we have updated and built new features within Encord with a strong focus on improving your panoptic segmentation workflows across data, labeling, and model evaluation. Here are some updates we’ll cover in this article: Bitmask lock. SAM + Bitmask lock + Brush for AI-assisted precision labeling. Fast and performant rendering of fully bitmask-segmented images and videos. Panoptic Quality model evaluation metrics. Bitmask Lock within Encord Annotate to Manage Segmentation Overlap Our Bitmask Lock feature introduces a way to prevent segmentation and masks from overlapping, providing pixel-perfect accuracy for your object segmentation tasks. By simply toggling the “Bitmask cannot be drawn over” button, you can prevent any part of a bitmask label from being included in another label. This feature is crucial for applications requiring precise object boundaries and pixel-perfect annotations, eliminating the risk of overlapping segmentations. Let’s see how to do this within Encord Annotate: Step 1: Create your first Bitmask Initiating your labeling process with the Bitmask is essential for creating precise object boundaries. If you are new to the Bitmask option, check out our quickstart video walkthrough on creating your first Bitmask using brush tools for labeling. Step 2: Set Bitmask Overlapping Behavior Managing how bitmasks overlap is vital for ensuring accurate segmentation, especially when dealing with multiple objects that are close to each other or overlapping. After creating your first bitmask, adjust the overlapping behavior settings to dictate how subsequent bitmasks interact with existing ones. This feature is crucial for delineating separate objects without merging their labels—perfect for panoptic segmentation. This prevents any part of this bitmask label from being included in another label. This is invaluable for creating high-quality datasets for training panoptic segmentation models. Step 3: Lock Bitmasks When Labeling Multiple Instances Different images require different approaches. Beyond HSV, you can use intensity values for grayscale images (like DICOM) or RGB for color-specific labeling. This flexibility allows for tailored labeling strategies that match the unique attributes of your dataset. Experiment with the different settings (HSV, intensity, and RGB) to select the best approach for your specific labeling task. Adjust the criteria to capture the elements you need precisely. Step 4: Using the Eraser Tool Even with careful labeling, adjustments may be necessary. The eraser tool can remove unwanted parts of a bitmask label before finalizing it, providing an extra layer of precision. If you've applied a label inaccurately, use the eraser tool to correct any errors by removing unwanted areas of the bitmask. See our documentation to learn more. Bitmask-Segmented Images and Videos Got a Serious Performance Lift (At Least 5x) Encord's commitment to enhancing user experience and efficiency is evident in the significant performance improvements made to the Bitmask-segmented annotation within the Label Editor. Our Engineering team has achieved a performance lift of at least 5x by directly addressing user feedback and pinpointing critical bottlenecks. This improves how fast the editor loads for your panoptic segmentation labeling instances. Here's a closer look at the differences between the "before" and "after" scenarios, highlighting the advancements: Before the Performance Improvements: Performance Lag on Zoom: Users experienced small delays when attempting to zoom in on images, with many instances (over 100) that impacted the precision and speed of their labeling process. Slow Response to Commands: Basic functionalities like deselecting tools or simply navigating through the label editor were met with sluggish responses. Operational Delays: Every action, from image loading to applying labels, was hindered by "a few milliseconds" of delay, which accumulated significant time overheads across projects. After the Performance Enhancements: Quicker Image Load Time: The initial step of image loading has seen a noticeable speed increase! This sets a good pace for the entire labeling task. Responsiveness: The entire label editor interface, from navigating between tasks to adjusting image views, is now remarkably more responsive. This change eradicates previous lag-related frustrations and allows for a smoother user experience. Improved Zoom Functionality: Zooming in and out has become significantly more fluid and precise. This improvement is precious for detailed labeling work, where accuracy is paramount. The positive changes directly result from the Engineering team's responsiveness to user feedback. Our users have renewed confidence in handling future projects with the Label Editor. We are dedicated to improving Encord based on actual user experiences. Use Segment Anything Model (SAM) and Bitmask Lock for High Annotation Precision Starting your annotation process can be time-consuming, especially for complex images. Our Segment Anything Model (SAM) integration offers a one-click solution to create initial annotations. SAM identifies and segments objects in your image, significantly speeding up the annotation process while ensuring high accuracy. Step 1: Select the SAM tool from the toolbar with the Bitmask Lock enabled. Step 2: Click on the object you wish to segment in your image. SAM will automatically generate a precise bitmask for the object. Step 3: Use the bitmask brush to refine the edges for pixel-perfect segmentation if needed. See how to use the Segment Anything Model (SAM) within Encord in our documentation. Validate Segmentation with Panoptic Quality Metrics You can easily evaluate your segmentation model’s panoptic mask quality with new metrics: mSQ (mean Segmentation Quality) mRQ (mean Recognition Quality) mPQ (mean Panoptic Quality) The platform will calculate mSQ, mRQ, and mPQ for your predictions, labels, and dataset to clearly understand the segmentation performance and areas for improvement. Navigate to Active → Under the Model Evaluation tab, choose the panoptic model you want to evaluate. Under Display, toggle the Panoptic Quality Metrics (still in beta) option to see the model's mSQ, mRQ, and mPQ scores. Fast Rendering of Fully Bitmask-Segmented Images within Encord Active The performance improvement within the Label Editor also translates to how you view and load panoptic segmentation within Active. Try it yourself: Key Takeaways: Panoptic Segmentation Updates in Encord Here’s a recap of the key features and improvements within Encord that can improve your Panoptic Segmentation workflows across data and models: Bitmask Lock: This feature prevents overlaps in segmentation. it guarantees the integrity of each label, enhancing the quality of the training data and, consequently, the accuracy of machine learning models. This feature is crucial for projects requiring meticulous detail and precision. SAM + Bitmask Lock + Brush: The Lock feature allows you to apply Bitmasks to various objects within an image, which reduces manual effort and significantly speeds up your annotation process. The integration of SAM within Encord's platform, using Lock to manage Bitmask overlaps, and the generic brush tool empower you to achieve precise, pixel-perfect labels with minimal effort. Fast and Performant Rendering of Fully Bitmask-segmented Images and Videos: We have made at least 5x improvements to how Encord quickly renders fully Bitmask-segmented images and videos across Annotate Label Editor and Active. Panoptic Quality Model Evaluation Metrics: The Panoptic Quality Metrics—comprising mean Segmentation Quality (mSQ), mean Recognition Quality (mRQ), and mean Panoptic Quality (mPQ)—provide a comprehensive framework for evaluating the effectiveness of segmentation models.
March 6
7 min
Software To Help You Turn Your Data Into AI
Forget fragmented workflows, annotation tools, and Notebooks for building AI applications. Encord Data Engine accelerates every step of taking your model into production.