The Full Guide to Data Augmentation in Computer Vision

This article explores the importance of data augmentation, its techniques, and how it can significantly improve model performance by enhancing dataset diversity and size.
One of the most common modeling point-of-failure faced by machine learning practitioners is the problem of overfitting. This happens when models memorize model training examples but fail to generalize predictions to unseen images. Overfitting is especially pertinent in computer vision where we deal with high-dimensional image inputs and large, over-parameterized deep networks.
There are many modern modeling techniques to deal with this problem including dropout-based methods, label smoothing, or architectures that reduce the number of parameters needed while still maintaining the power to fit complex data. But one of the most effective places to combat overfitting is increasing the size of the dataset itself. This is where data augmentation comes in. Since it can be expensive and time consuming to gather more data, which is essential to continue improving your AI or CV model’s performance, data augmentation increases the size of the data set without requiring more collection.
What Is Data Augmentation?
Data augmentation is generating new training examples from existing ones through various transformations. It is a very effective regularization tool and is used by experts in virtually all CV problems and models. Data augmentation can increase the size of just about any image training set by 10x, 100x or even infinitely, in a very easy and efficient way. Mathematically speaking:
More data = better model. Data augmentation = more data. Therefore, data augmentation = better machine learning models.
Why Should I Do Data Augmentation?
Deep learning models can be incredibly data-hungry, and one of the most effective ways to improve your model’s performance is to give it more data - the fuel of deep learning. This can be done in two ways:
Increasing the raw quantity of data
This combats overfitting by “filling out” the underlying distribution from which your images come from in the dataset, thus refining your model’s decision boundaries. The more examples you have - for example, from a particular class in a classification problem - the more accurately you can recover the support of that class.
Increasing diversity in the dataset
It’s worth mentioning that failure to generalize to new data can also be caused by dataset/distribution shifts. Imagine classifying dog breeds using a training set of images of dogs in parks, but seeing dogs in other locations in production. Widening your training dataset to include these types of images will likely have a dramatic effect on your model’s ability to generalize. (But most of the time image augmentation will not be able to address this issue).
However, data collection can often be very expensive and time-consuming. For example, in healthcare applications, collecting more data usually requires access to patients with specific conditions, considerable time and effort from skilled medical professionals to collect and annotate the data, and often the use of expensive imaging and diagnostic equipment. In many situations, the “just get more data” solution will be very impractical. Furthermore, public datasets aren’t usually used for custom CV problems, aside from transfer learning. Wouldn’t it be great if there were some way to increase the size of our dataset without returning to the data collection phase? This is data augmentation.
When Should I Do Data Augmentation?
The answer is: always! Data augmentation is usually going to help regularize and improve your model, and there are unlikely to be any downsides if you apply it in a reasonable way. The only instance where you might skip it is if your dataset is so incredibly large and diverse that augmentation does not add any meaningful diversity to it. But most of us will not have the luxury of working with such fairytale datasets.
Data Augmentation for Class Imbalance
Augmentation can also be used to deal with class imbalance problems. Instead of using sampling or weighting-based approaches, you can simply augment the smaller classes more to make all classes the same size.
Data Augmentation Techniques
| Transformation | Definition |
| Rotation | Rotating an image by a specified angle (e.g., 90°, 180°, random angles). Helps models become invariant to object orientation. |
| Scaling | Changing the size of the image while maintaining aspect ratio. Prevents models from overfitting to specific object scales |
| Translation | Shifting the image horizontally or vertically. Simulates objects appearing in different parts of the frame |
| Flipping | Flipping the image along the horizontal or vertical axis. Useful for symmetry-based augmentation, e.g., in face or object detection. |
| Cropping | Cutting out parts of an image (randomly or centrally). Focuses on object localization and prevents overreliance on contextual background. |
{{table(Color Space Transformations)}}
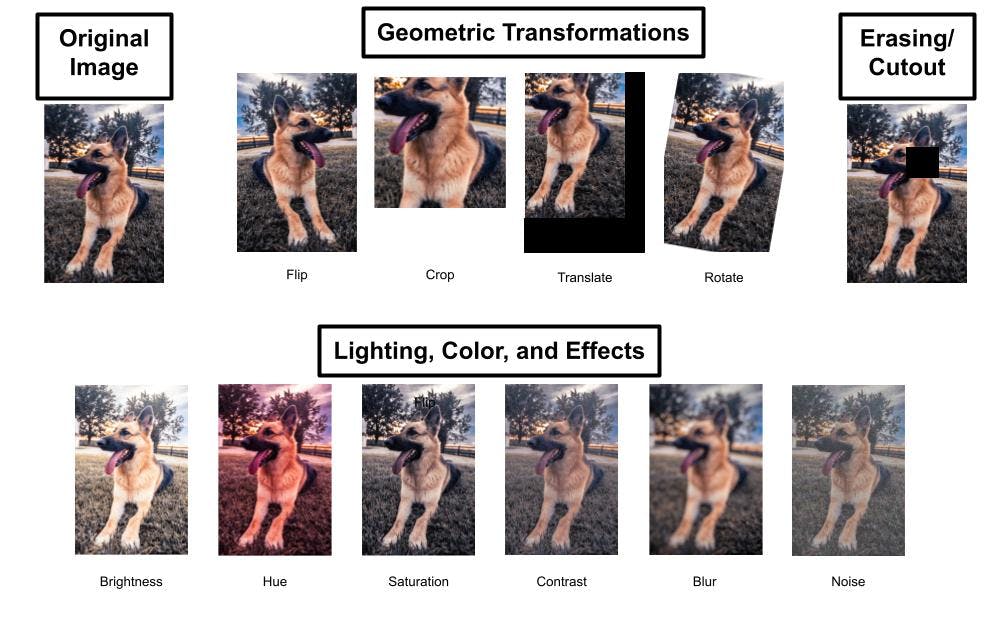
Common image transformations for data augmentation.
The list of methods demonstrated by the figure above is by no means exhaustive. There are countless other ways to manipulate images and create augmented data. You are only limited by your own creativity!
Don’t feel limited to only using each technique in isolation either. You can (and should) chain them together like so:
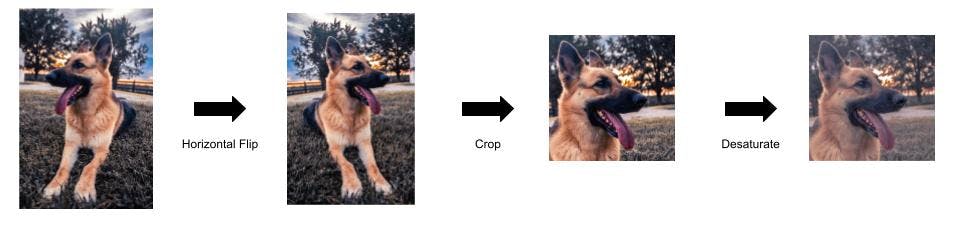
Multiple transformations
More examples of augmentation combinations from a single source image. (source)
So Which Transformations Should I Choose?
There is no one exact answer, but you should start by thinking about your problem. Does the transformation only generate images that are completely outside the support that you’d ever expect in the real world? Even if an inverted image of a tree in a park isn’t something you’d see in real life, you might see a fallen tree in a similar orientation. However, some transformations might need to be re-considered such as:
- Vertically reflected (upside-down) stop signs at an intersection for object recognition in self-driving.
- Upside-down body parts or blurred/colored images for radiology images where there will always be consistent orientation, lighting, and sharpness.
- Grid distortion on satellite images of roads and neighborhoods. (though this might be one of the best places to apply rotations).
- 180-degree rotation on digit classification (MNIST). This transformation will make yours 6’s look like 9’s and vice versa while keeping the original label.
Your transformations don’t have to be exclusively realistic, but you should definitely be using any transformations that are likely to occur in practice.
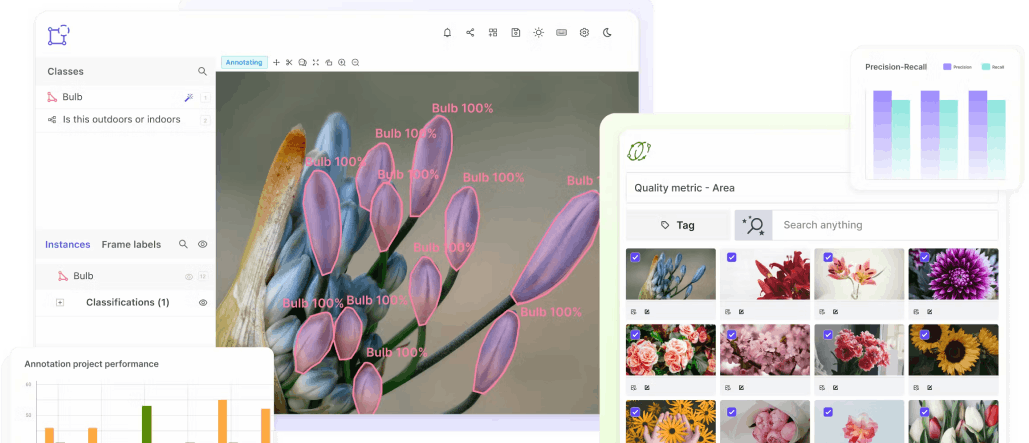
In addition to knowledge of your task and domain, knowledge of your dataset is also important to consider. Better knowledge of the distribution of images in your dataset will allow you to better choose which augmentations will give you sensible results or possibly even which augmentations can help you fill in gaps in your dataset. A great tool to help you explore your dataset, visualize distributions of image attributes, and examine the quality of your image data is Encord Active.
However, we are engineers and data scientists. We don’t just make decisions based on conjectures, we try things out and run experiments. We have the tried-and-true technique of model validation and hyperparameter tuning. We can simply experiment with different techniques and choose the combination that maximizes performance on our validation set.
If you need a good starting point: horizontal reflection (horizontal flip), cropping, blur, noise, and an image erasing method (like a cutout or random erasing) are a good base, to begin with. To further enhance your image, explore how to unblur it by combining these techniques and experimenting with adjustments like brightness and color changes.
Data Augmentation for Video
Augmentation techniques for video data are very similar to image data, with a few differences. Generally, the chosen transformation will be applied identically to each frame in the video (with the exception of noise). Trimming videos to create shorter segments is also a popular technique (temporal cropping).
How to Implement Data Augmentation
The exact specifics of your implementation will depend on your hardware, chosen deep learning library, chosen transformations, etc. But there are generally two strategies to implement data augmentation: offline and online.
Offline augmentation
Performing data augmentation offline means you will compute a new dataset that includes all of your original and transformed images, and save it to disk. Then you’ll train your model, as usual, using the augmented dataset instead of the original one. This can drastically increase the disk storage required, so we don’t recommend it unless you have a specific reason to do so (such as verifying the quality of the augmented images or controlling for the exact images that are shown during training).
Online augmentation
This is the most common method of implementing data augmentation. In online augmentation, you will transform the images at each epoch or batch when loading them. In this scenario, the model sees a different transformation of the image at each epoch, and the transformations are never saved to disk. Typically, transformations are randomly applied to an image each epoch. For example, you will randomly decide whether or not to flip an image at each epoch, perform a random crop, sample a blur/sharpening amount, etc.
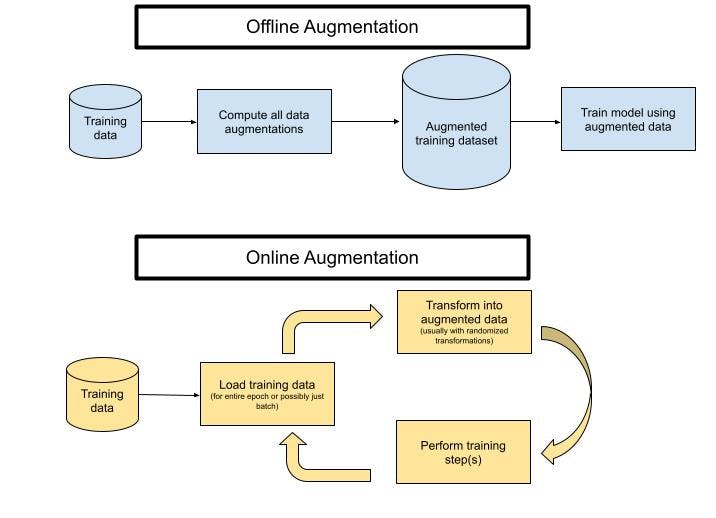
Online and offline data augmentation processes.
TensorFlow and PyTorch both contain a variety of modules and functions to help you with augmentation. For even more options, check out the imgaug Python library.
Which Techniques Do The Pros Use?
You may still be wondering, “How do people who train state-of-the-art models use image augmentation?” Let’s take a look:
null
| Paper | Data Augmentation Techniques |
|---|---|
|
Translate, Scale, Squeeze, Shear |
|
|
Translate, Flip, Intensity Changing |
|
|
Crop, Flip |
|
|
Flip, Crop, Translate |
|
|
Crop, Elastic distortion |
|
|
Cutout, Crop, Flip |
|
|
AutoAugment, Mixup, Crop |
|
|
AutoAugment, RandAugment, Random erasing, Mixup, CutMix |
|
|
RandAugment, Mixup, CutMix, Random erasing |
|
|
Translate, Rotate, Gray value variation, Elastic deformation |
|
|
Flip |
|
|
Scale, Translate, Color space |
|
|
Crop, Resize, Flip, Color Space, Distortion |
|
|
Mosaic, Distortion, Scale, Color space, Crop, Flip, Rotate, Random erase, Cutout, Hide and Seek, GridMask, Mixup, CutMix, StyleGAN |
Erasing/Cutout: Wait, what is all this cut-mix-rand-aug stuff? Some of these like Cutout, Random Erasing, and GridMask are image-erasing methods. When performing erasing, you can cut out a square, rectangles of different shapes, or even multiple separate cuts/masks within the image. There are also various ways to randomize this process.
Erasing is a popular strategy, and for example, in the context of image classification, can force the model to learn to identify objects from each individual part rather than just the most distinct one by erasing the most distinct part (for example learning to recognize dogs by paws and tails, not just faces). Erasing can be thought of as a sort of “dropout in the input space”.
Mixing: Another popular technique in data augmentation is mixing. Mixing involves combining separate examples (usually of different classes) to create a new training image. Mixing is less intuitive than the other methods we have seen because the resulting images do not look realistic. Let’s look at a couple of popular techniques for doing this:
Mixup: Mixup combines two images by linear interpolation (weighted average) of the two images. The same interpolation is then applied to the class label.
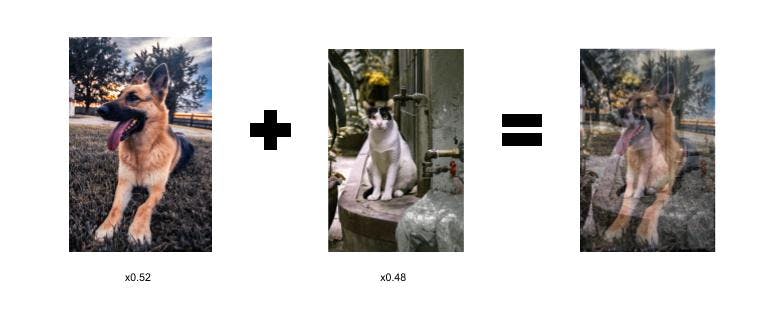
An example of a mixup image. The corresponding image label in a binary image classification problem with labels (dog, cat) would then be (0.52, 0.48).
What? This looks like hazy nonsense! And what are those label values? Why does this work?
Essentially, the goal here is to encourage our model to learn smoother, linear transitions between different classes, rather than oscillate or behave erratically. This helps stabilize model behavior on unseen examples at inference time.
CutMix: CutMix is a combination of the Cutout and Mixup approaches. As mentioned before, Mixup images look very unnatural and can be confusing to the model when performing localization. Rather than interpolate between two images, CutMix simply takes a crop of one image and pastes it onto a second image. This also has the benefit over cutout, that the cut-out region is not just thrown away and replaced with garbage, but instead with actual information. The label weighting is similar - for a classification problem, the labels correspond to the percentage of pixels from the corresponding class image that is present in the augmented image. For localization, we keep the same bounding boxes or segmentation from the original images in their respective parts of the composite image.
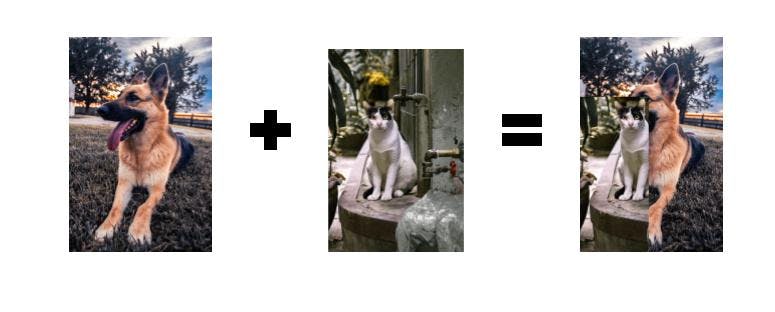
An example of a CutMix image.
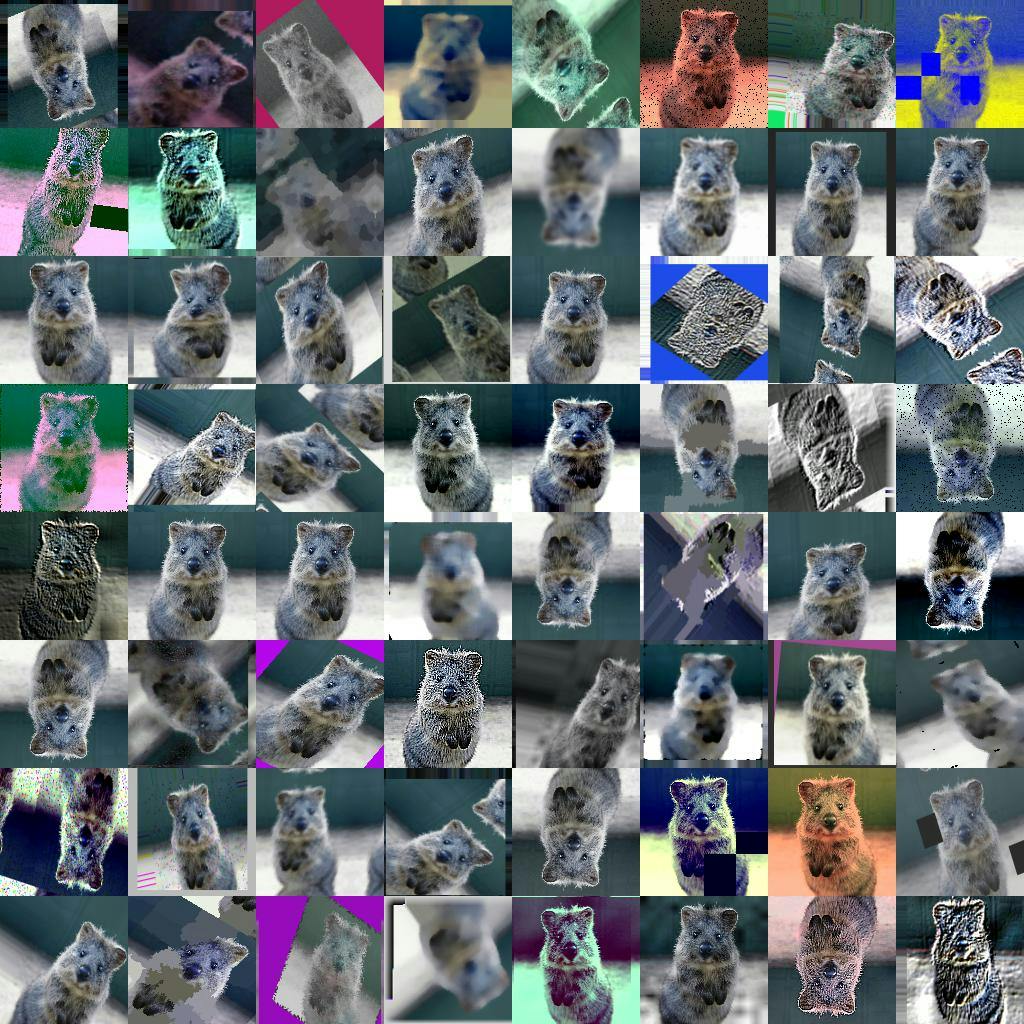
AugMix: Augmix is a little different from the above examples, but is also worth mentioning here. AugMix doesn’t mix different training images together - instead, it mixes different transformations of the same image. This retains some of the benefits of mixing by exploring the input space between images and reduces degradation effects from applying many transformations to the same image. The mixes are computed as follows:
- Multiple (3 by default) augmented images are created. Each augmented image is created using 1-3 different transformations.
- The 3 augmented images are mixed by weighted averaging
- The resulting image is mixed with the original image by weighted averaging
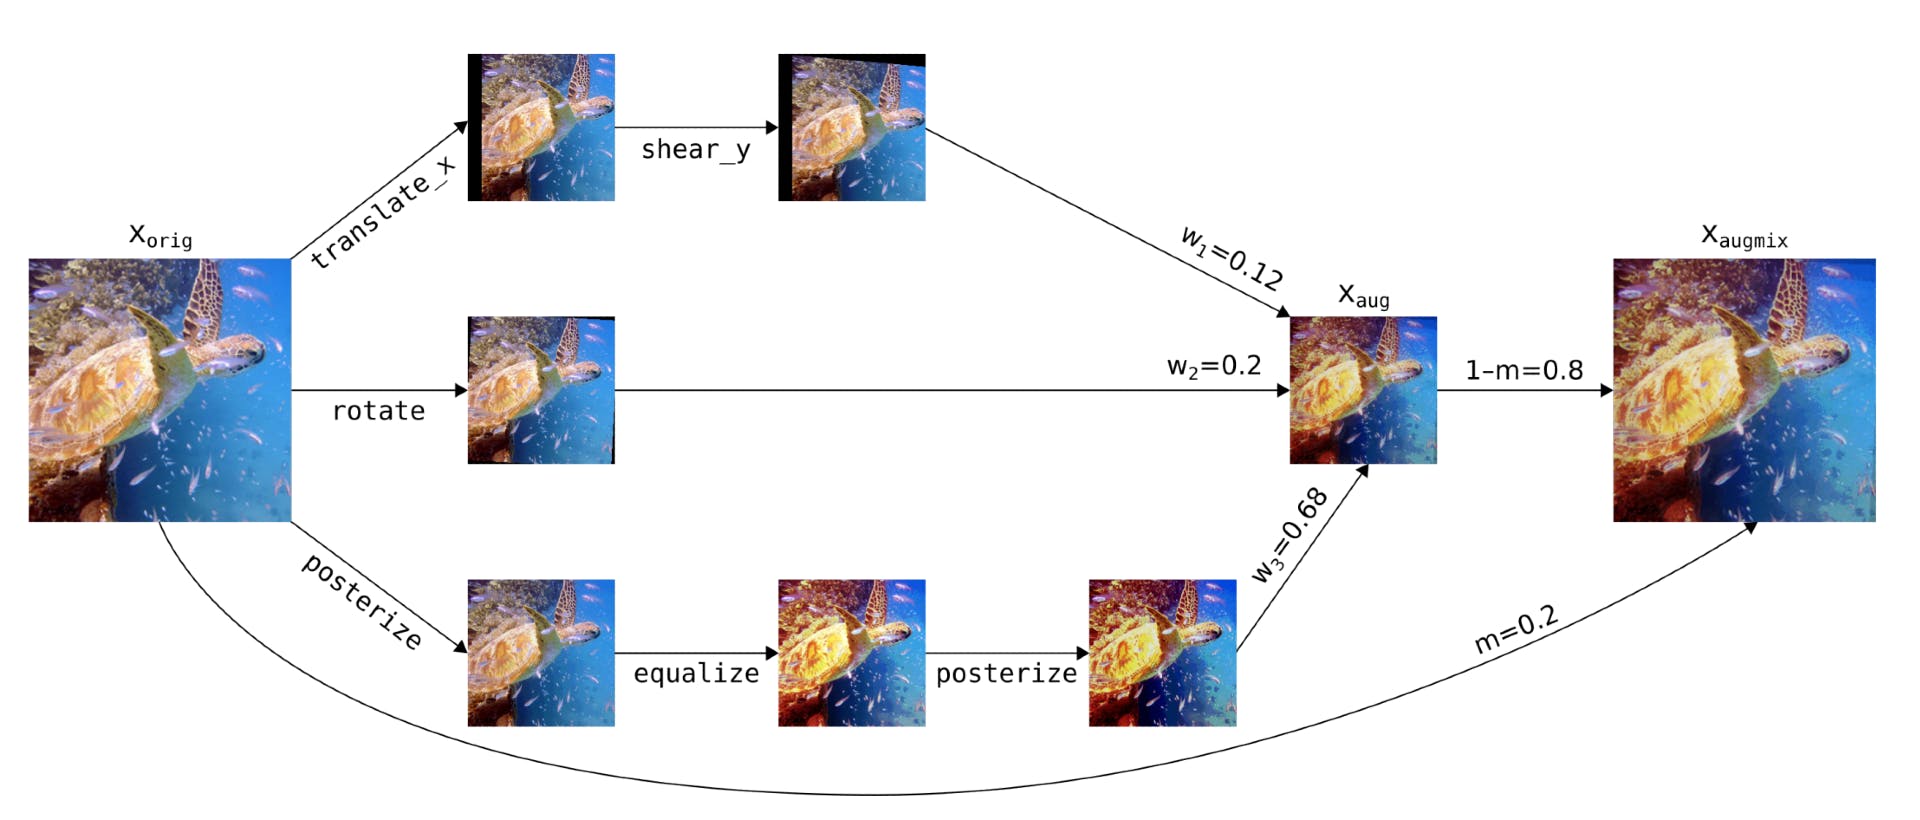
AugMix augmentation process. The entire method involves other parts as well such as a specific loss function. (source)
Advanced Data Augmentation Techniques
“Can’t I just generate completely unique data using GANs”?
Image augmentation is still an active research area, and there are a few more advanced methods to be aware of. The following techniques are more complex (particularly the last two) and will not always be the most practical or efficient-to-implement strategies. We list these for the sake of completeness.
- Feature Space Augmentation: Feature space augmentation consists of performing augmentation on the hidden layer representations during training instead of the original images. The idea is that you would be more likely to encounter random images traversing through the feature space than through the input space. This can be done by adding noise to the hidden representations, performing mixing on them, or other methods.
- GANs: Another approach is to generate new synthetic images using a generative model (typically GAN) that learns the underlying data-generating distribution. This can be done unconditionally, or by starting from existing training examples, for example, by using style transfer. For video data, simulation techniques can be used to synthesize sequences of frames.
- Automatic Augmentation: Finding the best combinations of augmentation techniques for a given problem can be time-consuming and require expertise in both the domain and specific dataset. Wouldn’t it be great if the computer could do all of that work for us? Automatic Augmentation algorithms search over the space of possible augmentations to find the best-performing ones. Reinforcement learning methods like AutoAugment find high-performing augmentation policies. Adversarial learning-based methods that generate difficult-to-classify transformations also exist.
Considerations and Potential Pitfalls of Data Augmentation
- It should go without saying that any data augmentation should occur after splitting your dataset into training, validation, and testing subsets. Otherwise, you will be creating a major data leak in your models, and your test results will be useless.
- If you’re performing localization-based tasks like object detection or segmentation, your labels will change when applying geometric transformations like reflection (flipping), rotation, translation, and cropping. Hence, you will need to apply the same transformations to your label annotations as well.
- When you crop images, you are changing the size and possibly the shape of the inputs to your model. For convolutional neural network models, you’ll need all of your inputs, including your test set, to have the same dimensionality. A common way of handling this is applying crop transformations to the test and validation sets as well. Resizing the images is another option.
- Some of these transformations like translation, rotation, or scaling can result in “blank spaces” where the transformed image doesn’t fully cover the grid space that’s fed into your model. In these cases, you can fill the extra pixels with constant black/white/gray pixels, random noise, or interpolations that extend the original image content.
- Be careful not to crop or translate so much that you completely remove relevant objects from an image. This is easily detectable when you know bounding boxes in object detection tasks, but could be an issue for image classification if you completely crop out the object corresponding to the label.
- Data augmentation is typically only performed on the training set. While it can also be used as a strategy to decrease variance in very small validation or even test sets, you should always be very careful about making any changes to test sets. You want test data to be an unbiased estimate of performance on unseen examples from the inference-time distribution, and an augmented dataset may not resemble that distribution.
- Don’t chain too many augmentations together. You might think to throw everything in at once and the kitchen sink by combining all of the listed transforms, but this can quickly make the resulting image extremely unrealistic, unidentifiable to humans, and also cause the potential problem outlined in the point above. There’s nothing wrong with using all of these transformations, just don’t combine all of them at once.
That being said, transformed images don’t need to be perfect to be useful. The quantity of data will often beat the quality of data. The more examples you have, the less detrimental effect one outlier/mistake image will have on your model, and the more diverse your dataset will be.
While it will almost always have a positive effect on your model’s performance, data augmentation isn’t a cure-all silver bullet for problems related to dataset size. You can’t expect to take a tiny dataset of 50 images, blow it up to 50,000 with the above techniques and get all the benefits of a dataset of size 50,000. Data augmentation can help make models more robust to things like rotations, translations, lighting, and camera artifacts, but not for other changes such as different backgrounds, perspectives, variations in the appearance of objects, relative positioning in scenes, etc.
Key Takeaways: Data Augmentation
- Data Augmentation Mitigates Overfitting: By increasing the size and diversity of the training dataset, it enables models to generalize better to unseen data.
- Essential for Robust Model Performance: Augmentation adds variability by introducing transformations which helps models handle real-world variations and distribution shifts.
- Versatile Techniques Tailored to Needs: Popular techniques include geometric transformations, color adjustments, and advanced methods like Mixup and CutMix.
- Practical Implementation Options: Data augmentation can be applied offline or online. Online augmentation is more common as it reduces storage requirements and ensures diverse transformations during each training epoch.
- Not a Cure-All but Highly Beneficial: While data augmentation can’t replace a truly diverse, real-world dataset, it significantly improves model performance by making models more robust to common image variations.
Now you know what data augmentation is and how it helps address overfitting by filling out your dataset. You know that you should be using data augmentation for all of your computer vision tasks. You have a good overview of the most essential data augmentation transformations and techniques, you know what to be mindful of, and you’re ready to add data augmentation to your own preprocessing and training pipelines.
Sign-up for an Encord Free Trial: The Active Learning Platform for Computer Vision, used by the world’s leading computer vision teams.
Want to stay updated?
Follow us on Twitter and LinkedIn for more content on computer vision, training data, and active learning.
Frequently asked questions
Data augmentation is the process of creating new training examples from existing ones through various transformations such as flipping, rotating, cropping, or adjusting brightness. This technique helps to increase the size and diversity of a dataset, improving model performance and reducing overfitting.
Data augmentation should generally be applied in all cases where the dataset is small or lacks diversity. It can be particularly beneficial when dealing with small datasets, imbalanced classes, or when the model is at risk of overfitting. However, if the dataset is already large and highly diverse, augmentation may offer diminishing returns.
No, data augmentation should only be applied to the training set. The validation and test sets must represent real, unseen data to accurately measure a model's performance. Modifying these sets with augmentations could lead to biased results.
Data augmentation can help address class imbalance by artificially increasing the size of the underrepresented classes. For example, you can augment the smaller classes more often, balancing the number of examples across all classes and improving the model's performance on those classes.
Encord is designed to integrate various data types, including electrical measurements from surgical devices and live video from endoscopy systems. This integration allows for comprehensive data analysis, enhancing the ability to label, combine, and derive insights that can benefit both patients and healthcare providers.
Encord streamlines the data curation process by helping users select the right data for annotation and integrating it into their models. Additionally, the platform supports model evaluation, ensuring that the performance of trained models can be effectively assessed and optimized.
Encord is equipped to enhance data pipelines by offering an integrated solution that automates data collection and preparation. This reduces the reliance on manual processes, enabling teams to scale their operations and efficiently trigger training jobs as data is ingested.
Encord facilitates a seamless transition from data preparation to model training by offering integrated workflows that cover everything from data ingestion to active learning. This ensures that clients can quickly iterate on their models and improve performance.
Encord provides a comprehensive suite of tools for data management and annotation, allowing users to curate and label data effectively. This ensures that high-quality data is available for training AI models, ultimately improving their accuracy and performance.
Encord offers advanced automation capabilities that streamline the data annotation process, reducing manual effort and increasing efficiency for users. This enables teams to manage their annotation pipelines more effectively and focus on higher-level tasks.
Encord offers features that integrate various annotation tools, allowing for seamless data management across platforms. This unification simplifies the workflow, reducing administrative burdens and improving efficiency in tracking and managing annotations.
Setting up data integrations in Encord involves planning essential items during the onboarding process. The customer success team will assist in establishing the necessary connections to ensure seamless data flow and usage within the Encord platform.
Yes, Encord has capabilities for data augmentation, which can enhance the quality and quantity of imaging data used in clinical studies. This feature is particularly useful for ongoing projects involving complex conditions like Alzheimer's disease.
Encord features a comprehensive editor interface for performing annotations and correcting data. This tool is integrated into the broader data pipeline, allowing users to streamline their annotation processes and improve data quality effectively.