The Full Guide to Video Annotation for Computer Vision

ML Lead at Encord
Discover how video annotation transforms raw footage into actionable data for cutting-edge computer vision projects. From self-driving cars to medical diagnostics, this guide covers techniques, tools, and best practices to streamline your annotation workflow and build smarter machine learning models. Dive in to learn how to turn complex data into efficient and accurate computer vision models.
The Computer vision market is poised for impressive growth, with its value anticipated to reach $25.80 billion in 2024. Over the next several years, the market is expected to expand at a robust compound annual growth rate (CAGR) of 10.5%, projecting a total market size of $46.96 billion by 2030. (Source: Statista)
Computer vision has numerous cool applications like self-driving cars, pose estimation and many others in the field of medical imaging which uses videos as their data. Hence, video annotation plays a crucial part in training computer vision models.
Annotating images is a relatively simple and straightforward process. Video data labeling on the other hand is an entirely different beast! It has an added layer of complexity but you can extract more information from it if you know what you are doing and use the right tools.
In this guide, we’ll start with understanding video annotation, its advantages and use cases. Then we’ll look at the fundamental elements of video annotation and how to annotate a video. We’ll then look at video annotation tools and discuss best practices to improve video annotation for your computer vision projects.
Video Labeling for Computer Vision Models
In order to train computer vision AI models, video data is annotated with labels or masks. This can be carried out manually or, in some cases with AI-assisted video labeling. Labels can be used for everything from simple object detection to identifying complex actions and emotions.
Video annotation tools help manage these large datasets while ensuring high accuracy and consistency in the process of labeling.
Video annotation vs. Image annotation
As one might think, video and image annotation are similar in many aspects. But there are considerable differences as well between the two. Let’s discuss the three major aspects:
Data
Compared to images, video has a more intricate data structure which is also the reason it can provide more information per unit of data.
For example, the image shown doesn’t provide any information on the direction of movement of the vehicles. A video on the other hand would provide not only the direction but provide information to estimate its speed compared to other objects in the image. Annotation tools allow you to add this extra information to your dataset to be used for training ML models.
Video data can also use data from previous frames to locate an object that might be partially obscured or contains occlusion. In an image, this information would be lost.
Annotation process
Comparing video annotation to image annotation, there is an additional level of difficulty. While labeling one must synchronize and keep track of objects in various states between frames. This process can be made quicker by automating it.
Accuracy
While labeling images, it is essential to use the same annotations for the same object throughout the dataset. This can be difficult and prone to error. Video on other hand provides continuity across frames, limiting the possibility of errors. In the process of annotation, tools can help you remember context throughout the video, which in turn helps in tracking an object across frames. This ensures more consistency and accuracy than image labeling, leading to greater accuracy in the machine learning model’s prediction.
Computer vision applications do rely on images to train machine learning. While in some use cases, like object detection or pixel-by-pixel segmentation, annotated images are preferred. But considering image annotation is a tedious and expensive process, if you are building the dataset from scratch, let’s look at some of the advantages of video annotation instead of image data collection and annotation.
Advantages of annotating video
Video annotation can be more time-consuming than image annotation. But with the right tool, it can provide added functionalities for efficient model building. Here are some of the functionalities that annotated videos provide:
Ease of data collection
As you know a few seconds of the video contains several individual images. Hence, a video of an entire scene contains enough data to build a robust model. The process of annotation also becomes easier as you do not need to annotate each and every frame. Labeling the first occurrence of the object and the last frame the object occurs is enough. The rest of the annotation of in-between frames can be interpolated.
Temporal context
Video data can provide more information in form motion which static images cannot help the ML models. For example, labeling a video can provide information about an occluded object. It provides the ML model with temporal context by helping the ML model understand the movement of objects and how it changes over time.
This helps the developer to improve network performance by implementing techniques like temporal filters and Kalman filters. The temporal filters help the ML models to filter out the misclassifications depending on the presence or absence (occlusion) of specific objects in adjacent frames. Kalman filters use the information from the adjacent frames to determine the most likely location of an object in the subsequent frames.
Practical functionality
Since the annotated videos provide fine-grained information for the ML models to work with, they lead to more accurate results. Also, they depict real-world scenarios more precisely than images and hence can be used to train more advanced ML models. So, video datasets are more practical in terms of functionality.
Video annotation use cases
Now that we understand the advantages of annotated video datasets, let’s briefly discuss how it helps in real-world applications of computer vision.
Autonomous vehicles
The ML models for autonomous vehicles solely rely on labeled videos to understand the surrounding. It’s mainly used in the identification of objects on the street and other vehicles around the car. It is also helpful in building collision braking systems in vehicles. These datasets are not just used in building autonomous vehicles, they can also be used to monitor driving in order to prevent accidents. For example, monitoring the driver’s condition or monitoring unsafe driving behavior to ensure road safety.
Pose estimation
Robust pose estimation has a wide range of applications like tracking body parts in gaming, augmented and virtual reality, human-computer interaction, etc. While building a robust ML model for pose estimation one can face a few challenges which arise due to the high variability of human visual appearance when using images. These could be due to viewing angle, lighting, background, different sizes of different body parts, etc. A precisely annotated video dataset, allows the ML model to identify the human in each frame and keep track of them and their motion in subsequent frames. This will in turn help in training the ML model to track human activities and estimate the poses.
Traffic surveillance
Cities around the world are adapting to rely on smart traffic management systems to improve traffic conditions. Given the growing population, smart management of traffic is becoming more and more necessary. Annotated videos can be used to build ML models for traffic surveillance. These systems can monitor accidents and quickly alert the authorities. It can also help in navigating the traffic out of congestion by routing the traffic into different routes.
Medical Imaging
Machine learning is making its way into the field of medical science. Many diagnoses rely on videos. In order to use this data for diagnosis through ML models, one needs to annotate. For example, in endoscopy, the doctors have to go through videos in order to detect abnormalities. This process can be fast-forwarded by annotating these videos and training ML models. ML models can run live detection of abnormalities and act as the doctor’s assistant. This will also ensure higher accuracy as there is a second method of filtration for the detection. For deeper insight into how video annotation helps doctors in the field of gastroenterology, take a look at our blog Pain Relief for Doctors Labeling Data.

In the field of medical diagnostics, high-precision annotations of medical images are crucial for building reliable machine learning models. In order to understand the importance of robust and effective medical image annotation and its use in the medical industry in detail, please read our blog Introduction to medical image labeling for machine learning.
Though the use cases discussed here mainly focus on the object detection and segmentation tasks in the field of computer vision, it is to be noted that use cases of video datasets are not limited to just these tasks.
While there are several benefits to annotating videos rather than images and many use cases of video datasets alone, the process is still laborious and difficult. The person responsible for annotating these videos must understand the use of the right tools and workflows.
What is the role of a video annotator?
The role of a video annotator is to add labels and tags to the video dataset that has been curated for the specific task. These labeled datasets are used for training the ML models. The process of adding labels to data is known as annotation and it helps the ML models in identifying specific objects or patterns in the dataset.
The best course of action if you are new to the process is to learn about video annotation techniques. This will help in understanding and using the ideal type of annotation for the specific task. Let’s first understand the different processes of annotating videos and then dive deeper into different methods to annotate a video.
Video annotation techniques
There are mainly two different methods one could annotate the videos:
- Single frame annotation
This is more of a traditional method of labeling. The video is separated or divided into distinct frames or images and labeled individually. This is chosen when the dataset contains videos with less dynamic object movement and is smaller than the conventional publicly available datasets. Otherwise, it is time consuming and expensive as the videos one has to annotate a huge amount of image data, given a large video dataset.
- Multiframe or stream annotation
In this method, the annotator labels the objects as video streams using data annotation tools, i.e the object and its coordinates have to be tracked frame-by-frame as the video plays. This method of video annotation is significantly quicker and more efficient, especially when there is a lot of data to process. The tagging of the objects is done with greater accuracy and consistency. With the growing use of video annotation tools, the multi-frame approach has grown more widespread.
The continuous frame method of video labeling tools now features to automate the process which makes it even easier and helps in maintaining continuity. This is how it’s done: Frame-by-frame machine learning algorithms can track objects and their positions automatically, preserving the continuity and flow of the information. The algorithms evaluate the pixels in the previous and next frames and forecast the motion of the pixels in the current frame. This information is enough for the machine learning algorithms to accurately detect a moving object that first appears at the beginning of the video before disappearing for a few frames and then reappearing later.
The task for which the dataset has been curated is essential to understand in order to pick the right annotation methods. For example, in human pose estimation, you need to use the keypoint method for labeling the joints of humans. Using a bounding box for it would not provide the ML model with enough data to identify each joint. So let’s learn more about different methods to annotate your videos!
Different methods to annotate
Bounding boxes
Bounding boxes are the most basic type of annotation. With a rectangular frame, you surround the object of interest. It can be used for objects for which some elements of the background will not interfere in the training and interpretation of the ML model. Bounding boxes are mainly useful in the task of object detention as they help in identifying the location and size of the object of interest in the video. For rectangular objects, they provide precise information. If the object of interest is of any other shape, then polygons should be preferred.
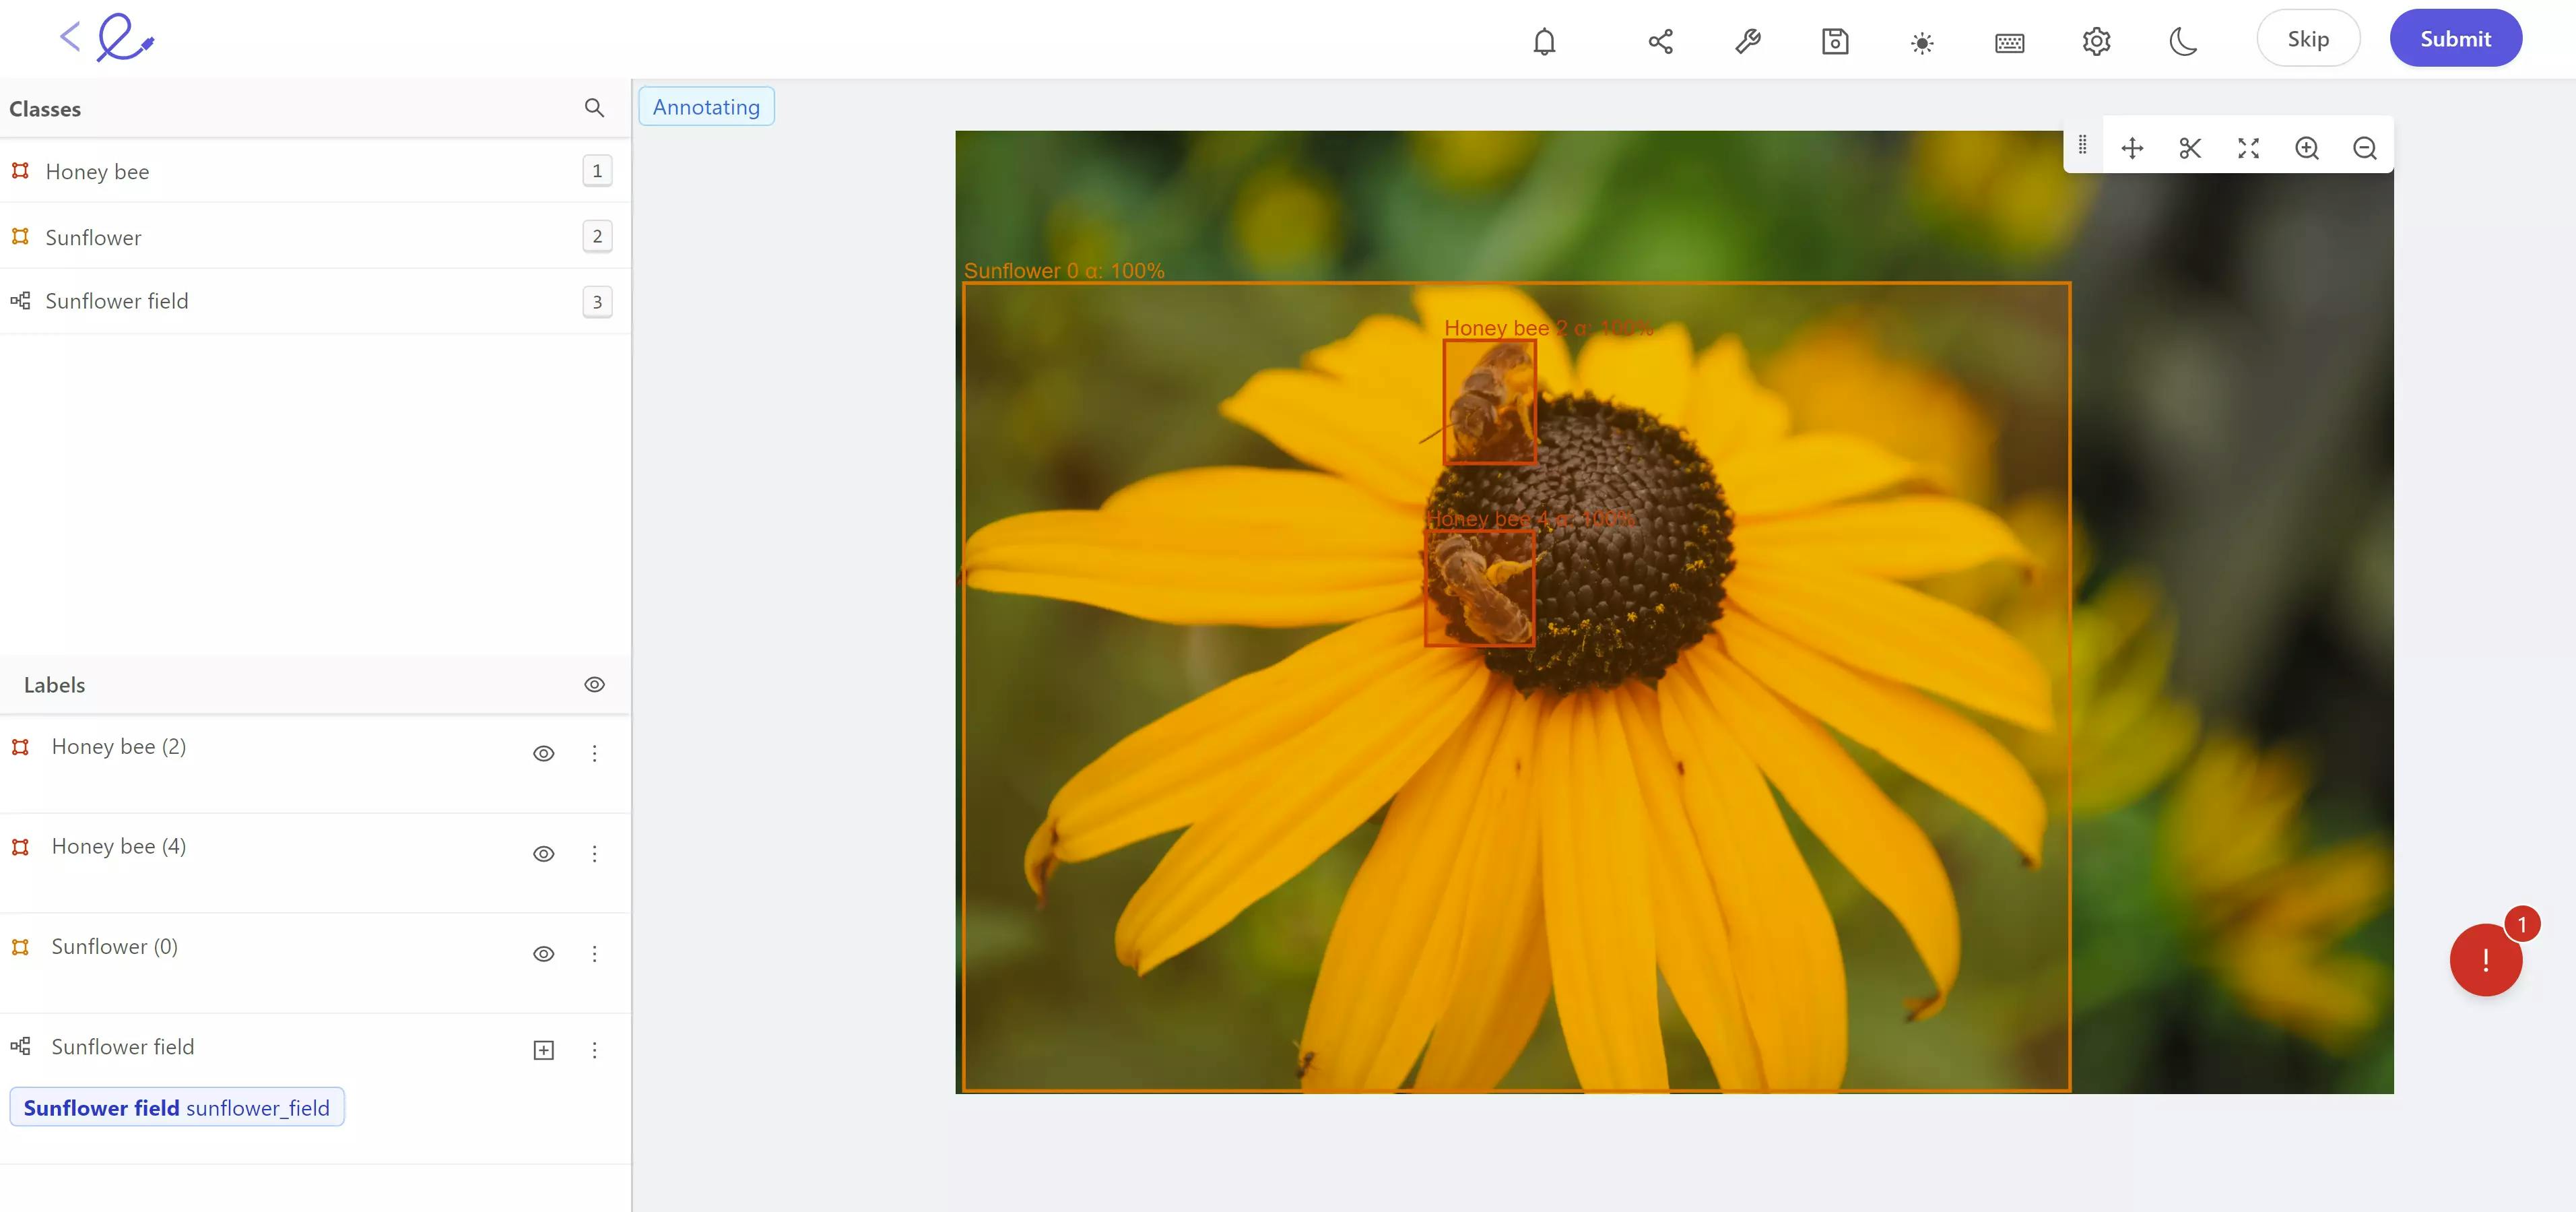
Annotating an image with bounding boxes in the Encord platform
Polygons
Polygons are used to annotate when the object of interest is of irregular shape. This can also be used when any element of background is not required.
This process of annotating through polygons can be tiresome for large datasets. But with automated segmentation features in the annotation tools, this can get easier.
Polylines
Polylines are quite essential in video datasets to label the objects which are static by nature but move from frame to frame. For example, in autonomous vehicle datasets, the roads are annotated using polylines.
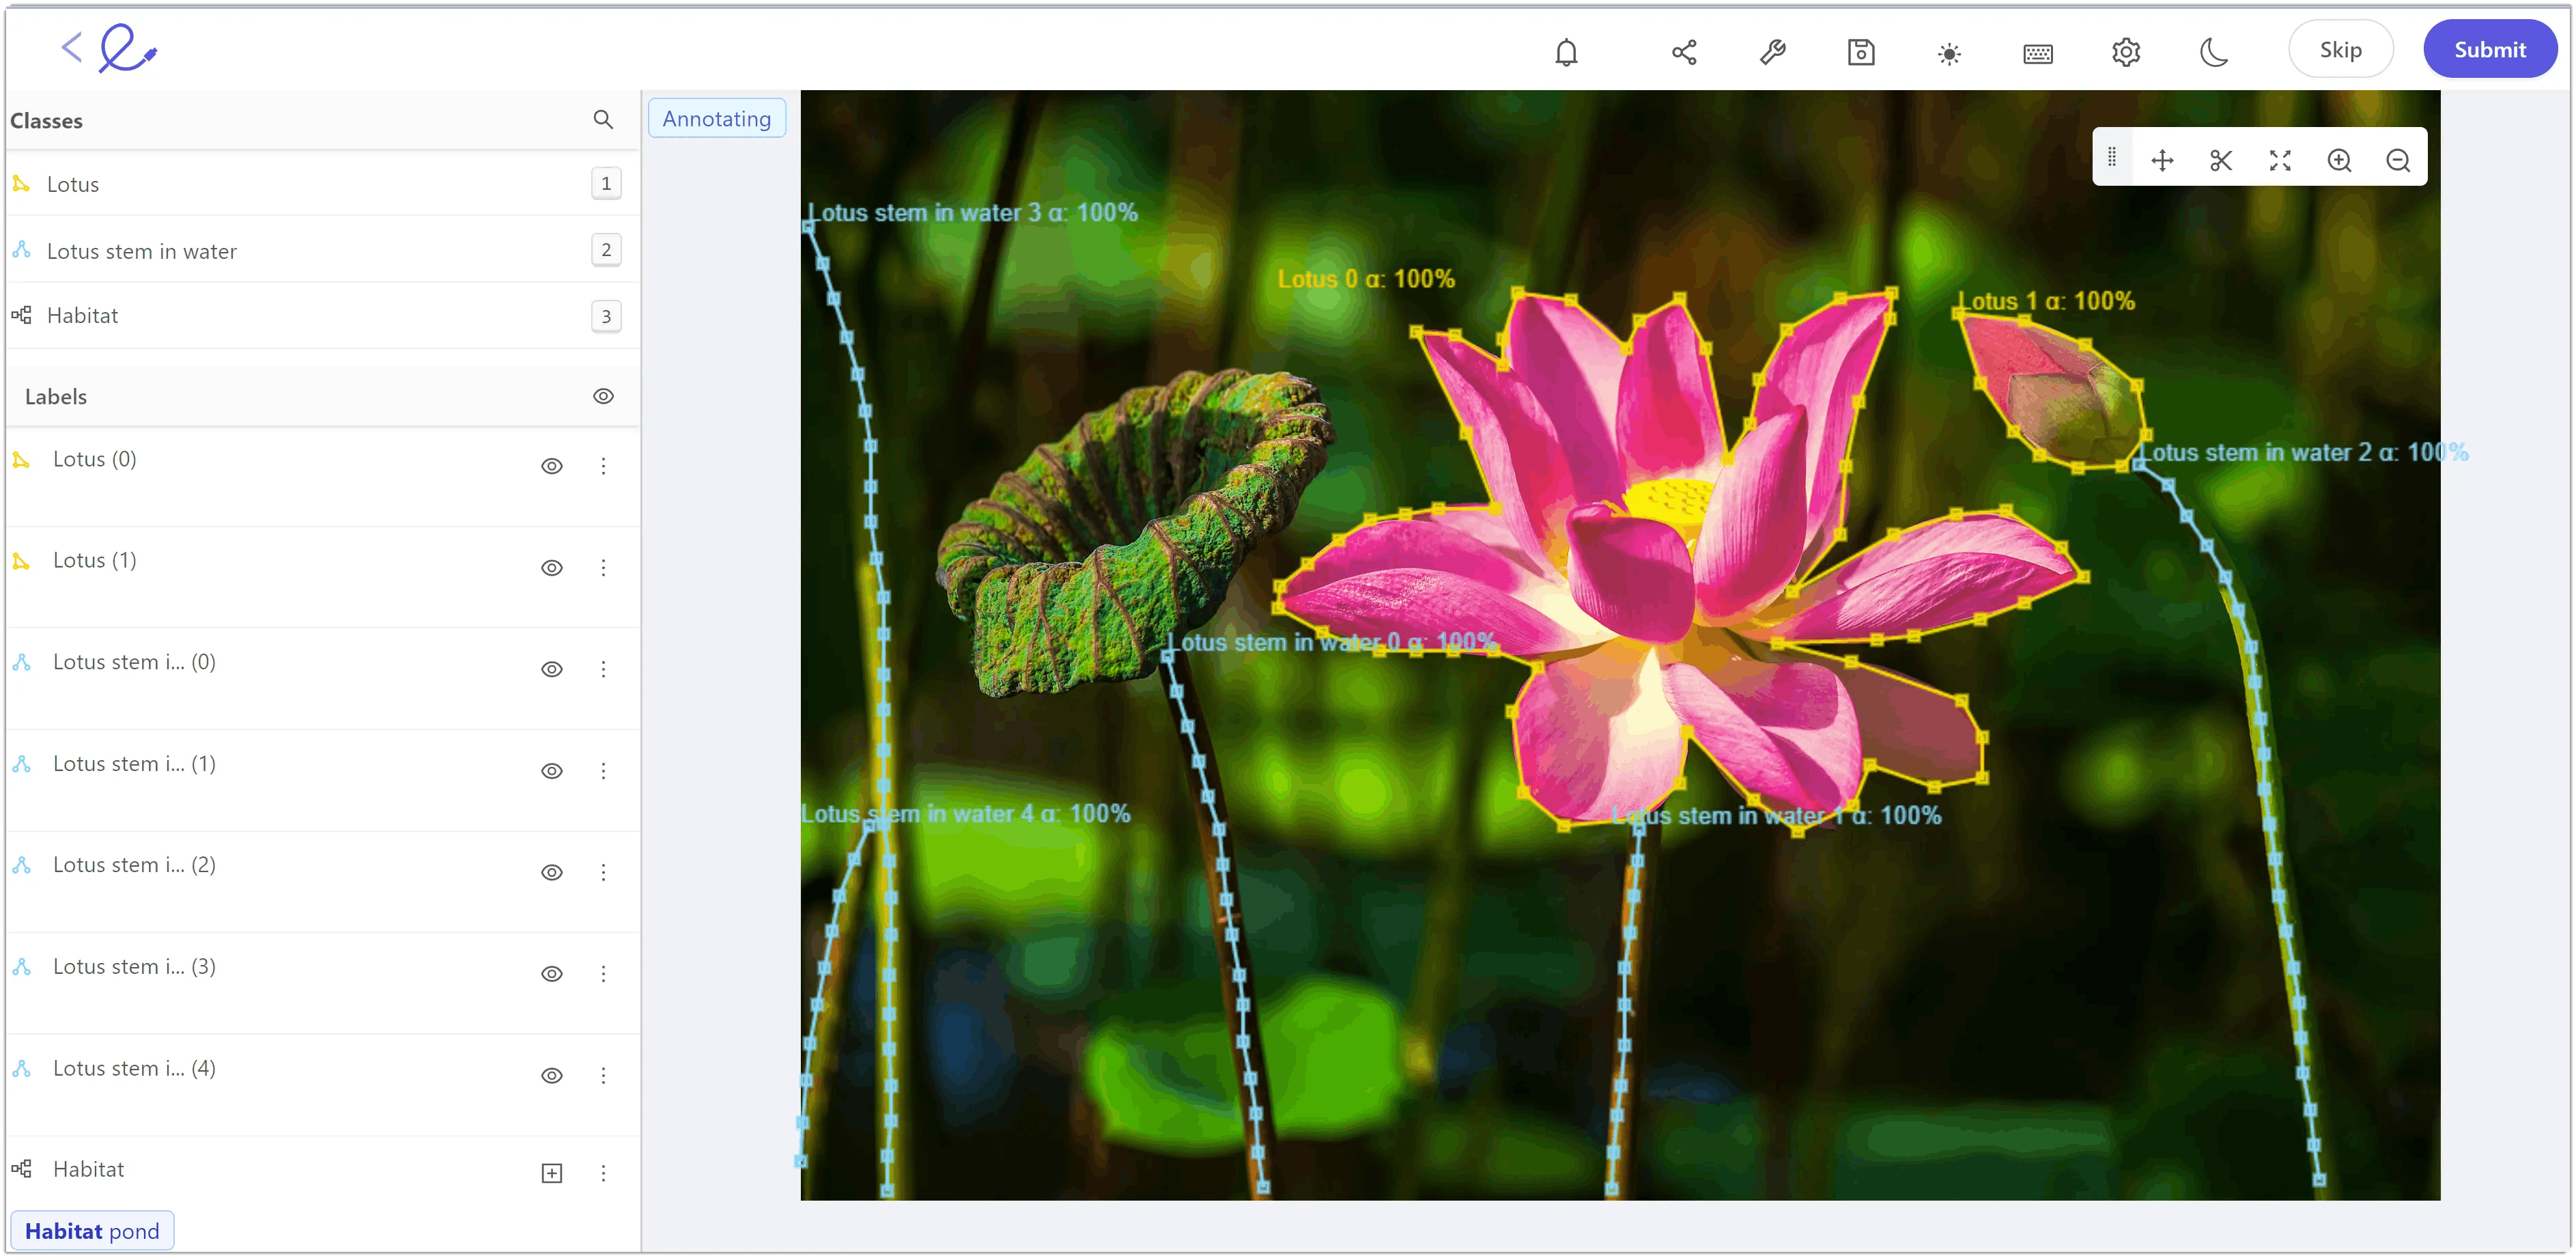
Polygon and polyline annotation in the Encord platform
Keypoints
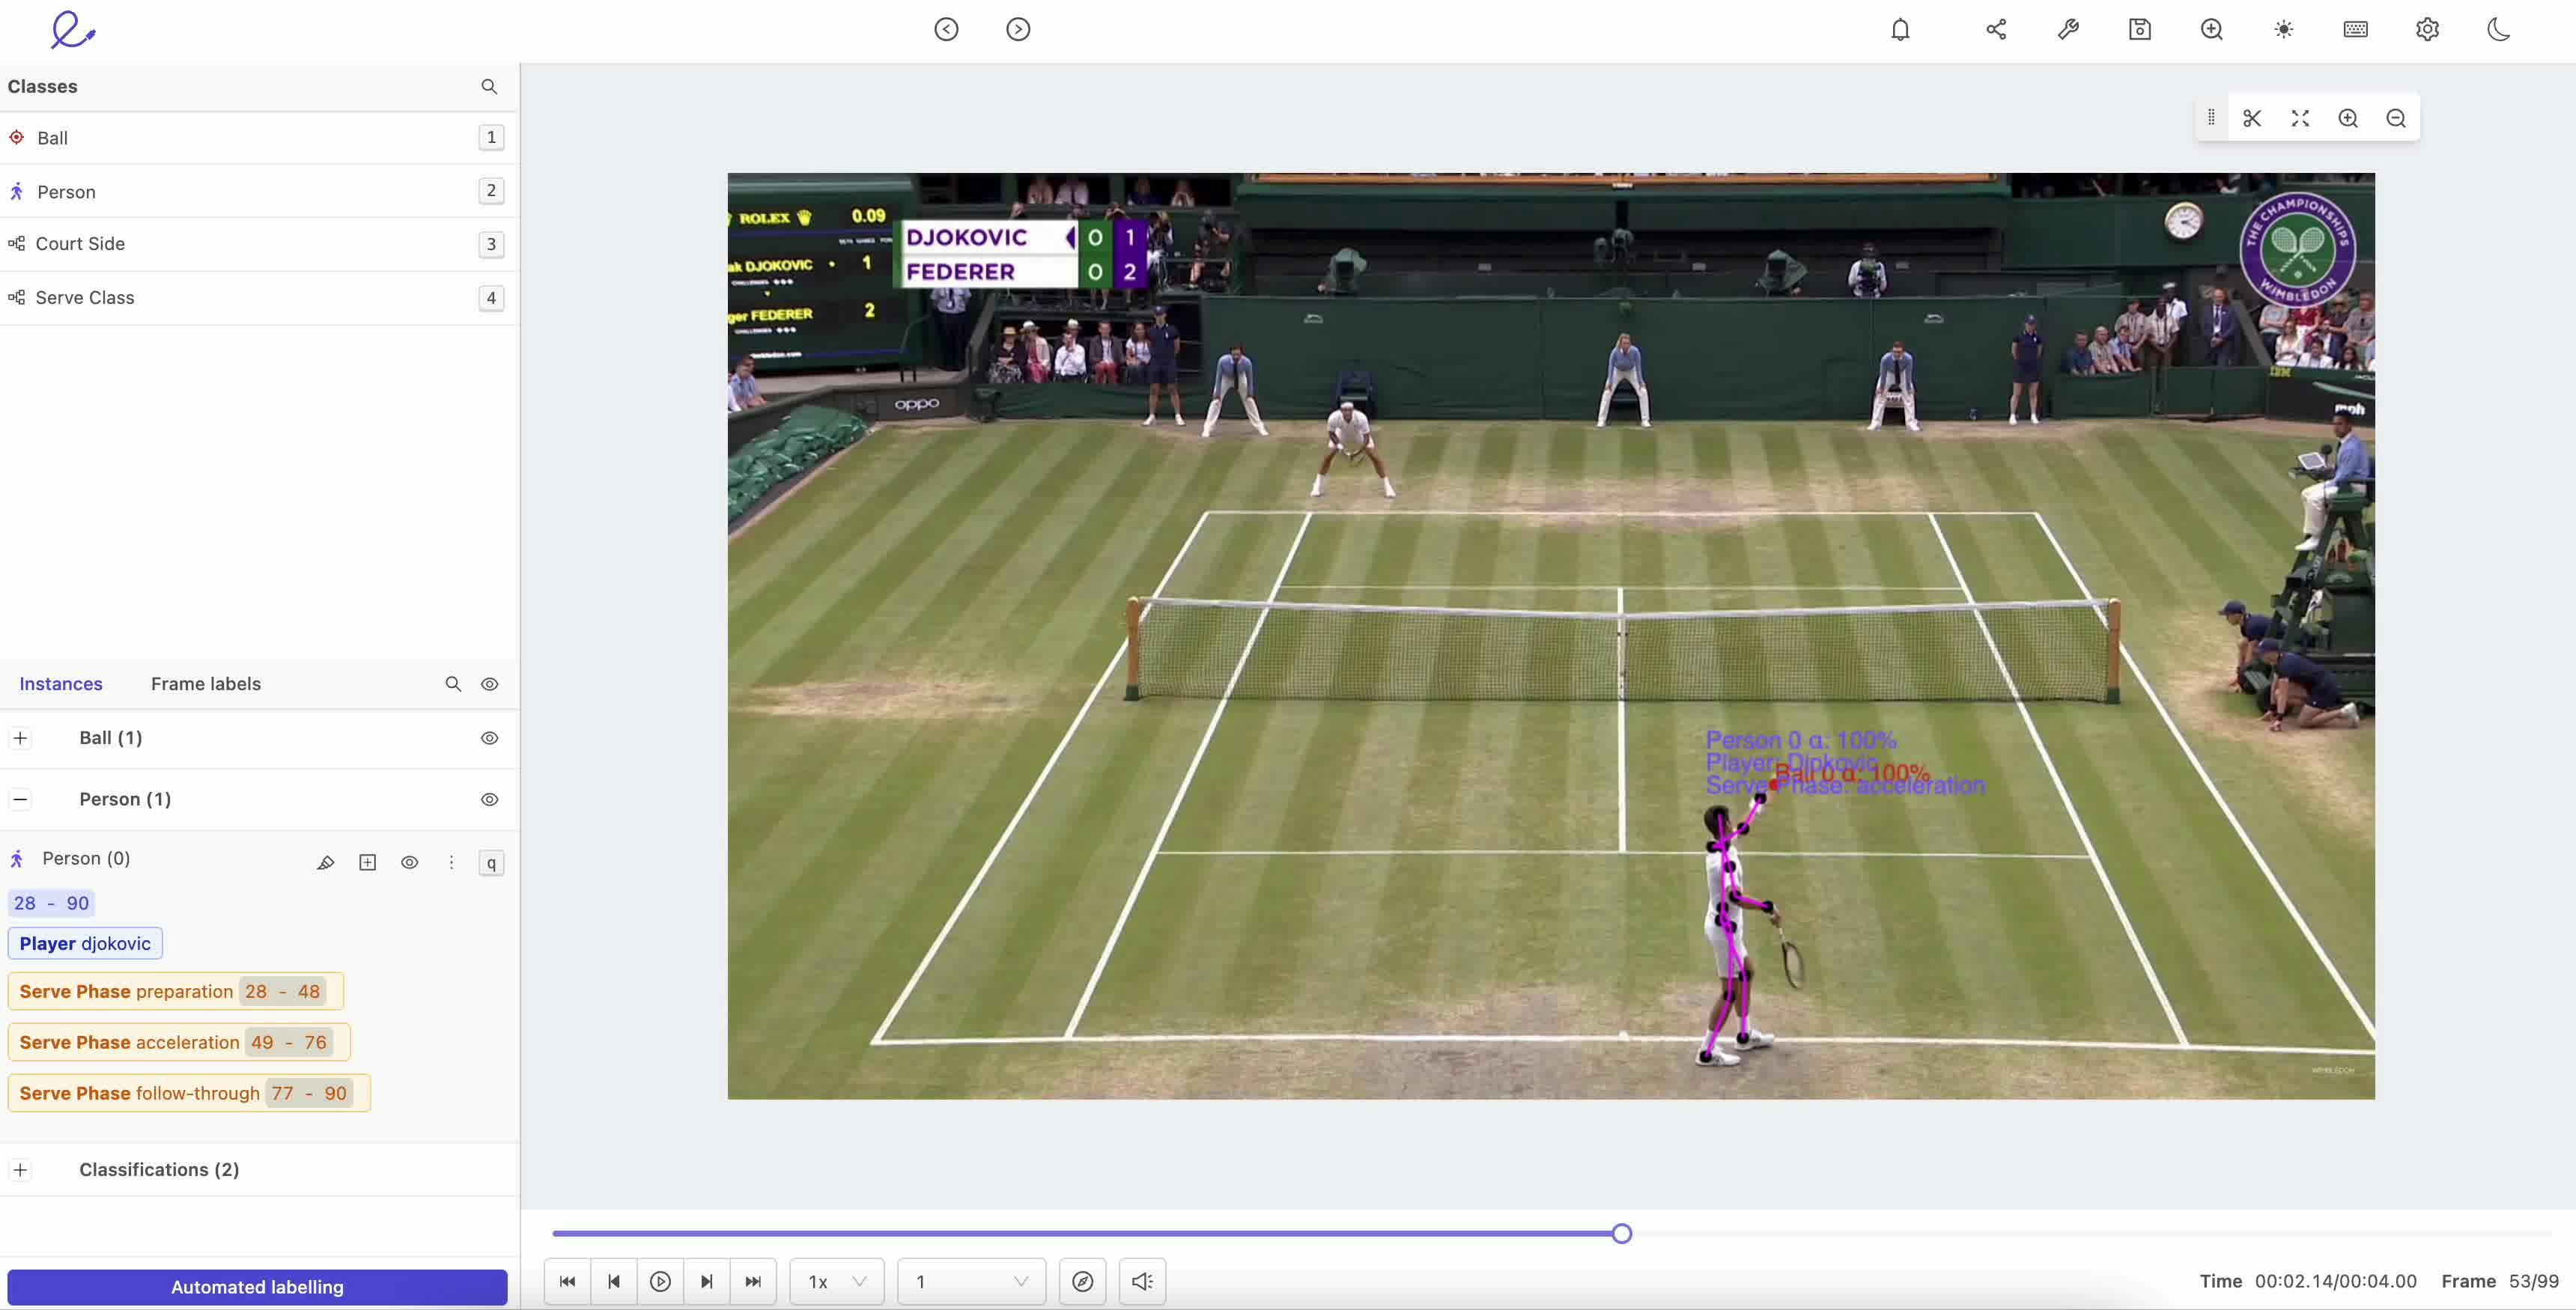
Keypoints are helpful for annotating objects of interest whose geometry is not essential for training the ML model. They outline or pinpoint the landmarks of the objects of interest. For example, in pose estimation, keypoints are used to label the landmarks, or the joints, of the human body. These keypoints here represent the human skeleton and can be used to train models to interpret or monitor the motion of humans in videos.
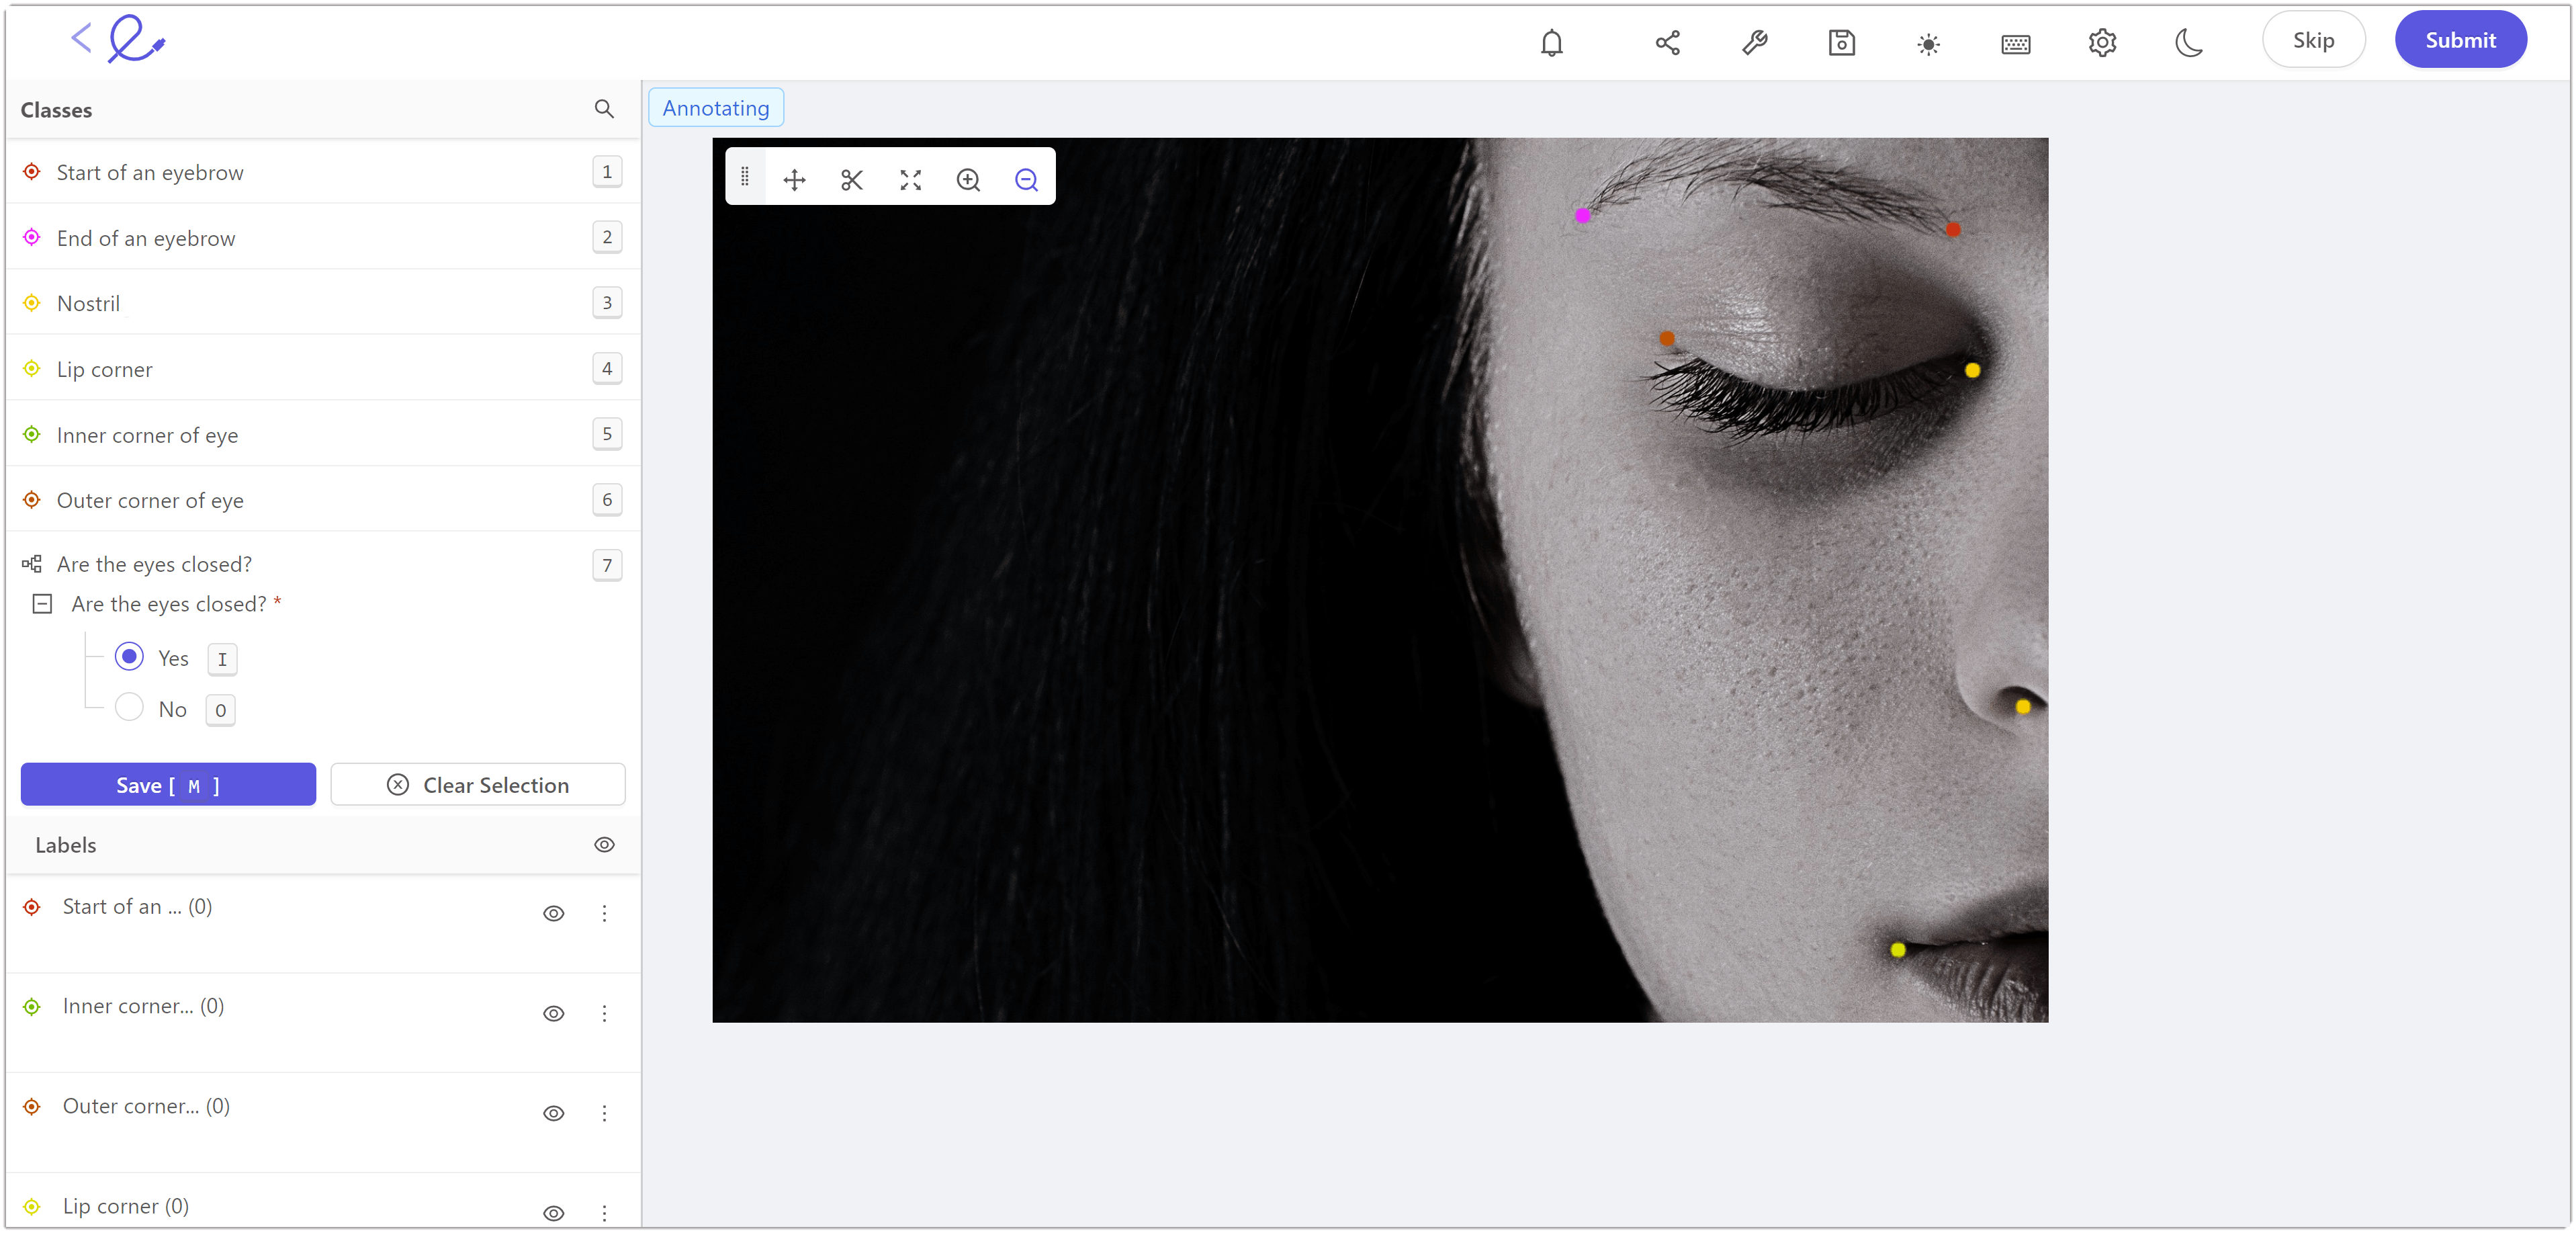
Keypoint annotation in Encord
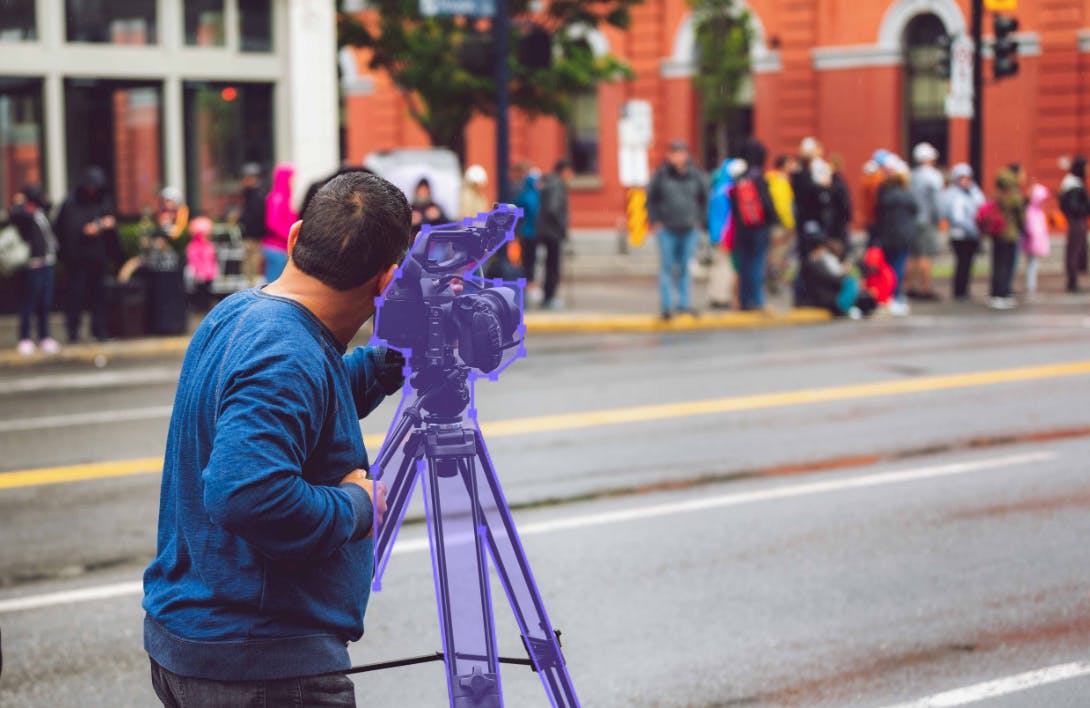
Primitives
They are also known as skeleton templates. Primitives are used for specialized annotations for template shapes like 3D cuboids, rotated bounding boxes, etc. It is particularly useful in labeling objects whose 3D structure is required from the video. Primitives are very helpful for annotating medical videos.
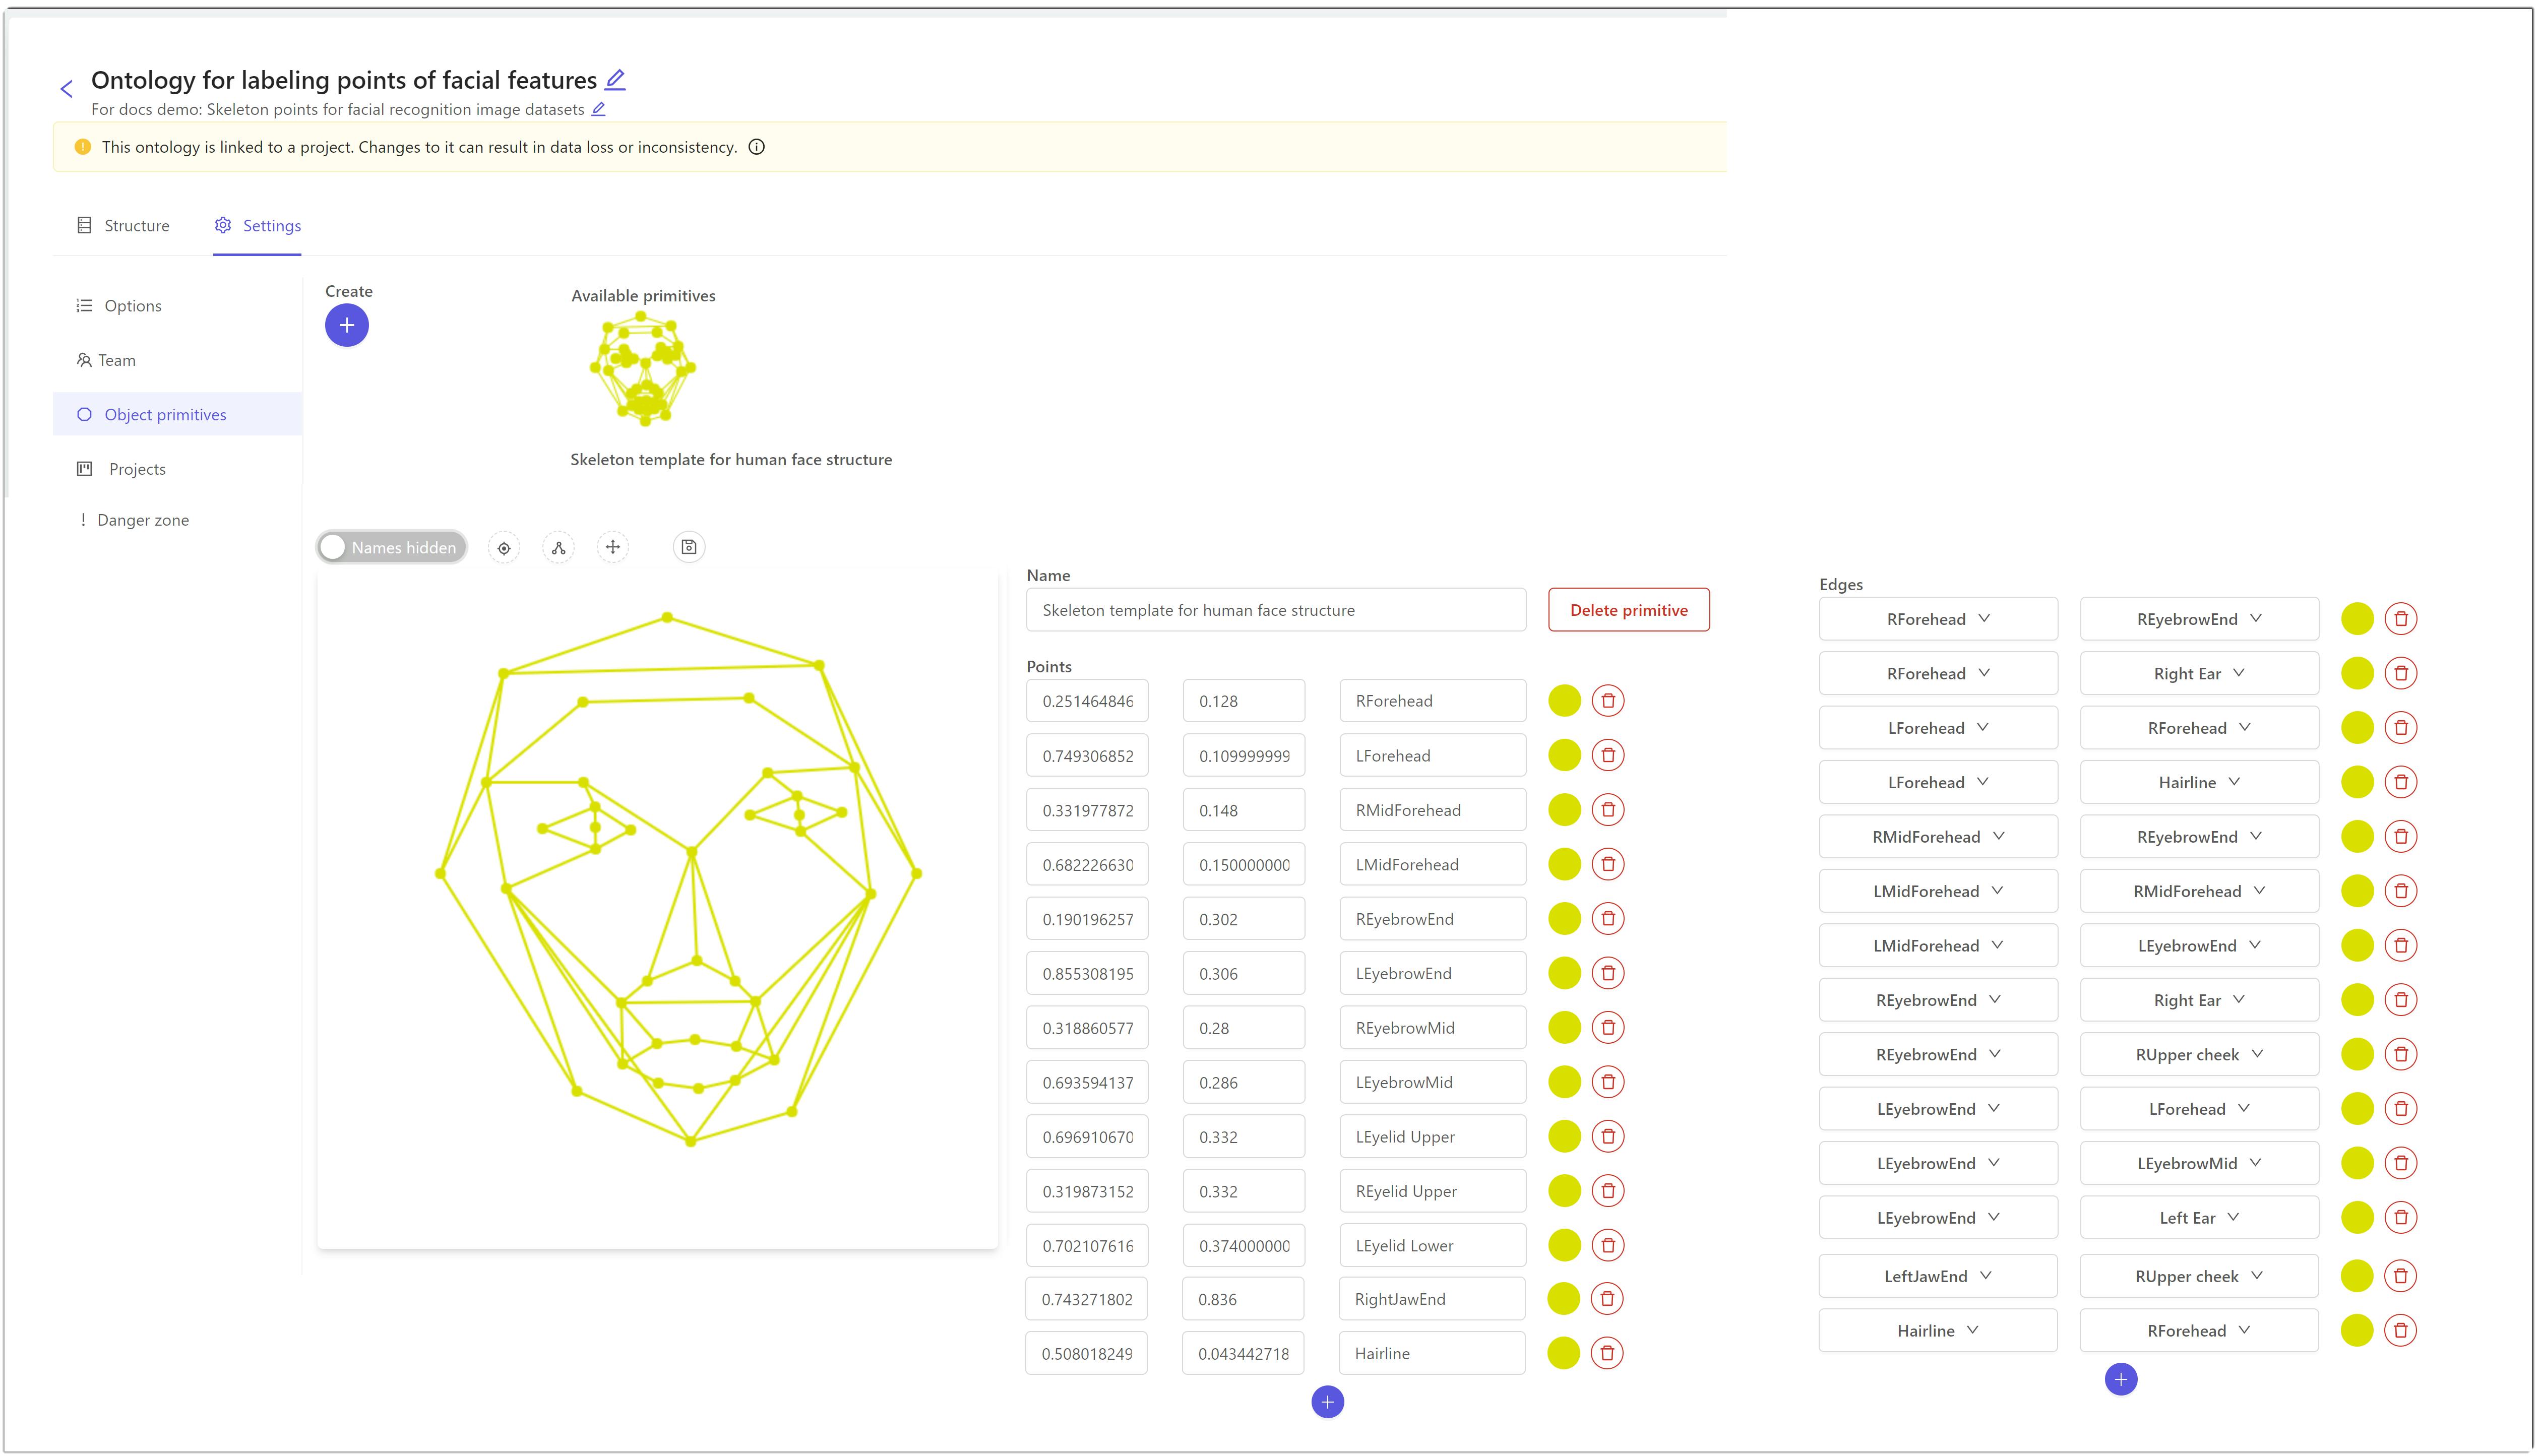
Creating a skeleton template (primitives) in Encord
Now that we have understood the fundamentals of video annotation, let us see how to annotate a video!
How to annotate a video for computer vision model training
Even though video annotations are efficient, labeling them can still be tedious for the annotator given the sheer amount of videos in datasets. That’s why designing the video annotation pipeline streamlines the task for the annotators. The pipeline should include the following components:
1. Define Objectives
Before starting the annotation process, it is essential to explicitly define the project’s goal. The curated dataset and the objective of the ML model should be accounted for before the start of the annotation process. This ensures that the annotation process supports the building of a robust ML model.
2. Choose the right tool or service
The type of dataset and the techniques you are going to use should be considered while choosing the video annotation tool. The tool should contain the following features for ease of annotation:
- Advanced video handling
- Easy-to-use annotation interface
- Dynamic and event-based classification
- Automated object tracking and interpolation
- Team and project management
To learn more about the features to look for in a video annotation tool, you can read the blog 5 features you need in a video annotation tool.
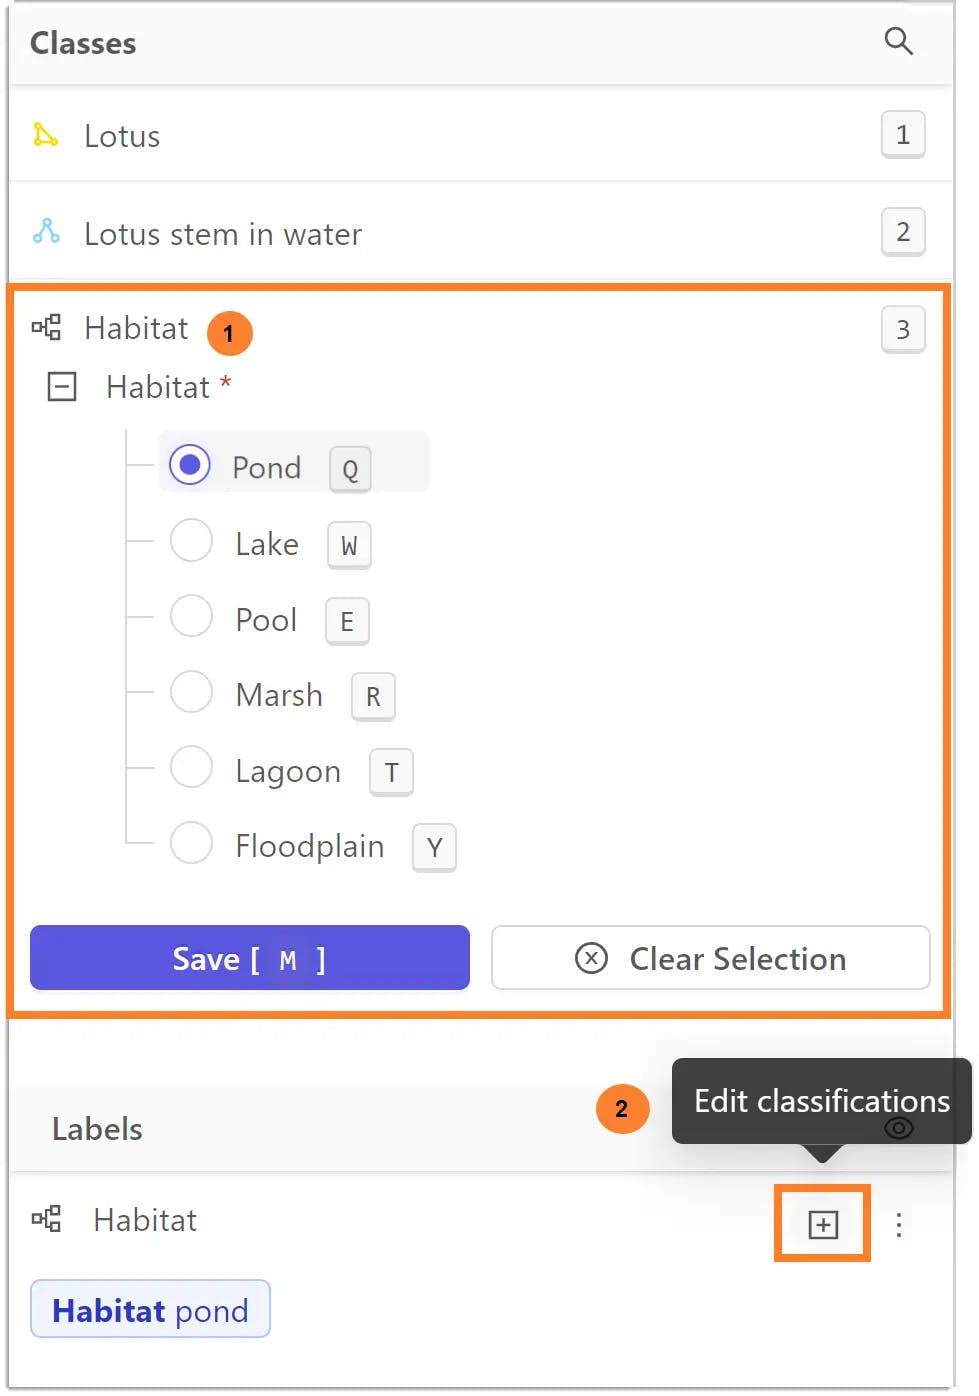
Label classifications in Encord
3. Review the annotation
The process of reviewing the annotations should be done from time to time to ensure that the dataset is labeled as per the requirement. While annotating large datasets, it is possible that a few things are annotated wrongly or missed. Reviewing the annotation at intervals would ensure it doesn’t happen. Annotation tools provide operation dashboards to incorporate this into your data pipeline. These pipelines can be automated as well for continuous and elastic data delivery at scale.
Video annotation tools
There are a number of video annotation platforms available, some of them are paid whereas some of them are free.
The paid annotation platforms are mainly used by machine learning and data operations teams who are working on commercial computer vision projects. In order to deal with large datasets and manage the whole ML lifecycle, you need additional support from all the tools you are using in your project. Here are some of the features Encord offers which aren’t found in free annotation tools:
- Powerful ontology features to support complex sub-classifications of your labels
- Render and annotate videos and image sequences of any length
- Support for all annotation types, boxes, polygons, polylines, keypoints and primitives.
- Customizable review and annotation pipelines to monitor the performance of your annotators and automatically allocate labeling tasks
- Ability to automate the annotation using Encord’s micro- model approach
There are also video annotation tools which are free. They are suitable for academics, ML enthusiasts, and students who are looking for solutions locally and have no intention of scaling the solution.
So, let’s look at a few open-source video annotation tools for labeling your data for computer vision and data science projects.
CVAT
CVAT is a free and open-sourced, web-based annotation tool for labeling data for computer vision. It supports primary tasks for supervised learning: object detection, classification and image segmentation.
Features
- Offers four basic annotation techniques: boxes, polygons, polylines and points
- Offers semi-automated annotation
- Supports interpolation of shapes between keyframes
- Web-based and collaborative
- Easy to deploy. Can be installed in a local network using Docker but is difficult to maintain as it scales
LabelMe is an online annotation tool for digital images. It is written in Python and uses Qt for its graphical interface.
Features
- Videos should be converted into images for the annotation
- Offers basic annotation techniques: polygon, rectangle, circle, line, and point
- Image flag annotation for classification and cleaning
- Annotations can only be saved in JSON format (supports VOC and COCO formats which are widely used for experimentation)
Diffgram is an open-sourced platform providing annotation, catalog and workflow services to create and maintain your ML model.
Features
- Offers fast video annotation with high resolution, high frame rate and multiple sequences with their interface
- Annotations can be automated
- Simplified human review pipelines to increase training data and project management efficiency
- Store the dataset virtually; unlimited storage for their enterprise product
- Easy ingest of the predicted data
- Offers automated error highlighting to ease the process of debugging and fixing issues.
Best practices for video annotation
In order to use your video datasets to train a robust and precise ML model, you have to ensure that the labels on the data are accurate. Choosing the right annotation technique is important and should not be overlooked. Other than this, there are a few things to consider while annotating video data.
So, how do you annotate effectively?
For those who want to train their computer vision models, here are some tips for video annotators.
Quality of the dataset
The quality of the dataset is crucial for any ML model building. The dataset curated should be cleaned before starting the annotation process. The low quality and duplicate data should be identified and removed so that it doesn’t affect your model training adversely.
If an annotation tool is being used then you have to ensure that it uses lossless frame compression so that the tool doesn’t degrade the quality of the dataset.
Using right labels
The annotators need to understand how the dataset is going to be used in the training of the ML model. If the project goal is object detection, then they need to be labeled using bounding boxes or the right annotation technique to get the coordinates of the object. If the goal is to classify objects, then class labels should be defined previously and then applied.
Organize the labels
It is significant to use customized label structures and use accurate labels and metadata to prevent the objects from being incorrectly classified after the manual annotation work is complete. So the label structures and the class it would belong to should be predefined.
Use of interpolation and keyframes
While annotating videos, you may come across objects that move predictably and don’t change shape throughout the video. In these cases, identifying the frames which contain important data which is enough is important. By identifying these keyframes, you do not need to label the whole video, but use them to interpolate and annotate. This speeds up the process while maintaining quality. So the sooner you find these keyframes in your video, the faster the annotation process.
User-friendly video annotation tool
In order to create precise annotations which will, later on, be used for training ML models, annotators require powerful user-friendly annotation tools. The right tool would make this process easier, cost-effective and more efficient. Annotation tools offer many features which can help to make the process simpler.
For example, tools offering auto-annotation features like auto segmentation. Annotating the segmentations in video datasets manually is more time consuming than labeling classes or drawing bounding boxes for object detection. The auto-segmentation feature allows the annotator to just draw an outline over the object of interest, and the tool automatically “snaps' to the contours of the object saving the annotator's time of annotator.
Similarly, there are many features a video annotation tool has which are built to help the annotators. While choosing the tool it is also essential to look at features such as automation, which align with the goal of the annotation and would make the process more efficient.
Key Takeaways: Video Annotation for Computer Vision
Computer vision systems are built around images and videos. So, if you are working on a computer vision project, it is essential to understand your data and how it has been created before building the model. I’ve discussed the difference between using images and videos, and the advantages of using videos for your ML model. Then we took a deeper dive into video annotation, and the techniques, and discussed briefly the tools available. Lastly, we looked at a few of the best practices for your video annotation.
If you’re looking for an easy to use video annotation tool that offers complex ontology structures and streamlined data management dashboards, get in touch to request a trial of Encord.
Frequently asked questions
Video annotation is the process of labeling video data to train machine learning models for computer vision tasks. It helps models identify objects, actions, and patterns in dynamic visual data. This is crucial for applications like autonomous vehicles, pose estimation, and medical imaging.
Rich Data: Videos offer more information per unit of data, including motion and temporal context.
Efficiency: Annotations in videos can be interpolated across frames, reducing manual work.
Practicality: Annotated videos depict real-world scenarios more accurately, improving model performance.
Autonomous Vehicles: Object detection, collision prevention, and traffic monitoring.
Pose Estimation: Tracking human movement for applications in gaming, AR/VR, and healthcare.
Traffic Surveillance: Smart city traffic management and accident monitoring.
Medical Imaging: Assisting in diagnostics, such as detecting abnormalities in endoscopy videos.
Annotated videos provide temporal and spatial data that improve the accuracy and reliability of computer vision models. By ensuring data is labeled correctly and consistently, video annotation enhances the model’s ability to interpret dynamic, real-world scenarios.
Encord provides a best-in-class video annotation platform that goes beyond simple annotation tools. It includes end-to-end data development features such as data curation, cleaning, and visualization capabilities. Additionally, Encord helps select the right images and videos for the annotation workflow and offers model evaluation tools to identify performance issues and edge cases.
Encord offers a range of annotation tools specifically designed for video analysis, including support for bounding boxes, which allow users to identify and track specific objects within video frames. This capability is crucial for applications such as cow monitoring, where detailed observations and records are necessary.
Encord offers user-friendly UI features that enhance video annotation processes, allowing users to scrub through videos more easily. This is particularly beneficial for leveraging context clues from videos in conjunction with time series data, ultimately streamlining the annotation workflow.
Encord is designed to work with long video series, enabling users to extract and label data over time. The platform facilitates the annotation of key frames and allows for the adjustment of labels as the video progresses, streamlining the labeling process for dynamic scenes.
Encord streamlines the annotation process by allowing users to divide video data into approximately two-second clips, which can then be annotated with relevant classes. This method helps focus on critical surgical events, such as suturing or other significant actions.
Encord provides guidance and resources for best practices in video encoding, ensuring users can effectively utilize the platform for their specific needs. For detailed inquiries, users are encouraged to connect with technical support for personalized assistance.
Encord understands the importance of data quality in sports annotation and provides flexible labeling options. Users can discuss specific requirements, such as video resolution and annotation density, to ensure that the output meets their quality standards.
Encord provides advanced capabilities for annotating videos, allowing users to efficiently mark specific cases over time. This feature is particularly valuable for sports analytics, where precise video annotation is crucial for performance evaluation.
Encord provides native video annotation capabilities that save time and improve accuracy. Users can play, pause, scrub through videos, and utilize features like zooming in and adjusting brightness, making the annotation process more efficient.
Encord supports native video annotations without the need for downsampling or frame-by-frame fragmentation. The platform allows for advanced features like object tracking across video frames, making it easier to manage complex video datasets.