Contents
Project Overview
Fusing OpenCV with Python to Solve Sudoku: A Winning Combination
Recognizing the Missing Digits
Grid Extraction to Decode Puzzle Structure
Breaking Sudoku Code with Algorithm
The Final Result: Puzzle Solved!
Key Takeaways
Encord Blog
A Guide to Building a Sudoku Solver CV Project
If you are a big fan of solving puzzles, you must have seen or played Sudoku at some point. Sudoku is one of the most beloved puzzle games worldwide. The game might appear as a simple puzzle of 9x9 boxes. However, it requires concentration and mental agility to complete. Additionally, the game might seem math-based, but you do not need to excel at mathematics to solve this puzzle game. Instead, Sudoku is a game of pattern recognition, and once you identify that, you have won!
To make things fun, how about involving technology in this game? With the Sudoku Solver Project, we aim to make puzzle-solving even more interesting, lively, and competitive. You might be wondering how. The star of this project is OpenCV. By involving OpenCV, we will turn your computer into a smart brain that can easily solve Sudoku.
Now, you might be thinking, “What is the tech behind it that would make your computer as smart as your brain in solving puzzles?” OpenCV is a library of various programming functions for computer vision tasks. Computer vision will give your device the ability to understand images. This is how your computer can decode and solve puzzle games like Sudoku. Equipped with OpenCV, computer vision can easily recognize lines, grids, numbers, boxes, etc. It will be possible for the device to detect and understand the patterns and solve them accordingly.
Do you find it intriguing? Learn more about how OpenCV can help transform your computer into a puzzle-solving genius.
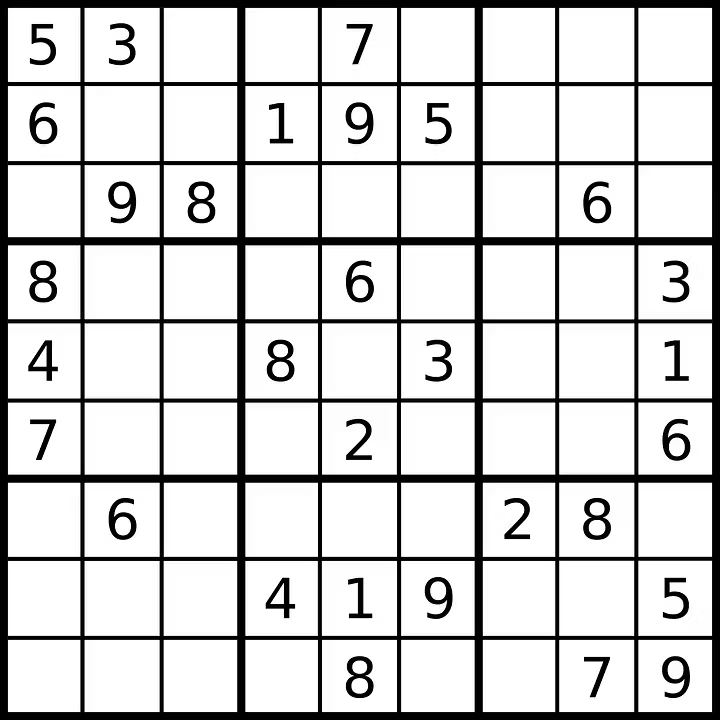
Here’s an outline of the article:
- Project Overview
- Fusing OpenCV with Python: A Winning Combination
- Image Processing
- Disclosing Puzzle Numbers with Digit Recognition
- Grid Extraction to Decode Puzzle Structure
- Breaking Sudoku Code with Algorithm
- The Final Result: Puzzle Solved!
- Key Takeaways
Project Overview
The main aim of this project is quite simple yet ambitious. We want to teach machines how to understand and solve puzzles like Sudoku. Since solving Sudoku requires high analytical capabilities, the aim is to equip computers with the power of computer vision. Computer vision allows them to see a puzzle like a human brain.
With computer vision, your computer will become a pro at solving puzzles alone, without human intervention. Now, that would be super cool, isn't it? That is what our project aims for.
Fusing OpenCV with Python to Solve Sudoku: A Winning Combination
We have integrated two powerful tools for our Sudoku Solver Project: Python and OpenCV. Python is one of the most popular and widely used programming languages worldwide, primarily because of its simplicity and readability. With Python, developers can design and build complex applications without writing overly complicated code.
OpenCV is a powerful library primarily used for real-time computer vision applications. It plays a pivotal role in model execution within Artificial Intelligence and Machine Learning. OpenCV provides a comprehensive set of tools that allow developers to train models to understand images and identify patterns, making it ideal for tasks like solving puzzles.
By leveraging the capabilities of OpenCV and Python, this project aims to equip your computer to solve Sudoku puzzles autonomously. Observing a computer tackle these puzzles with precision will be an intriguing experience.
Find the complete code for this project in this repository.
Image Processing
One of the crucial parts of solving the puzzle would be preparing the image through image processing. The system needs a proper and usable puzzle image. The image needs to be cleaned up well and prepared accordingly. After all, our system will use this image for the final puzzle-solving job. Now, that involves multiple steps.
Let’s find out about each step in detail below:
Image Loading
The first step would be loading the image. Here, OpenCV will play a crucial role. OpenCV is a massive open-source library designed for computer vision and image processing. It is highly useful for image loading and image processing. It processes images and videos to identify faces, objects, grids, etc.
Whenever the image needs to be loaded from a location specified by the path of the file, a particular function in OpenCV is required. With image loading, the image can be integrated into the program as either a grayscale or color image.
Image Resizing
Once the image gets loaded, we will ensure that the image is not too big for the computer. The image must be resized so our computer can process it better and faster. Image resizing matters in this regard, as the image has to be fitted to a format and size that allow the computer to process it efficiently.
Filter Application
We now need to apply a filter to enhance the clarity of the image. For this, we will use the Gaussian blur filter. This is a widely used technique in image processing and graphics software, where image blurring is done using the Gaussian function. It helps in reducing image noise and image detail.
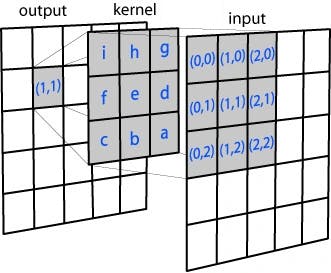
Applying Gaussian Blur distribution on a 3x3 kernel
Placing Everything Together in Place
Now that the puzzle image is processed, resized, and given a little touch-up with a filter, it is ready! All these steps are necessary to make the image properly visible and understandable to the computer’s vision. Once all this is completed, it is time to move on to the next big steps – digit recognition and grid extraction. While image processing is also an important step, it is the stepping stone to the showdown. These are two of the most crucial and indispensable procedures our computer needs to perform for Sudoku solving. Let’s dive into the details.
Recognizing the Missing Digits
This is the next big step in converting your system to a smart puzzle-solver to make it unmask the digits in the image. Sudoku is all about numbers and identifying the pattern that lies in them. Thus, your computer needs to find and figure out the numbers first to process the underlying patterns.
With the Sudoku Solver, we will enable computers to check out each cell and identify their number. Machine learning will play a vital role in this case. Let’s go find out more about digit recognition here:
Separating Individual Numbers
To recognize the digits, the computer must treat each cell separately. It will focus on one cell at a time to determine the number in each cell. For this, we will use a Digit Recognizer model.
Load the model from the file in the repository:
new_model = tf.keras.models.load_model('Digit_Recognizer.h5')Using Machine Learning
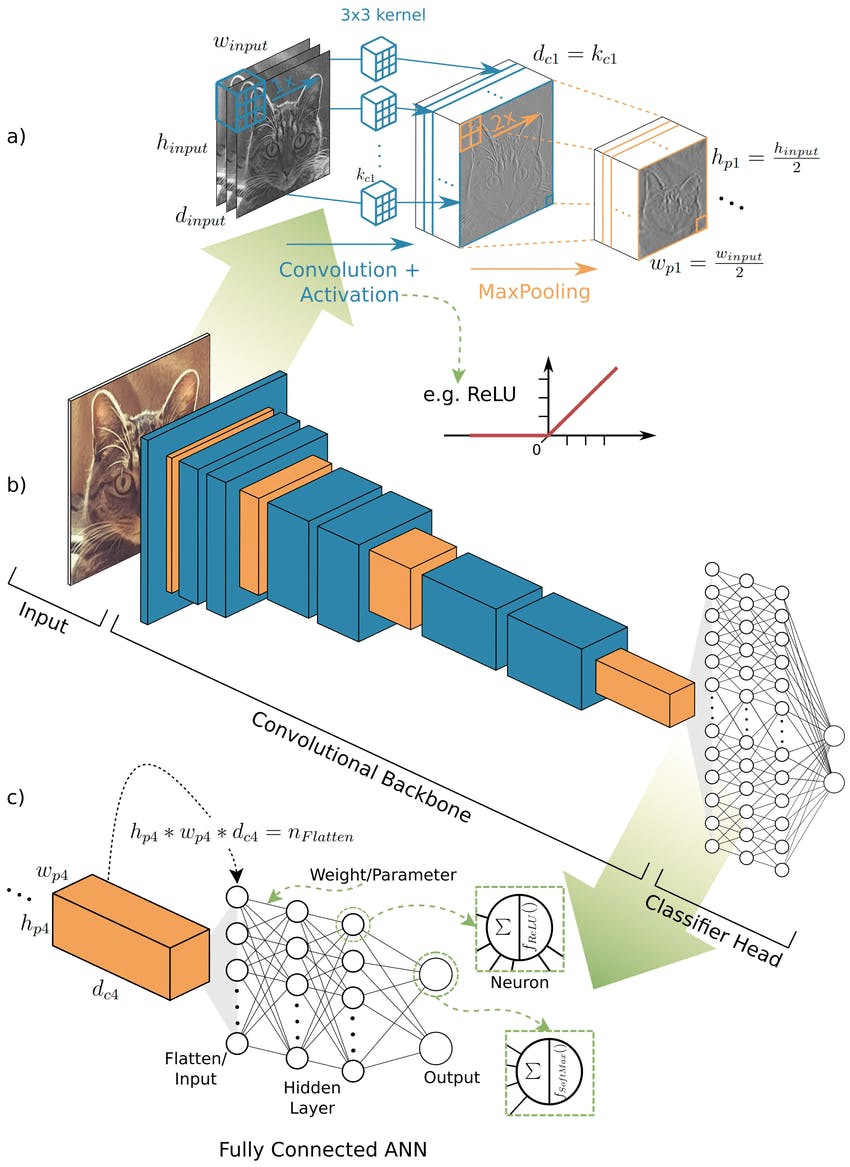
The actual task begins when the model has separated the number from each cell. It has to know the number in each cell. Convolutional Neural Network (CNN) is the algorithm you will use to train the model to identify numbers by itself.
The model inspects each cell and recognizes the numbers for the CNN module. This ML module then plays its magic of identifying what exactly the numbers are in the cell of the puzzle game. With image processing and a little ML module, your system turns into a smart puzzle-solver.
Grid Extraction to Decode Puzzle Structure
After image processing and digit detection, the model must detect the puzzle grid. Detecting and then extracting the puzzle grid of the game will help the model detect where each cell starts and ends. Understanding the grid will let the device decode the puzzle structure. Here are the steps through which the puzzle grid is detected and extracted:
Decoding the Grid Lines
The computer will begin by detecting the grid lines of the Sudoku puzzle. We will use a technique in OpenCV called contour detection to detect the grid lines in a Sudoku puzzle. Through contour detection, our model will learn to find the puzzle frames. With contour detection, we will detect the borders of any object and then localize those borders in an image.
Contour is something we get by joining all the points on the boundary of an object. OpenCV is useful for finding and drawing contours in an image. OpenCV has two straightforward functions for contour detection. These are “findContours()” and “drawContours()”.
There are multiple steps involved in contour detection. These steps include reading an image and converting it into a grayscale format, applying a binary threshold, detecting the contours using the function “findContours()” and drawing them on the original image. The largest contours in the Sudoku puzzle are located in the corners.
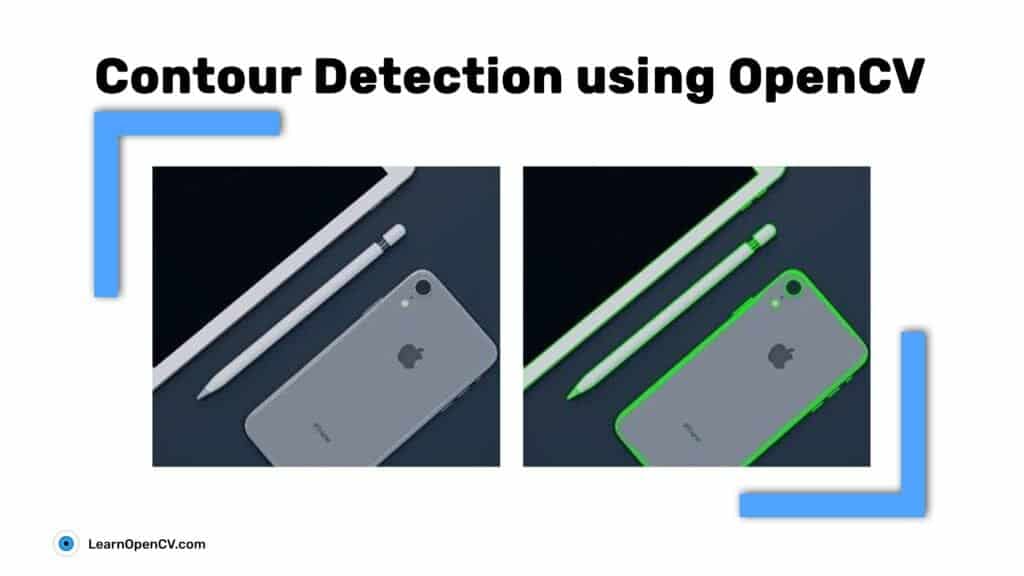
Contour detection with the help of OpenCV
Grid Cell Extracting
Now that the model learns where each grid line of the puzzle is, it has to extract each puzzle cell. This process is breaking the puzzle into different tiny bits. It will help the model facilitate a finer inspection of every cell of the game.
The code below will smoothly decide and extract the grid lines chronologically:
#To order predicted digit nested list
def display_predList(predList):
    predicted_digits = []
    for i in range(len(predList)):
        for j in range(len(predList)):
            predicted_digits.append(predList[j][i])

    return predicted_digits
#Parameters for Warping the image
margin = 10
case = 28 + 2*margin
perspective_size = 9*case
cap = cv2.VideoCapture(0)
flag = 0
ans = 0
while True:
ret, frame=cap.read()
p_frame = frame.copy()#Process the frame to find contour
gray=cv2.cvtColor(frame, cv2.COLOR_BGR2GRAY)
gray=cv2.GaussianBlur(gray, (5, 5), 0)
thresh=cv2.adaptiveThreshold(gray, 255, cv2.ADAPTIVE_THRESH_GAUSSIAN_C, cv2.THRESH_BINARY_INV, 9, 2)#Get all the contours in the frame
contours_, hierarchy = cv2.findContours(thresh, cv2.RETR_TREE, cv2.CHAIN_APPROX_SIMPLE)
contour = None
maxArea = 0#Find the largest contour(Sudoku Grid)
for c in contours_:
area = cv2.contourArea(c)
if area > 25000:
peri = cv2.arcLength(c, True)
polygon = cv2.approxPolyDP(c, 0.01*peri, True)
if area>maxArea and len(polygon)==4:
contour = polygon
maxArea = area#Draw the contour and extract Sudoku Grid
if contour is not None:
cv2.drawContours(frame, [contour], 0, (0, 255, 0), 2)
points = np.vstack(contour).squeeze()
points = sorted(points, key=operator.itemgetter(1))
if points[0][0]<points[1][0]:
if points[3][0]<points[2][0]:
pts1 = np.float32([points[0], points[1], points[3], points[2]])
else:
pts1 = np.float32([points[0], points[1], points[2], points[3]])
else:
if points[3][0]<points[2][0]:
pts1 = np.float32([points[1], points[0], points[3], points[2]])
else:
pts1 = np.float32([points[1], points[0], points[2], points[3]])
pts2 = np.float32([[0, 0], [perspective_size, 0], [0, perspective_size], [perspective_size, perspective_size]])
matrix = cv2.getPerspectiveTransform(pts1, pts2)
perspective_window =cv2.warpPerspective(p_frame, matrix, (perspective_size, perspective_size))
result = perspective_window.copy()#Process the extracted Sudoku Grid
p_window = cv2.cvtColor(perspective_window, cv2.COLOR_BGR2GRAY)
p_window = cv2.GaussianBlur(p_window, (5, 5), 0)
p_window = cv2.adaptiveThreshold(p_window, 255, cv2.ADAPTIVE_THRESH_GAUSSIAN_C, cv2.THRESH_BINARY_INV, 9, 2)
vertical_kernel = cv2.getStructuringElement(cv2.MORPH_RECT,(5,5))
p_window = cv2.morphologyEx(p_window, cv2.MORPH_CLOSE, vertical_kernel)
lines = cv2.HoughLinesP(p_window, 1, np.pi/180, 120, minLineLength=40, maxLineGap=10)
for line in lines:
x1, y1, x2, y2 = line[0]
cv2.line(perspective_window, (x1, y1), (x2, y2), (0, 255, 0), 2)#Invert the grid for digit recognition
invert = 255 - p_window
invert_window = invert.copy()
invert_window = invert_window /255
i = 0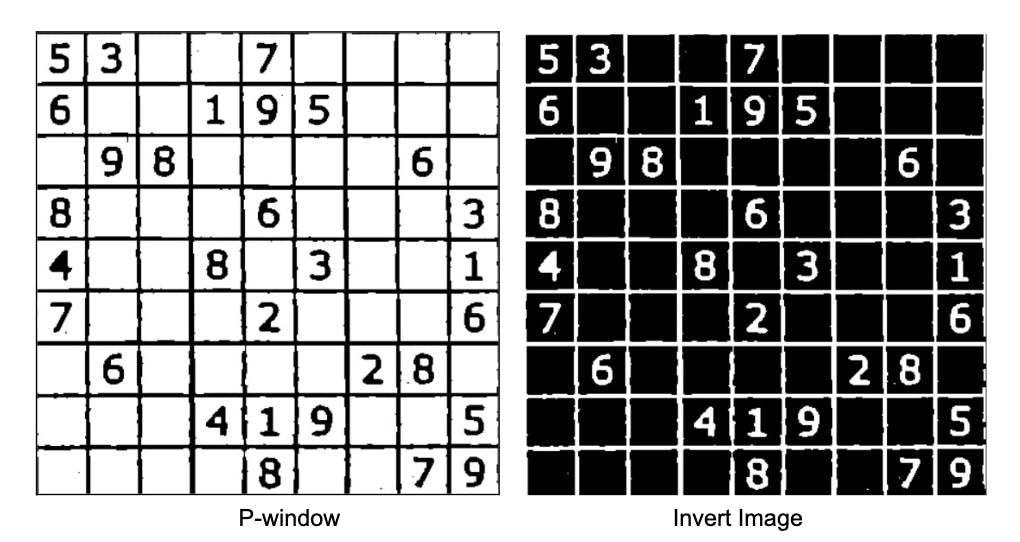
#Check if the answer has been already predicted or not
#If not predict the answer
#Else only get the cell regions
if flag != 1:
            predicted_digits = []
            pixels_sum = []
#To get individual cells
for y in range(9):
predicted_line = []
for x in range(9):
y2min = y*case+margin
y2max = (y+1)*case-margin
x2min = x*case+margin
x2max = (x+1)*case-margin#Obtained Cell image = invert_window[y2min:y2max, x2min:x2max]
#Process the cell to feed it into model
img = cv2.resize(image,(28,28))
                        img = img.reshape((1,28,28,1))
#Get sum of all the pixels in the cell
#If sum value is large it means the cell is blank
pixel_sum = np.sum(img)
pixels_sum.append(pixel_sum)#Predict the digit in the cell
pred = new_model.predict(img)
predicted_digit = pred.argmax()#For blank cells set predicted digit to 0
if pixel_sum > 775.0:
predicted_digit = 0#If we already have predicted result, display it on window
if flag == 1:
ans = 1
x_pos = int((x2min + x2max)/ 2)+10
y_pos = int((y2min + y2max)/ 2)-5
image = cv2.putText(result, str(pred_digits[i]), (y_pos, x_pos), cv2.FONT_HERSHEY_SIMPLEX,
1, (255, 0, 0), 2, cv2.LINE_AA)
i = i + 1#Get predicted digit list
if flag != 1:
predicted_digits.append(predicted_line)Placing Everything Together
Once grid line detection with contour detection and grid cell extraction are complete, the model is ready to dissect the entire puzzle. This step also requires image cropping and image warping. To crop the image, you need to know the dimensions of the Sudoku image. A Sudoku puzzle is usually square and comes with equal dimensions.
We need to measure and calculate the height and width to ensure that we do not accidentally crop out any part of the puzzle piece. After constructing the dimension, we will get the grid and then warp the image. The codes required for image warping are provided above. These processes let the device dissect into each puzzle cell. Let us now move on to the next vital step.
Breaking Sudoku Code with Algorithm
This is the final step. Our model would be unwrapping the Sudoku puzzle and solving it. The device has identified the numbers and detected the grid lines, and now it is time to unveil and crack the puzzle. For this final task, we will use an algorithm called backtracking. Backtracking is a handy tool used for solving constraint satisfaction problems such as puzzle solving, Sudoku, crosswords, verbal mathematics and more. With backtracking, we will make the final move to solve the Sudoku puzzle.
Implementing the Backtracking Algorithm
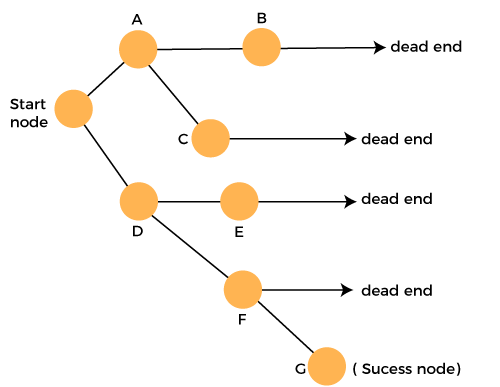
With backtracking, our model will be solving the Sudoku puzzle. Backtracking algorithm searches every possible combination to find the solution to a computational problem. The system will test every cell to find the one that fits. Backtracking is a systematic, algorithmic approach that explores possible solutions by making choices and recursively exploring them until a solution is found or deemed impossible.
It begins with an initial choice and proceeds step by step, backtracking or undoing choices and trying alternatives whenever it encounters an invalid or unsatisfactory solution path. This method is particularly effective for solving puzzles with complex and branching solution spaces, such as Sudoku, the Eight-Puzzle, or the N-Queens problem, where constraints or rules must be satisfied and an exhaustive search is necessary to find the correct solution. Backtracking ensures that all possibilities are explored while minimizing memory usage and providing a deterministic way to find solutions.
Applying the Sudoku Rules
Sudoku comes with unique rules, like any other puzzle game. The model needs to follow these rules while solving the game. It will place the numbers in a cell only after ensuring it abides by the rules of Sudoku.
You can now observe the model's meticulous process as it navigates through each cell, methodically unraveling the puzzle. By amalgamating all the steps and techniques previously outlined, the model actively engages in the quest for a solution. It diligently applies the rules of Sudoku, emulating the problem-solving strategies of the human brain in its relentless pursuit of resolving the puzzle.
The Final Result: Puzzle Solved!
When equipped with computer vision and the below code, our model becomes nothing less than a brilliant puzzle-solving champion, and when it finally solves the puzzle, you will be amazed at its accuracy and efficiency.
Below is the complete code for getting the final Sudoku result. Also, find it in this repository.
#Get solved Sudoku
ans = solveSudoku(predicted_digits)
        if ans==True:
            flag = 1
            pred_digits = display_predList(predicted_digits)
To display the final result of the puzzle, use:
#Display the final result
if ans == 1:
                cv2.imshow("Result", result)
                frame = cv2.warpPerspective(result, matrix, (perspective_size, perspective_size), flags=cv2.WARP_INVERSE_MAP)

        cv2.imshow("frame", frame)
        cv2.imshow('P-Window', p_window)
        cv2.imshow('Invert', invert)

    cv2.imshow("frame", frame)

    key=cv2.waitKey(1)&0xFF
    if key==ord('q'):
        break

cap.release()
cv2.destroyAllWindows()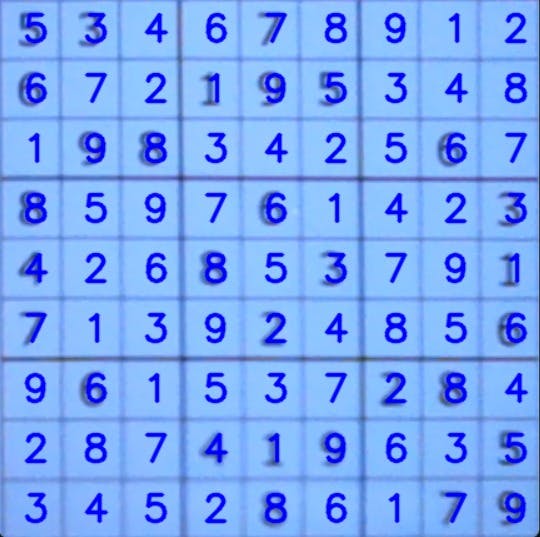
Computer vision actually goes beyond just solving Sudoku. It can solve multiple real-world problems and play various games. Computer vision is a great option to find solutions to many issues. OpenCV, Python, and some Machine Learning can be a winning combination for allowing computers to solve puzzles like human brains.
The Sudoku Solver CV Project is not just about allowing computers to solve puzzles like humans. It is about the sheer thrill, joy, and excitement of blending technology with the fantastic capabilities of the human brain to achieve real-world solutions.
Key Takeaways
Here are the major points that we find here:
- You can turn your computer into a puzzle-solving genius just like a human mind with the Sudoku Solver CV Project.
- The Sudoku Solver CV Project uses OpenCV, Machine Learning and backtracking algorithms to solve Sudoku puzzles faster and more efficiently.
- There are three main steps involved in making a computer a Sudoku-solving wizard. These include image loading, resizing and processing, digit recognition, and grid cell extraction.
- OpenCV plays a crucial role in image loading, resizing, and processing.
- Convolutional Neural Network, a Machine Learning algorithm, is crucial for digit recognition. It teaches the computer to detect a digit in any cell without human intervention.
- Contour Detection is a significant method used in grid cell detection. This technique allows the system to find the borders of any image. This technique is essential to understanding the borderline of the grid and is crucial for extracting grid cells.
- Backtracking is a practical algorithm necessary to solve the puzzle because it systematically explores solution spaces while respecting constraints, making it suitable for a wide range of complex problems.
Explore our products
