How to annotate video for machine learning: A Step-by-Step workflow

Head of Forward Deployed Engineering at Encord
TL;DR: Video annotation for ML requires a workflow built around time, not just labels: define a taxonomy mapped to your model architecture, track objects consistently through occlusion, run both frame-level and sequence-level QA, and split train/validation/test at the video level to avoid temporal leakage that silently inflates validation accuracy.
Video annotation for machine learning is the process of labeling objects, actions, and events across video frames so a model can learn to detect, track, and reason about them over time.
This guide walks Machine Learning and data science teams through the full workflow on how to annotate video for machine learning, from defining a t axonomy to loading labeled data into a training pipeline, with the steps most guides skip.
Step 1: Define your annotation task and taxonomy
Before anyone opens an annotation tool, decide what the model needs to learn and how that maps to a label set.
Map label classes to your model architecture and downstream task:
A detection model needs class labels tied to bounding boxes. A tracking model needs the same classes plus persistent object IDs across frames. A segmentation model needs pixel-accurate masks. Get this wrong at the taxonomy stage and you end up re-labeling the whole dataset once the model architecture is locked in, which is a more expensive mistake than it sounds like on paper.
Choose the annotation type per task.
- Bounding boxes for object detection where a rectangular region is enough signal
- Polygons for irregular shapes where a box would include too much background
- Keypoints for pose estimation or joint tracking, where you need specific points rather than a region
- Segmentation masks for pixel-level tasks like scene parsing or medical video, where boundary precision drives model performance
Nested ontologies matter more in video than in image labeling, because you're often tracking attribute changes over time (a vehicle that's "parked" and then "moving") rather than a single static state. Building that hierarchy into the taxonomy from the start avoids retrofitting temporal attributes later.

Step 2: Prepare and ingest your raw video footage
Raw footage rarely arrives in a state that's ready to label.
Format, resolution, and frame rate considerations:
Annotation tools vary in which containers and codecs they support natively (MP4, AVI, MOV, WebM are the common ones). Frame rate matters more than people expect: a 30fps clip and a 60fps clip of the same event produce very different numbers of frames to label, and mismatched frame rates across a dataset can quietly break temporal consistency during training if you're not tracking it.
Splitting long footage into manageable segments:
Hour-long surveillance or industrial footage is rarely useful as a single annotation unit. Most teams split by scene change, by fixed time windows, or by event boundaries (an object entering and leaving frame).
The tradeoff: split too aggressively and you lose the temporal context that makes video annotation valuable in the first place; don't split enough and reviewers lose track of what they're looking at three hours into a shift.
A video-native annotation platform avoids one of the more common failure points here: frame-splitting, where a tool decodes video into individual image files before labeling. That approach breaks temporal continuity and inflates storage.
Encord's video annotation renders footage natively rather than splitting it into frames, which preserves temporal context and cuts storage overhead substantially compared to frame-based approaches.
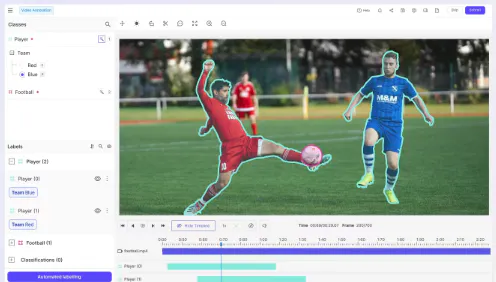
Video Annotation with Encord Video
Step 3: Select and configure your annotation tool
Evaluation criteria: automation support, scalability, format compatibility:
The gap between annotation tools shows up fastest on video. Look for native object tracking (not just per-frame labeling with manual continuity), model-assisted labeling that can pre-populate likely labels for review rather than replace review entirely, and support for the specific formats your pipeline already uses.
Setting up workspace access and reviewer roles:
Video annotation is rarely a solo task at scale. Configure role-based access so annotators, reviewers, and ML engineers have distinct permissions, and set up workflow stages (label, review, and where needed, a second review pass) before anyone starts labeling, not after the first batch comes back with quality issues.
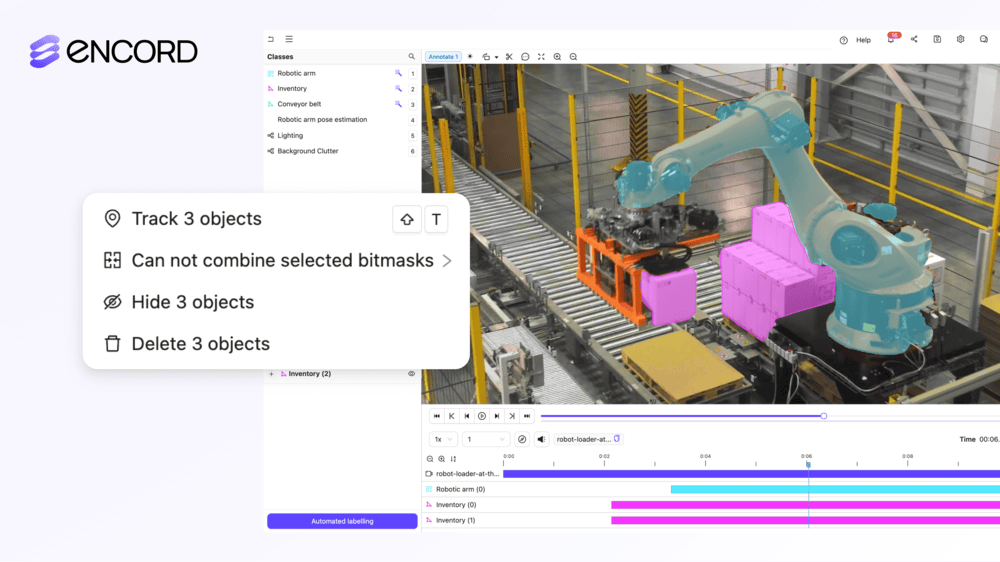
Step 4: Label keyframes and apply interpolation
Setting keyframe intervals based on object motion:
A slow-moving object might only need a keyframe every 10-15 frames, with interpolation filling the gap. A fast-moving or erratically moving object needs tighter keyframe spacing, because interpolation assumes roughly linear motion between the frames you've explicitly labeled.
When to trust auto-interpolation vs. manual correction:
This is the step most video annotation guides gloss over, and it's where labeling quality actually gets won or lost. Auto-interpolation works well for objects moving predictably in a straight line or a smooth curve. It breaks down in a few predictable situations:
- Sudden direction changes (a pedestrian stopping and reversing)
- Rapid scale changes (an object moving quickly toward or away from the camera)
- Deformable objects where the bounding shape itself changes, not just its position
The practical rule: treat interpolated frames as a first draft, not a final label. Spot-check a sample of interpolated frames per sequence, and set an explicit threshold (for example, motion exceeding a set pixel-per-frame delta) below which auto-interpolation is trusted and above which every frame gets a manual check. Teams that skip this step tend to discover the problem downstream, when the model has learned a slightly-wrong trajectory pattern baked in by dozens of unreviewed interpolated frames.
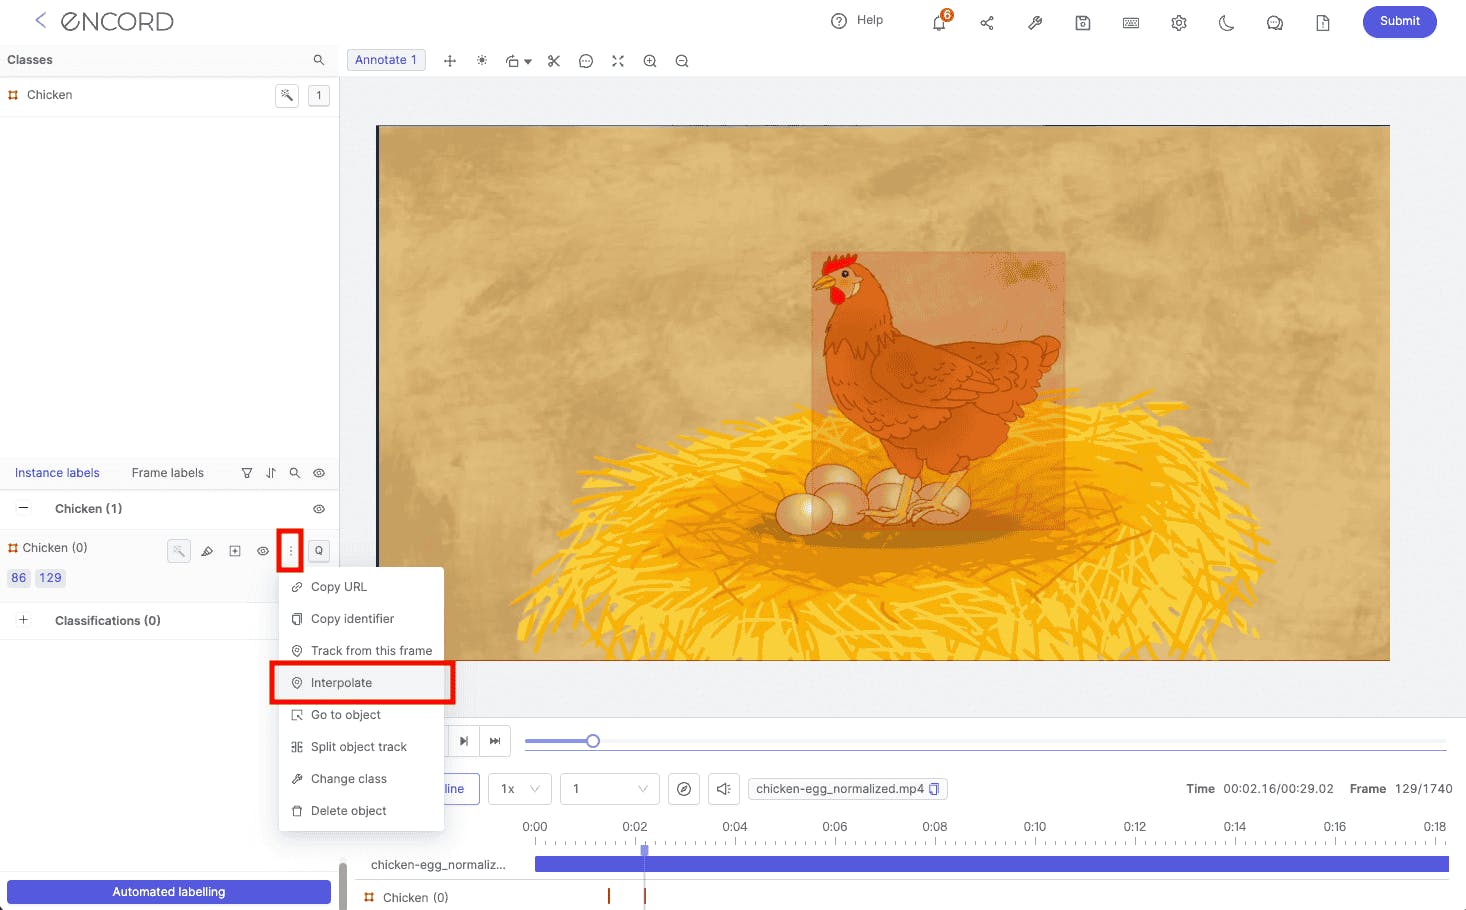
Interpolation in the Encord Platform
Step 5: Track objects across frames and handle occlusion
Maintaining consistent object IDs through re-entry and occlusion:
This is the hardest part of video annotation and the part that separates a workable dataset from a fragile one. When an object leaves the frame or is occluded (a person walking behind a pillar, a vehicle passing behind another vehicle) and then reappears, the annotation has to preserve the same object ID rather than assigning a new one. Get this wrong and the model learns that objects spontaneously appear and disappear, which is exactly the failure mode you're trying to prevent in tracking and re-identification tasks.
A few practical patterns:
- Set a maximum occlusion duration (in frames or seconds) beyond which annotators default to closing out the ID and confirming re-identification manually rather than trusting automated re-linking
- Use appearance-based cues (color, shape, relative position to landmarks) as a secondary check when position alone is ambiguous
- Flag partial occlusion separately from full occlusion in the ontology, since partial occlusion often still has a usable bounding region
Model-assisted tracking, such as Encord's native SAM-based object tracking and segmentation, can carry an object ID through short occlusions automatically, but the annotator still needs a clear rule for when to trust that automation and when to manually verify re-identification, particularly around longer occlusions or crowded scenes with multiple similar objects.
Step 6: Run multi-layer quality assurance
Frame-level vs. sequence-level review:
Frame-level review catches individual labeling errors: a mislabeled class, a box that doesn't tightly fit the object. Sequence-level review catches the errors that only show up across time: an object ID that silently swaps mid-sequence, a track that jumps unrealistically between frames, an interpolated stretch that drifted off the actual object. Both layers are necessary. A dataset that only passes frame-level QA can still be full of temporal inconsistencies that a model will learn as noise.
Setting inter-annotator agreement thresholds.
Inter-annotator agreement (IAA) measures how consistently multiple annotators label the same data, and it's the standard way to catch ambiguous taxonomy definitions before they become inconsistent labels at scale. For video, run IAA checks on both static properties (class, initial bounding region) and temporal properties (does the tracked ID hold up, does the occlusion handling agree between annotators). Where agreement is low, the fix is usually a taxonomy clarification, not more annotator training.
Zeitview provides inspection solutions for the energy and infrastructure sectors, and its rooftop penetration detection model depended on getting annotation quality control right. An initial dataset labeled by 15 external contractors on a third-party tool produced inconsistent annotations and weak model performance.
Zeitview restructured its QA process on Encord: moving to a smaller, five-person internal labeling team, running a structured three-round QA workflow with ML engineers built directly into the review loop, and relabeling problem data while expanding the dataset. The result was a 3.67% boost in precision, a 12.33% boost in recall, and 2x the dataset size and throughput, with a smaller team.
Step 7: Export and validate your labeled dataset
Structuring exports for your training pipeline:
JSON, XML, CSV is a true but unhelpful answer here, because the format that matters is the one your training code actually expects. In practice:
- COCO format for object detection and segmentation tasks feeding into most standard CV training frameworks, with annotations keyed by image/frame ID and category ID
- YOLO format for lightweight bounding-box detection pipelines, where labels are stored as normalized coordinates in plain text files alongside each frame
- Custom schema when your model consumes temporal sequences directly (tracking IDs persisted across a JSON array of frames, for example), which is common in video-specific architectures that need explicit object continuity rather than independent per-frame annotations
Whichever format you export to, validate before you train: check for orphaned annotations (labels referencing frames that don't exist in the export), missing class mappings, and malformed coordinate values. A validation script that runs against the export schema before training starts catches these in minutes instead of after a training run silently underperforms.
Step 8: Integrate labeled data into your ML training pipeline
Loading annotated video with PyTorch/TensorFlow dataloaders.
Video adds a wrinkle that image pipelines don't have to deal with: the dataloader needs to preserve frame order and temporal windows for architectures that consume sequences (3D CNNs, video transformers), rather than treating each frame as an independent sample. Build the dataloader around how the model actually consumes time, not just how the images happen to be stored.
Structuring train/validation/test splits without temporal leakage.
This is the single most common and most avoidable mistake in video ML pipelines, and it's rarely mentioned outside of specialist ML literature. If frames from the same source video end up split across your training and validation sets, the model can effectively memorize that specific video's visual characteristics (lighting, camera angle, background) rather than learning the general pattern you're trying to teach it. Validation accuracy looks great. Real-world performance doesn't match it, because the model was never actually tested on unseen footage.
The fix is straightforward but has to be enforced deliberately: split at the video level, not the frame level. Every frame from a given source video goes entirely into train, validation, or test, never split across more than one. If you're working with long footage split into segments (per Step 2), track which segments came from which original video and keep that lineage intact through the split, or you'll reintroduce the same leakage one level down.
Common video annotation mistakes that hurt model performance
- Inconsistent object IDs across occlusion. An ID that silently changes when an object reappears teaches the model a false discontinuity, undermining tracking and re-identification tasks specifically.
- Over-relying on interpolation for fast motion. Trusting auto-interpolation past the point where motion is genuinely linear bakes small trajectory errors into every frame it touches, and those errors compound across a dataset.
- Skipping sequence-level QA. Frame-level review alone misses the temporal errors, drifted tracks, silently swapped IDs, inconsistent occlusion handling, that only surface when you review a sequence as a whole rather than frame by frame.
Key takeaways
- Taxonomy and annotation-type decisions made in Step 1 determine how much rework you'll face later; get the label-to-architecture mapping right before labeling starts
- Interpolation is a productivity tool, not a substitute for review; set explicit motion thresholds for when it needs manual correction
- Object ID consistency through occlusion is the hardest and most consequential part of video annotation
- QA needs two layers: frame-level for individual label accuracy and sequence-level for temporal consistency
- Export format should match what your training pipeline actually consumes, not a generic default
- Splitting train/validation/test at the video level, not the frame level, prevents temporal leakage that silently inflates validation accuracy
Frequently asked questions
Frame-level QA checks individual labels (correct class, tight bounding region) on a single frame in isolation. Sequence-level QA checks consistency across time, whether object IDs hold through occlusion, whether tracks are continuous, whether interpolated stretches still match the object. Both are necessary since sequence-level errors don't show up in frame-level review.
Set an explicit motion threshold based on how much an object moves or changes shape between keyframes. Below that threshold, interpolation is generally reliable. Above it, particularly with sudden direction changes or rapid scale changes, spot-check or manually correct interpolated frames rather than trusting them by default.
Temporal leakage happens when frames from the same source video appear in both training and validation/test sets, letting the model learn video-specific visual characteristics rather than generalizable patterns. Avoid it by splitting at the video level: every frame from one source video goes entirely into a single split.
Match the format to your training pipeline. COCO suits standard detection and segmentation frameworks. YOLO suits lightweight bounding-box pipelines. A custom schema is usually necessary when your model needs explicit temporal continuity (persisted object IDs across a frame sequence) rather than independent per-frame labels.